
![]() Wed Oct 17, 2012 9:32 am
Wed Oct 17, 2012 9:32 am
Making a Raimundo-Style Snapper
The following is derived from Rai's textual description of his procedure for making one of his snappers. Credits for the original design and procedure go to Raimundo. Any errors are mine. I have retained Rai's use of the first-person account. My annotations will appear in square brackets ([]) If you perform all of the Modification steps you will have a distinctly Raimundo-style snapper with all the bells and whistles. If you leave out these steps you will have a basic -- but still functional -- snapper.
[Add photos for trap narrowing procedure (4/11/2012) -Piotr]
[Typos; grammar; punctuation (5/11/2012) -Piotr]
THE SNAPPER: THE EASIEST PICK TO DIY
Here's a tutorial on how to make your own snapper from a bike spoke, with my recent improvements.
You will need a bike spoke from a normal full-sized bike, these are just the right length. [In the photographic procedure I have used 301mm (~12-inch) bicycle spokes. -Piotr]
(1) Make a 90-degree bend at approximately 1 inch (~2.5cm) from the nailhead. You can easily do this with a small smooth jaw plier. [The smooth jaws won't leave tool marks. But if you don't have smooth-jawed pliers you can use regular pliers. -Piotr]
(2) Bend the 1-inch segment to 90-degrees to form a 1 inch x 1/4 inch rectangle (with rounded corners). [The bicycle spoke is very springy so you needn't worry about closing the rectangle. -Piotr]
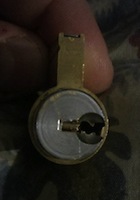
(3) Make a bend that leaves the 'rectangle' -- henceforth referred to as the trap -- at 90-degrees from the rest of the spoke. Before making the bend you need to decide whether you want a right-handed or left-handed snapper. If you put the trap to the right, that will make your tool what I call 'right-handed'. [The photograph illustrates a right-handed snapper.-Piotr]
(4) Modification At this stage you can optionally add a "thumb spinner" which will make the snapper more comfortable to use. This feature is not on any of the snappers you may have seen on the WWW. Use a piece of a Bic Stic pen or any other rigid plastic tubing that will not easily fracture as a result of repeated use. You can also use a short piece of metal tubing but plastic will be quieter.
This spinner will try to fall into the way as you perform the next step so it must be secured near the trap with a rubber band.
(5) To wind the coil a pair of rosary pliers or wrap and tap pliers can greatly simplify the process and give you a tightly wound coil. These sorts of pliers can be purchased from jewellers' suppliers.
The length of the hand-held portion of the tool will be established by the length between the trap and the coil. An optimal length is around 3 inches. A longer length will have less striking power. Short hits harder. You will (hopefully) be making a few snappers so you will see how that works.
The interior diameter of the coil is around 1/4-inch to 1/2-inch[Rai's earlier coils are about 1/2-inch but the more recent are about 1/4-inch -Piotr]
If you don't have a pair of these specialised pliers use a small mandrel (bolt or whatever cylindrical object that has the required diameter).
You will want to wind the coil so that the thickening of the tool is on the side where the trap also thickens the tool, i.e. wind towards the direction in which the trap laterally extends the snapper.
[I think I have this correct but I need Rai's confirmation. -Piotr]
For a first snapper one loop will do, later you can try two turns on the loop. You already have the trap on one side of the bike spoke, that is the side that you should wind the coil to put its width on, you do not want the coil to have its width on the opposite side. Why? Because I say so; it would screw the asthetics of my design. Also there might be problems I don't know about because I don't make them any other way.
The two tangent arms coming out of the coil should be at about a 30-45 degree angle to each other. This angle affects the power of the tool
but it is also an issue in loading the needle arm into the trap so it might not be possible to make that angle greater without actually resetting it while lifting it into the trap under coil resistance.
[I think my arm angle may be a tad small. -Piotr]
(6) The arm that extends beyond the trap -- that will run through the trap -- is here termed the needle arm. The needle on the needle arm will be formed by shortening and flattening the needle arm segment that extends beyond the trap. This can be done after putting the arm in the trap, but its easier to do it outside the trap. Don't make the needle longer than a six-pin full-size key because excess length will make it harder to use. This should be roughly 1 1/4-inches.
(7) Modification To create a needle with a small pick head at the tip (to be used to ensure that the needle is placed just passed the last pin in the cylinder), at the 6-pin keyblade length, grip the needle stock in any plier with the jaw over the five and six pin area, then bend the outer excess length upward, and cut the excess off just in the middle of that bend. With a file you will rough form a very small hook or half-diamond at the tip of the needle using just a small part of the bend, most of that remaining bend will be filed off.
(8) To thin the needle you can initially use a grinder if you have the skill at it. Be sure to quench often, you do not want to cause uneven temper in the metal by overheating. If you are not skilled at grinding just go straight to the file, its too easy to overdo and cut too deep with a powertool. Grind a little bit off one side of the needle from root to tip, not the other way around because that technique will overthin the tip. Then grind the same amount off the other side. Repeat in small steps, do not try to bring it to final shape with the grinder, the powertool is only for mass wasting and speeds up the job. Haste will make waste. Final shaping is done with a file, with the needle held in a groove in a block of wood held firmly in a vise (or a bench pin if you have one). The groove can be made with a hacksaw blade and should be shallow enough to expose the metal above the groove. When you think you are almost there, use 220-grit sandpaper wrapped on a thin stick and rubberbanded on both ends. The 220-grit is aggressive and will still be shaping the tool, so use it to round the edges as well as take out the marks from the file. Inspect the result and if you are satisfied move on to 320-grit to take out the rough marks from the 220-grit. Now fold a small piece of 320-grit over the needle and push and pull the needle through this so the marks are parallel to the needle, remove all the marks and then if you like you can do this again with an even finer grit.
[I had a photographic continuity problem at this point. The spinner cracked so I had to remove it leaving me with a "bare backed" snapper. I will sort this out shortly and make another snapper with the blue tube spinner. -Piotr]
(9) Modification The trap can be narrowed, producing a flatter snapper that is more easily carried and has less lateral play of the needle arm. Set the needle arm in the trap and permanently close the trap if you haven't already done so. You want to narrow the width of the trap but no so much so that it pinches the needle arm and interferes with its motion. A vise will make this task easier. To prevent the trap from being narrowed too much, insert a thin strip of metal that has the desired dimensions of the trap; you can use the handle of a cheap stainless steel butter knife as a "spacer". With the spacer inserted above the needle, place the non-nailhead side of the trap in the jaws of the vise, and clamp the vise so that the trap narrows and elongates towards the end of the trap opposite the nail head.
You can use some wet-and-dry sandpaper to remove the tool marks.
(10) Modification Make the ergo-banana-nomic shape. This is done by hand to eliminate the possibiltiy of tool marks on the spoke. Press the top trap arm all the way down (as far as the trap will allow) and hold it there. Now hand bend the ergonomic curve to the the needle arm. Note that you are bending the needle arm away from the trap arm. This is easy to do with no tools at all, but be careful not to put any bend in the needle in front of the trap. This will have the effect of a more comfortable grip as the banana shape fits more comfortably in the hand. The trap arm can be most easily bent before the spinner is placed on it, but it can also be bent after a short spinner is on and the coil is formed. Bend each arm of the snapper separarely but give both arms the same degree of curvature to produce the banana shape.
[Images forthcoming-Piotr]
(11) Modification Use needle files to reduce the nail head so it dosen't interfere with the thumb spinner.
[Images forthcoming-Piotr]
(12) Modification You can increase the power some by bending the needle arm of the snapper by hand at the point between the coil and the trap while the tool is complete and the needle is in the trap, this has the effect of spreading the effective angle of the two arms.
[Images forthcoming-Piotr]
[Add photos for trap narrowing procedure (4/11/2012) -Piotr]
[Typos; grammar; punctuation (5/11/2012) -Piotr]
THE SNAPPER: THE EASIEST PICK TO DIY
Here's a tutorial on how to make your own snapper from a bike spoke, with my recent improvements.
You will need a bike spoke from a normal full-sized bike, these are just the right length. [In the photographic procedure I have used 301mm (~12-inch) bicycle spokes. -Piotr]
(1) Make a 90-degree bend at approximately 1 inch (~2.5cm) from the nailhead. You can easily do this with a small smooth jaw plier. [The smooth jaws won't leave tool marks. But if you don't have smooth-jawed pliers you can use regular pliers. -Piotr]
(2) Bend the 1-inch segment to 90-degrees to form a 1 inch x 1/4 inch rectangle (with rounded corners). [The bicycle spoke is very springy so you needn't worry about closing the rectangle. -Piotr]
(3) Make a bend that leaves the 'rectangle' -- henceforth referred to as the trap -- at 90-degrees from the rest of the spoke. Before making the bend you need to decide whether you want a right-handed or left-handed snapper. If you put the trap to the right, that will make your tool what I call 'right-handed'. [The photograph illustrates a right-handed snapper.-Piotr]
(4) Modification At this stage you can optionally add a "thumb spinner" which will make the snapper more comfortable to use. This feature is not on any of the snappers you may have seen on the WWW. Use a piece of a Bic Stic pen or any other rigid plastic tubing that will not easily fracture as a result of repeated use. You can also use a short piece of metal tubing but plastic will be quieter.
This spinner will try to fall into the way as you perform the next step so it must be secured near the trap with a rubber band.
(5) To wind the coil a pair of rosary pliers or wrap and tap pliers can greatly simplify the process and give you a tightly wound coil. These sorts of pliers can be purchased from jewellers' suppliers.
The length of the hand-held portion of the tool will be established by the length between the trap and the coil. An optimal length is around 3 inches. A longer length will have less striking power. Short hits harder. You will (hopefully) be making a few snappers so you will see how that works.
The interior diameter of the coil is around 1/4-inch to 1/2-inch[Rai's earlier coils are about 1/2-inch but the more recent are about 1/4-inch -Piotr]
If you don't have a pair of these specialised pliers use a small mandrel (bolt or whatever cylindrical object that has the required diameter).
You will want to wind the coil so that the thickening of the tool is on the side where the trap also thickens the tool, i.e. wind towards the direction in which the trap laterally extends the snapper.
[I think I have this correct but I need Rai's confirmation. -Piotr]
For a first snapper one loop will do, later you can try two turns on the loop. You already have the trap on one side of the bike spoke, that is the side that you should wind the coil to put its width on, you do not want the coil to have its width on the opposite side. Why? Because I say so; it would screw the asthetics of my design. Also there might be problems I don't know about because I don't make them any other way.
The two tangent arms coming out of the coil should be at about a 30-45 degree angle to each other. This angle affects the power of the tool
but it is also an issue in loading the needle arm into the trap so it might not be possible to make that angle greater without actually resetting it while lifting it into the trap under coil resistance.
[I think my arm angle may be a tad small. -Piotr]
(6) The arm that extends beyond the trap -- that will run through the trap -- is here termed the needle arm. The needle on the needle arm will be formed by shortening and flattening the needle arm segment that extends beyond the trap. This can be done after putting the arm in the trap, but its easier to do it outside the trap. Don't make the needle longer than a six-pin full-size key because excess length will make it harder to use. This should be roughly 1 1/4-inches.
(7) Modification To create a needle with a small pick head at the tip (to be used to ensure that the needle is placed just passed the last pin in the cylinder), at the 6-pin keyblade length, grip the needle stock in any plier with the jaw over the five and six pin area, then bend the outer excess length upward, and cut the excess off just in the middle of that bend. With a file you will rough form a very small hook or half-diamond at the tip of the needle using just a small part of the bend, most of that remaining bend will be filed off.
(8) To thin the needle you can initially use a grinder if you have the skill at it. Be sure to quench often, you do not want to cause uneven temper in the metal by overheating. If you are not skilled at grinding just go straight to the file, its too easy to overdo and cut too deep with a powertool. Grind a little bit off one side of the needle from root to tip, not the other way around because that technique will overthin the tip. Then grind the same amount off the other side. Repeat in small steps, do not try to bring it to final shape with the grinder, the powertool is only for mass wasting and speeds up the job. Haste will make waste. Final shaping is done with a file, with the needle held in a groove in a block of wood held firmly in a vise (or a bench pin if you have one). The groove can be made with a hacksaw blade and should be shallow enough to expose the metal above the groove. When you think you are almost there, use 220-grit sandpaper wrapped on a thin stick and rubberbanded on both ends. The 220-grit is aggressive and will still be shaping the tool, so use it to round the edges as well as take out the marks from the file. Inspect the result and if you are satisfied move on to 320-grit to take out the rough marks from the 220-grit. Now fold a small piece of 320-grit over the needle and push and pull the needle through this so the marks are parallel to the needle, remove all the marks and then if you like you can do this again with an even finer grit.
[I had a photographic continuity problem at this point. The spinner cracked so I had to remove it leaving me with a "bare backed" snapper. I will sort this out shortly and make another snapper with the blue tube spinner. -Piotr]
(9) Modification The trap can be narrowed, producing a flatter snapper that is more easily carried and has less lateral play of the needle arm. Set the needle arm in the trap and permanently close the trap if you haven't already done so. You want to narrow the width of the trap but no so much so that it pinches the needle arm and interferes with its motion. A vise will make this task easier. To prevent the trap from being narrowed too much, insert a thin strip of metal that has the desired dimensions of the trap; you can use the handle of a cheap stainless steel butter knife as a "spacer". With the spacer inserted above the needle, place the non-nailhead side of the trap in the jaws of the vise, and clamp the vise so that the trap narrows and elongates towards the end of the trap opposite the nail head.
You can use some wet-and-dry sandpaper to remove the tool marks.
(10) Modification Make the ergo-banana-nomic shape. This is done by hand to eliminate the possibiltiy of tool marks on the spoke. Press the top trap arm all the way down (as far as the trap will allow) and hold it there. Now hand bend the ergonomic curve to the the needle arm. Note that you are bending the needle arm away from the trap arm. This is easy to do with no tools at all, but be careful not to put any bend in the needle in front of the trap. This will have the effect of a more comfortable grip as the banana shape fits more comfortably in the hand. The trap arm can be most easily bent before the spinner is placed on it, but it can also be bent after a short spinner is on and the coil is formed. Bend each arm of the snapper separarely but give both arms the same degree of curvature to produce the banana shape.
[Images forthcoming-Piotr]
(11) Modification Use needle files to reduce the nail head so it dosen't interfere with the thumb spinner.
[Images forthcoming-Piotr]
(12) Modification You can increase the power some by bending the needle arm of the snapper by hand at the point between the coil and the trap while the tool is complete and the needle is in the trap, this has the effect of spreading the effective angle of the two arms.
[Images forthcoming-Piotr]
You do not have the required permissions to view the files attached to this post.
Last edited by piotr on Mon Nov 05, 2012 2:01 am, edited 17 times in total.