FAQ  •  Register  •  Login
UKLockpickers.co.uk Lockpicking supplies such as Lockpicks, tools, and more! COMMANDOLOCK.COM Military grade padlock systems lockpickshop.com A source for lockpicking supplies such as lockpicks, locksmith tools, and more!

Lauren's Antique Padlock Restoration

<<

tpark

Contributor
Contributor

Posts: 240

Joined: Fri Nov 13, 2015 4:17 pm

Location: Alberta, Canada

Post Mon Jan 18, 2016 10:07 pm

Re: Lauren's Antique Padlock Restoration

Lauren wrote:I'm not familar with that process tpark, but I would be interested in seeing the result. I always enjoyed drafting in high school, so using a scribe and a dial calipar works nicely for me.


Scribing seems like a more authentic way of making keys for antique locks. For me it's faster to dremel out the general shape, then finish it off with a file. I suppose if I had the printing stuff set up it would be different, but scribing/cutting works for me too.
<<

Lauren

Active Member

Posts: 360

Joined: Mon Aug 27, 2012 10:29 pm

Location: United States

Post Thu Jan 21, 2016 6:44 pm

Re: Lauren's Antique Padlock Restoration

Shown below is the second EAGLE padlock from the lot of three I received last week. This padlock is exactly the same mechanically as the one described in my previous post. Clearly, EAGLE changed the keyway profile to increase the number of unique users. In addition, a second raised ward was cast in one of three positions outside of the circular raised ward in either the top or bottom the lock cases. This particular padlock has an additional ward beneath the top lock case. If only one additional ward was used, then this allowed six unique keys per keyway profile. If EAGLE introduced two raised wards (one always on top and one always on bottom in three possible positions per case surface) then this would have improved unique users by nine, total of fifteen possibilities between one and two ward placement. It would have been quite easy for a locksmith of the time to create a skeleton key (true use of the term), removing all possible ward material on top and bottom of the bit section to open multiple locks. This is only speculation, but EAGLE could have introduced a trap lever to prevent skeletonization. If all ward material is removed, as the lock is swept clockwise past twelve o'clock, an internal lever could lower, permanently trapping the key in the lock. This is what I would have done if I designed the lock.

I used a 5/32" drill bit to create the barrel hole on my homemade steel key, and later washed the finished key in and out of the barrel hole with this bit to reduce friction and to improve insertion and key removal. I probably increased the barrel hole size by .002 inch with this crude technique. Factory keys normally have a lot of "slop" or space between the inner barrel and the barrel pin. The problem is, you improve insertion and removal, but then the barrel thickness becomes increasing thinner. Too close of tolerances will hinder insertion and may tax the barrel pin. Close contact may increases the chances of a barrel pin breaking or bending due to accidental contact. When making your own barrel keys, you have to find that happy place when it comes to tolerances. I am able to machine my barrel thicknesses to what ever I want using the techniques described in my book. Notice how the barrel transitions beautifully into the bit section (shown below). I used to make my barrel extensions in the bit zone all by hand, but now this task is performed by controlled jigging on my drill press with incredible results. Also, I used a more simplified method for cutting the raised bottom ward on the key, no special Lauren tools needed.

Image
Shackle stamped: 40L7 EAGLE LOCK CO. TERRYVILLE, CONN. U.S.A.

Image

Image
<<

Lauren

Active Member

Posts: 360

Joined: Mon Aug 27, 2012 10:29 pm

Location: United States

Post Sun Jan 24, 2016 10:41 am

Re: Lauren's Antique Padlock Restoration

This was the third EAGLE padlock from my last EBAY purchase. I decided to make my key from 304 stainless steel bar stock. Naturally, the key will never look old, but it will certainly last a life time and will "stain-less". This lock, like the others from my last two posts has the same circular raised ward (.095 inch high) around the key post. But there is a second ward up against the ring (at the nine o'clock position). You can see I had to make a second ward cut on the key to give you an idea of the size and position of this ward. The shackle of this lock gets its spring force upon opening from a small leaf spring, which contacts the toe of the shackle. I noticed the shackle toe was binding against the lock body ever so slightly; just enough to prevent a friction-free sway. I solved this problem by compressing the shackle in my slide vise. Now the lock opens perfectly. Based on the shackle dents that this padlock endured from a hasp or something similar, it is not surprising the shackle expanded due to use or abuse.

Image

Image

Image
<<

Lauren

Active Member

Posts: 360

Joined: Mon Aug 27, 2012 10:29 pm

Location: United States

Post Tue Feb 02, 2016 8:48 pm

Re: Lauren's Antique Padlock Restoration

My latest EBAY acquisition is this three lever padlock by A.E. DEITZ. The bull ring shackle makes this particular lock rather attractive among collectors. I used a special technique that I invented to open my lock in order to make a key. The process is described in my book and is the same method I used on Farmall's DEITZ padlock. I highly recommend never to try to pick these locks open using heavy bolt/fence tension. These locks are easily damaged in this situation. My method is far safer and defies traditional locksmith techniques. This lock measures 3.250" tall by 2.125" wide. There is a tricky raised ward on the inside bottom of the lock case. The key has to be tailored to clear this ward and is the main surface contact between the key and the lock. My lock is in amazing working condition. Not bad for $10.00 with a resale value of $50.00.

Image

Image
<<

tpark

Contributor
Contributor

Posts: 240

Joined: Fri Nov 13, 2015 4:17 pm

Location: Alberta, Canada

Post Tue Feb 02, 2016 10:07 pm

Re: Lauren's Antique Padlock Restoration

Lauren wrote:This was the third EAGLE padlock from my last EBAY purchase. I decided to make my key from 304 stainless steel bar stock. Naturally, the key will never look old, but it will certainly last a life time and will "stain-less". This lock, like the others from my last two posts has the same circular raised ward (.095 inch high) around the key post. But there is a second ward up against the ring (at the nine o'clock position). You can see I had to make a second ward cut on the key to give you an idea of the size and position of this ward. The shackle of this lock gets its spring force upon opening from a small leaf spring, which contacts the toe of the shackle. I noticed the shackle toe was binding against the lock body ever so slightly; just enough to prevent a friction-free sway. I solved this problem by compressing the shackle in my slide vise. Now the lock opens perfectly. Based on the shackle dents that this padlock endured from a hasp or something similar, it is not surprising the shackle expanded due to use or abuse.


The thing that I found amazing is how you make the keys! I was wondering how you joined the bitting to the barrel of the key in such a flawless manner, and I see in your book that they are carved from a single piece of material.
<<

Lauren

Active Member

Posts: 360

Joined: Mon Aug 27, 2012 10:29 pm

Location: United States

Post Wed Feb 03, 2016 6:00 am

Re: Lauren's Antique Padlock Restoration

That's exactly right, Tpark. Everything is from solid bar stock. I don't have access to bronze casting (love to learn how on a small scale), and I don't like the appearance of silver soldered keys. If I soldered my keys it wouldn't be an art form and it wouldn't be as fun.
<<

MBI

User avatar

Site Owner

Posts: 1545

Joined: Thu Apr 03, 2008 9:25 pm

Location: Utah, USA

Post Wed Feb 03, 2016 2:43 pm

Re: Lauren's Antique Padlock Restoration

That's a neat lock, I haven't seen on of those before. Or if I did, passed right by it not knowing what it was. Nice bargain too, congratulations on the find.
<<

Lauren

Active Member

Posts: 360

Joined: Mon Aug 27, 2012 10:29 pm

Location: United States

Post Wed Feb 03, 2016 5:02 pm

Re: Lauren's Antique Padlock Restoration

MBI wrote:That's a neat lock, I haven't seen on of those before. Or if I did, passed right by it not knowing what it was. Nice bargain too, congratulations on the find.


The seller was asking $25.00, "buy it now" or starting bid, $9.99. I wanted the lock, but not the price (even though it was not unreasonable). I took a chance, and put cap of $26.50. No one came at me with a bid, so I won the lock at $9.99. Tax refund season is here, so winning padlocks at low prices is going to be harder for the next four months. I recommend people save their money and buy my book instead :smile: . Anyway, these DEITZ padlocks are not exactly easy to pick, combined with the fact that damage may come from it. Having an edge, a special technique, or what ever you want to call it, makes all the difference, and that's what makes my book so special. I was very fortunate this padlock was not collector tampered on the inside. I can't account for the strange "mother of pearl" effect in the metal. Maybe the patina was once torched off. If that's even possible.

Thanks for the chime in, MBI.
<<

Lauren

Active Member

Posts: 360

Joined: Mon Aug 27, 2012 10:29 pm

Location: United States

Post Tue Feb 09, 2016 6:21 pm

Re: Lauren's Antique Padlock Restoration

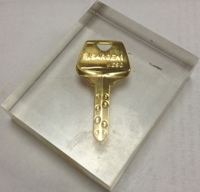
Not too long ago, I was expecting receipt of a SLAYMAKER padlock (like the one shown below). Unfortunately, the padlock was stolen in the mail, causing me to take some voice in Papa Gleb's thread of locks not received from Jeff Moss. In my case I had already spent a day making a rather nice stainless steel key blank for my anticipated treasure, but good old Murphy struck again. Naturally, I would obtain a new lock when one became available on EBAY.

Image

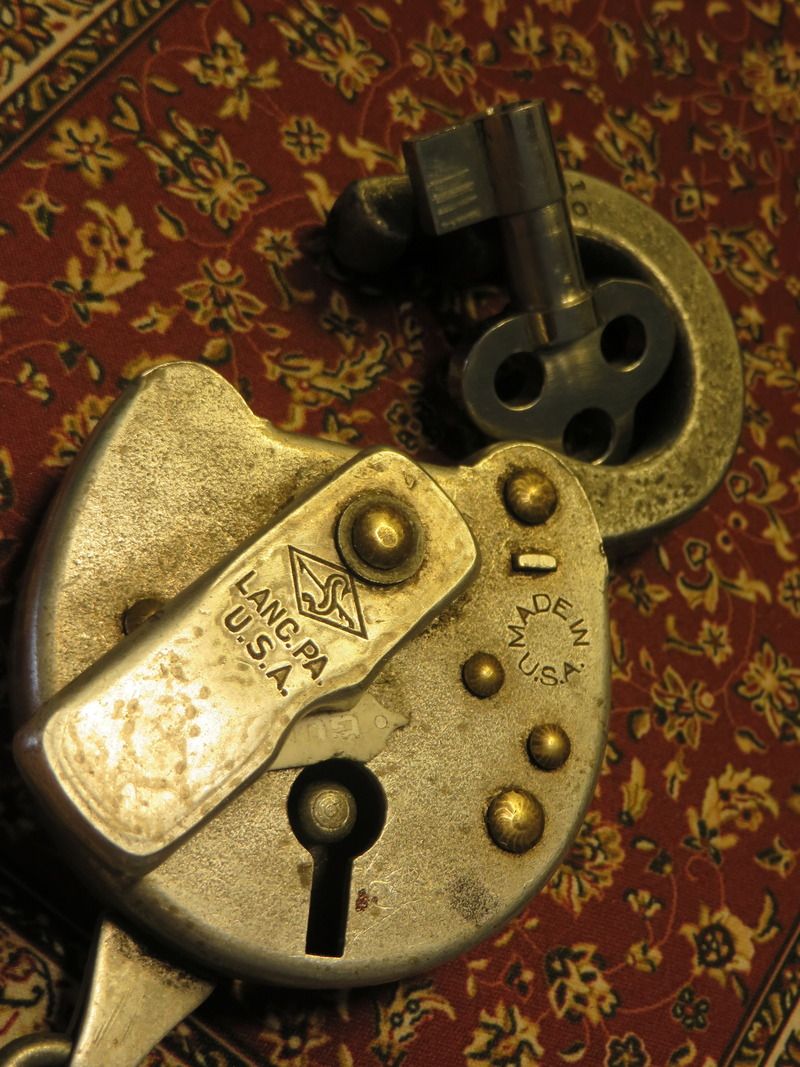
My latest padlock is marked "1948" on the shackle, most likely the date of manufacture. Although, these padlocks were abundant throughout the 1960's. I believed my latest key-less SLAYMAKER padlock would be a breeze to open, adopting some confidence in making keys for similar CORBIN/SAFE padlocks. Nevertheless, my own arrogance got the best of me, learning there is a huge difference between these padlocks. The SLAYMAKER design (a four lever tumbler) has extremely tight tollerances between the gates and fence. This would mean, if I was able to decode the lock correctly (using a special tool, not shown), I would only get one chance in cutting my stainless steel key blank. There was no way I was going to take the risk. I tried using some clever methods described in my book to get this lock open. But failure was at every corner. In general, a working key should feel like twisting a wood screw in soft pine, just as the fence becomes engaged into the gates of the tumbler stack. I needed a better option, and yes, it would have to be an extreme one.

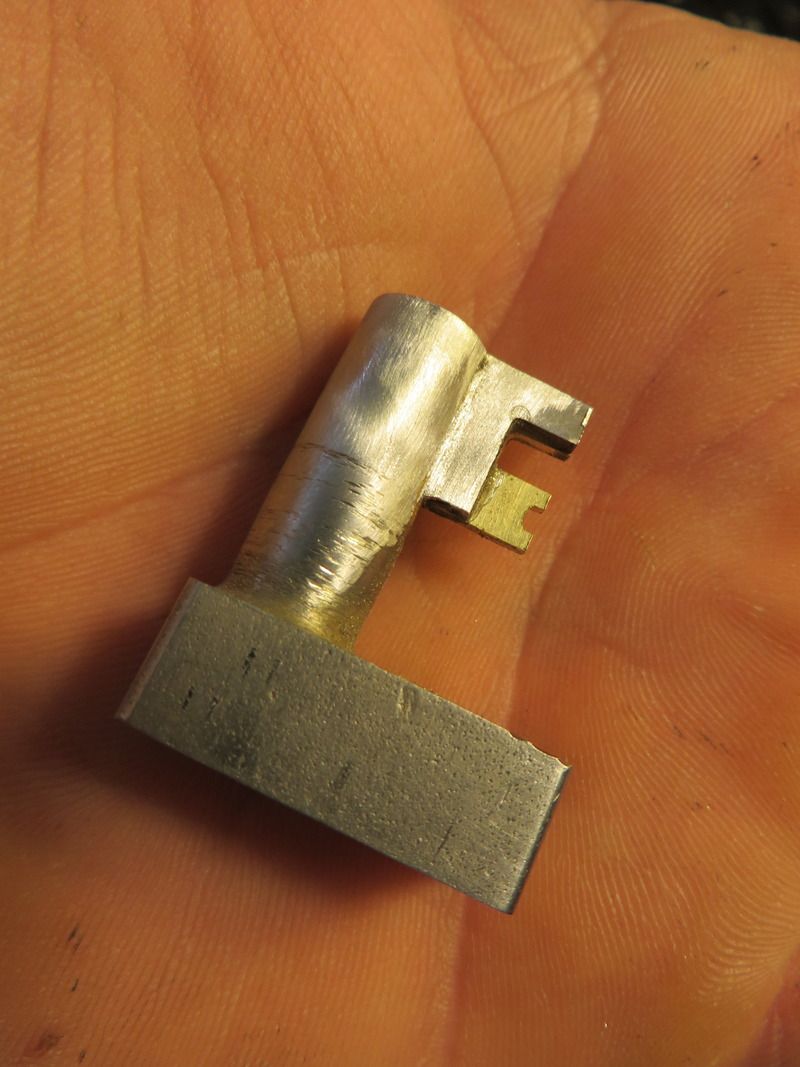
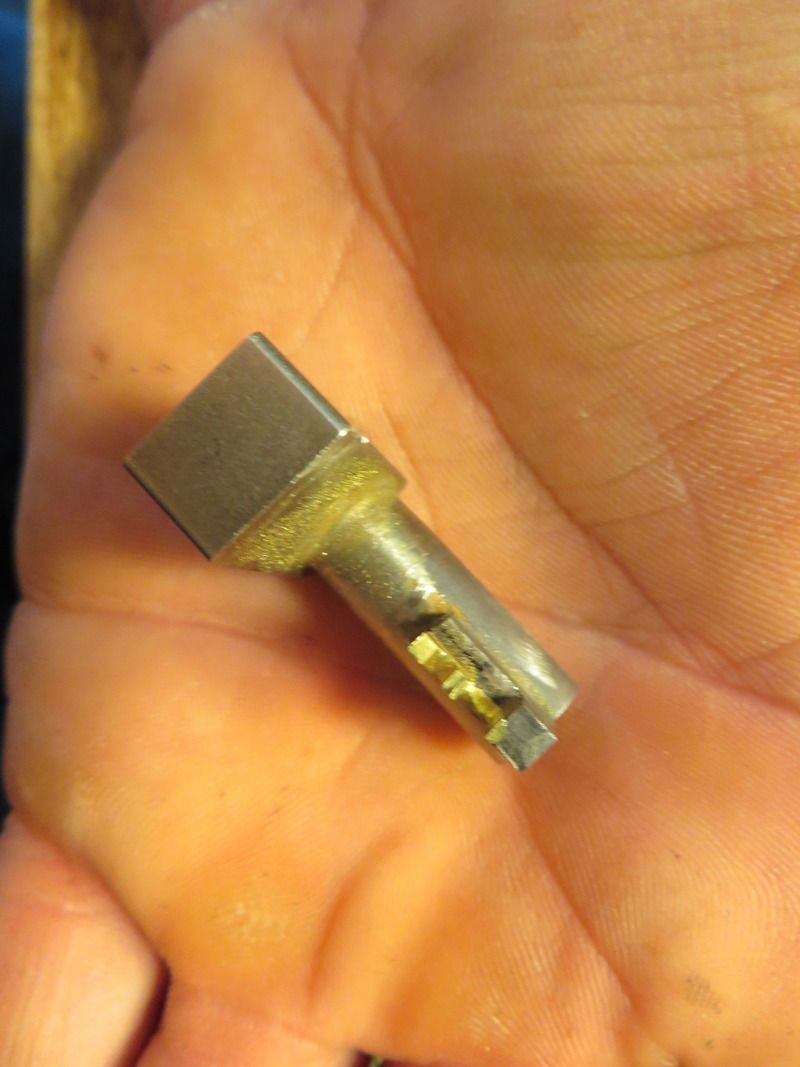
So, I invented a special barrel key unique to these SLAYMAKER padlocks. The idea is so cool, I almost wanted to write another chapter in my book, but enough is enough. I was able to determine all of the essential bitting, sketetonizing the key. My barrel key tool has one amazing feature; the bit section above the driver bit is removable. The little brass section is firmly super-glued onto the bit area. I was able to open my lock on the first try, but I needed a wrench to do it. I quickly realized the second bit cut for lever two was not cut deep enough by .005 inch. With the lock open, I have all the data to make my stainless steel key blank into a working key (a picture for another day). You folks who follow my thread are getting a real taste of the kind of methods that you will find in my book. They don't teach you this stuff in locksmithing school.

Image

Image

Image

http://www.blurb.com/b/6565733-the-extr ... -collector
Last edited by Lauren on Tue Feb 09, 2016 7:16 pm, edited 2 times in total.
<<

MBI

User avatar

Site Owner

Posts: 1545

Joined: Thu Apr 03, 2008 9:25 pm

Location: Utah, USA

Post Tue Feb 09, 2016 6:27 pm

Re: Lauren's Antique Padlock Restoration

Clever idea with that little brass section in the key.
<<

Lauren

Active Member

Posts: 360

Joined: Mon Aug 27, 2012 10:29 pm

Location: United States

Post Wed Feb 10, 2016 12:01 am

Re: Lauren's Antique Padlock Restoration

For those of you who have my book (fourth edition), refer to Chapter 8. I used a very similar T.T.T. with a tip thickness of.020 inch. Each lever tumbler was gap gauged from the center pin at eleven o'clock with a snug fit. The barrel key was drilled with a .250 inch drill bit, leaving a .375 inch total bit height on the blank.

The formula for Calculating depth cuts is as follows. Let L(x) = L wire width for a particular tumbler, H = total bit height = .375 inch, C = a constant = .030 inch, and D = depth cut of particular bit, then D(x) = .375 - L(x) + C. x = (1,2,3,4)

For example, Lever one or L(1) measured .355 inch with the T.T.T. left in position, then D(1) = .375 - .355 + .030 = .050 inch.
For example, Lever two or L(2) measured .305 inch with the T.T.T. left in position, then D(2) = .375 - .305 + .030 = .100 inch.
For example L(1) = L(3)
For example, Lever four or L(4) measured .205 inch with the T.T.T. left in position, then D(4) = .375 - .205 + .030 = .200 inch.

Conclusion: depth cuts are at increments of .050 inch.

Armed with this formula, I was able to file the bits of my test key to the correct depths. Now, the test key works the padlock perfectly. No harsh wrenching needed.
<<

Lauren

Active Member

Posts: 360

Joined: Mon Aug 27, 2012 10:29 pm

Location: United States

Post Wed Feb 10, 2016 6:27 pm

Re: Lauren's Antique Padlock Restoration

I finished cutting my stainless steel key blank this afternoon. The re-usable barrel key was a terrific approach in solving my decoding dilemma. The finished key works like a champ with a nice smooth action. My mathematical formula will be a future life saver for decoding identical SLAYMAKER padlocks. If you don't own the latest edition of my book, a lot of this stuff will be useless to you.

Image

Image
<<

jeffmoss26

User avatar

Sargent Mossberg
Sargent Mossberg

Posts: 2161

Joined: Sun Apr 18, 2010 8:21 pm

Location: Cleveland, OH

Post Thu Feb 11, 2016 7:23 am

Re: Lauren's Antique Padlock Restoration

Great work as always Lauren!
femurat: They're called restricted for a reason...
Innerpicked: The more keys you carry, the more important you look
GWiens2001: Great video! Learned a lot about what fun can be had with a forklift and a chainsaw.
pmaxey83: but i first have to submit the proper forms for a new hobby to my wife
<<

Riyame

Keeper of the Bests / Supreme Overlord of Small Format Interchangeable Picking Nightmares

Posts: 2164

Joined: Sun Jul 24, 2011 11:16 am

Location: Canada

Post Thu Feb 11, 2016 7:42 am

Re: Lauren's Antique Padlock Restoration

Now that is an interesting tool to make keys. Sure saves a lot of time and work if a mistake were to happen with a blank.
PhoneMan: I always knew I'd say something stupid and it would be someone's sig
macgng: i am an equal opportunity pervert
macgng: aww fuck thats goin in someone sig :-(

If life gives you melons, you might be dyslexic.
<<

Lauren

Active Member

Posts: 360

Joined: Mon Aug 27, 2012 10:29 pm

Location: United States

Post Thu Feb 11, 2016 5:37 pm

Re: Lauren's Antique Padlock Restoration

Thanks to those members who leave comments and to those who are my readers.

I am working on a pair of concept tools that would enable me to open these SLAYMAKER padlock in one attempt. After the lock is open any depth cut variances could be reconciled by reading the position of the tumbler gates through the shackle hole below the bolt.

Those members who don't get terribly excited about antique padlocks (yes, it's old technology with little monetary return for working locksmiths) are missing out on some of most awesome puzzles. There will always be new collectors of antique padlocks as collections are inherited or sold off. Conversely, I don't get terribly excited about modern-day high security padlocks, but one could argue that they too will one day become antiques. And, some of these puzzles are way beyond my skill level and are too expensive to dapple in. This is probably why cut-a-ways continue to be popular in both antiques and present day products. I have used my skills in attacking old locks to defeat some modern locks, so I guess there is a relationship of ideas. Ultimately, the more knowledge you have, the sharper your skills become solving the problem at hand. It's ironic in a way--some locksmiths can pick a modern padlock, but would know where to begin on an old one.

Just talking out both sides of my ass, (maybe I'll get three hits from this :bs:).
PreviousNext

Return to This Old (or unusual) Lock

Who is online

Users browsing this forum: No registered users

Don't forget to visit our sponsors for all of your lockpicking needs!
Powered by phpBB © 2000, 2002, 2005, 2007 phpBB Grop
"CA Black" theme designed by stsoftware