![]() Thu Feb 13, 2014 10:35 pm
Thu Feb 13, 2014 10:35 pm
 BAMF lock!
So I was a little busy with my latest project, and I didn't want to post anything on it until I was finished. I saw some of the guys building keys and thought that would be a neat project... but I don't have any antique locks, or lever locks. So, I decided to make one. A HUGE one! I give you the BAMF lock! (Big Ass MOFO lock!) oh.... and I made a key for it!
Also, there's so many picking masters on here - I wanted my own signature project! The BAMF lock should be a pretty memorable one!
Started at the start - drew out a shape and cut it out with the plasma cutter:

Ground of the edges:

Traced out and cut second cover piece: tacked together and ground both evenly together.

Shaped the lock body:

Heat and bent the shackle - welded on pin hole piece:

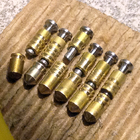
Started on the mechanism - there's a prototype gate and some prototype levers on the bench next to the lock:

Like I mentioned earlier, I don't actually own a lever padlock so I looked at pics on the net, and I have a weird ability to just build stuff in my head and see it work and function. I don't know if that makes me sound crazy, but it's pretty much what makes me good at my job. So here are some other pics of the gate and the levers:


Now that I had the levers figured out I built a key to operate them, I kept it pretty functional and jut put a simple butterfly handle on:


Next, I cleaned up the shackle and cut the groove for the gate:


Put a dust cover over the keyhole in the front cover:


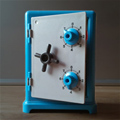
Assembled and finished the lock:


Here's a video showing the scale and the function of the lock before assembly:

Here's a video showing the lock after it has been assembled:

So that's what I've been up to for the last couple weeks - I've been working on it during my lunch and a couple breaks. I figure I have about 4 hours into it!
Hope you enjoyed it! It was pretty fun to build! I imagine I'll find some pretty ridiculous uses for it... like locking up the smallest possible thing with it. Pulling it out of my backpack at the coffee shop and locking up my bike. I'm sure it will make some people do a WTF! double take. LOL!
Take care,
Clay
Also, there's so many picking masters on here - I wanted my own signature project! The BAMF lock should be a pretty memorable one!
Started at the start - drew out a shape and cut it out with the plasma cutter:

Ground of the edges:

Traced out and cut second cover piece: tacked together and ground both evenly together.

Shaped the lock body:

Heat and bent the shackle - welded on pin hole piece:

Started on the mechanism - there's a prototype gate and some prototype levers on the bench next to the lock:

Like I mentioned earlier, I don't actually own a lever padlock so I looked at pics on the net, and I have a weird ability to just build stuff in my head and see it work and function. I don't know if that makes me sound crazy, but it's pretty much what makes me good at my job. So here are some other pics of the gate and the levers:


Now that I had the levers figured out I built a key to operate them, I kept it pretty functional and jut put a simple butterfly handle on:


Next, I cleaned up the shackle and cut the groove for the gate:


Put a dust cover over the keyhole in the front cover:


Assembled and finished the lock:


Here's a video showing the scale and the function of the lock before assembly:
Here's a video showing the lock after it has been assembled:
So that's what I've been up to for the last couple weeks - I've been working on it during my lunch and a couple breaks. I figure I have about 4 hours into it!
Hope you enjoyed it! It was pretty fun to build! I imagine I'll find some pretty ridiculous uses for it... like locking up the smallest possible thing with it. Pulling it out of my backpack at the coffee shop and locking up my bike. I'm sure it will make some people do a WTF! double take. LOL!
Take care,
Clay


 I'd love to see 'em.