FAQ  •  Register  •  Login
UKLockpickers.co.uk Lockpicking supplies such as Lockpicks, tools, and more! COMMANDOLOCK.COM Military grade padlock systems lockpickshop.com A source for lockpicking supplies such as lockpicks, locksmith tools, and more!

Lets redo another safe!

<<

00247

User avatar

Familiar Face

Posts: 153

Joined: Mon Mar 16, 2015 11:04 pm

Location: Wisconsin

Post Thu Sep 07, 2017 9:40 pm

Lets redo another safe!

I started another safe project and will share the the challenges in this thread. In the last few threads I waited till the project was almost done and stuffed it all in a small number of posts, I am going to do it a little differently this time. It takes a lot of time to write up text and insert pictures so I will make shorter posts as the safe progresses. I hope to keep this safe on the fast track but with the days getting shorter, there are a lot of other things that need to get done before winter sets in. The action in safe sections on several forums have been really quiet lately so I will try and stir up some action here.

With several safes sitting in the wings and two that I really want to do bad, the last thing I needed was another safe. But when this one turned up on Craigslist at a very reasonable price and It was only 30 miles from home, I couldn't refuse. It was still in use, hidden in a closet in a nice storage building stuffed to the gills with money, jewelry, and legal papers. I still wasn't sure who made it as all it said was Manganese Steel Money Chest.

Image

Image

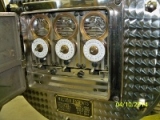
Although it was showing it's age, the safe was different than any other I had seen and I fell in love with it. Complete with the time lock and most of the original artwork, I wouldn't have to be searching for parts for this one. After some minor negotiations, a deal was struck. I returned a few days later with the trailer to collect my prize. The seller's son was there with a neighbor's fork lift to help load. Real easy this time.

Image

My uncle tagged along on this junk run. I had mentioned to him that there was also a 1937 McCormick Deering Farmall F12 for sale so we ended up with a full trailer after he bought it. The load drew a lot of attention on the way home with one semi driver darn near dislocating a disk while rubbernecking and giving a thumbs up while I was stopped by an intersection checking the load. I appreciated his enthusiasm!

Image

Once home in the shop and after some investigation, it turns out this is quite a safe. Diagnosed as a National Safe and Lock Company of Cleveland, Ohio lug door bank chest on the antique-locks forum, it seems to be an uncommon safe. I have not been able to find much information on National or this model and only one picture of another safe like it. Next time we will start looking at some unique features that National used on this safe. Stay tuned.

Image

Image
It is time... stand up for a constitutional America. Without it, we have shed blood in vain.
<<

ratlock

User avatar

Familiar Face

Posts: 208

Joined: Sat May 07, 2016 2:41 am

Location: Scotland

Post Fri Sep 08, 2017 12:54 am

Re: Lets redo another safe!

Nice safe, and nice isetta in the background too.
<<

Oldfast

User avatar

OldddffAASSTT the Spin Master Extraordinaire and American Lock Slayer

Posts: 4412

Joined: Thu Mar 31, 2011 9:16 am

Location: Michigan

Post Thu Sep 14, 2017 8:23 pm

Re: Lets redo another safe!

Nice! Can't wait to see a little more of the dial and lock.

.... I'll be patiently waiting :D
" Enjoy the journey AS MUCH as the destination."
<<

MrWizard

User avatar

Contributor
Contributor

Posts: 366

Joined: Sun Jan 27, 2013 11:27 am

Location: Arizona U.S.A. Planet Earth

Post Fri Sep 15, 2017 10:51 am

Re: Lets redo another safe!

Wow that is such a cool looking safe, you found a diamond in the rough. Lucky man to get it so close to home and in working condition no parts needed. Great find.
"Those who believe in telekinetics, raise my hand."
Kurt Vonnegut
<<

00247

User avatar

Familiar Face

Posts: 153

Joined: Mon Mar 16, 2015 11:04 pm

Location: Wisconsin

Post Fri Sep 15, 2017 8:27 pm

Re: Lets redo another safe!

Oldfast wrote:Nice! Can't wait to see a little more of the dial and lock.

.... I'll be patiently waiting :D


'Bout time you showed up, Oldfast!

The lock is a Yale friction fence with indirect drive. I will take detailed pictures tomorrow as I have it all apart again to solve a couple issues. I'm going to need some guidance from you or anyone else that is familiar with this lock. While working on door adjustment I had a lock out situation due to mechanics and an over site on my part. Thank god a member from another forum had sent me some pictures inside the lock from an identical National which allowed me to decipher the problem. He is supposed to join this forum and I hope he does. Thank you, Paul!

Five hours of frustration melted when the fence finally caught. I will share the issues and pictures in the next post. Here is the picture that saved the day.

Image

Image
It is time... stand up for a constitutional America. Without it, we have shed blood in vain.
<<

selim

User avatar

Diabolical Pinning Master & Lock Philanthropist

Posts: 410

Joined: Tue Jun 10, 2008 6:31 pm

Location: Maine

Post Fri Sep 15, 2017 8:42 pm

Re: Lets redo another safe!

That is wicked cool, nice pictures too, - I like old safes & vaults - don't really know much about them, but trying to learn - keep posting
<<

74TR6

Newbie

Posts: 2

Joined: Fri Sep 15, 2017 10:55 pm

Post Fri Sep 15, 2017 11:05 pm

Re: Lets redo another safe!

Good to be here and glad I could be of help; that is what it is all about
<<

Oldfast

User avatar

OldddffAASSTT the Spin Master Extraordinaire and American Lock Slayer

Posts: 4412

Joined: Thu Mar 31, 2011 9:16 am

Location: Michigan

Post Sat Sep 16, 2017 5:36 pm

Re: Lets redo another safe!

00247 wrote:'Bout time you showed up, Oldfast!

Tell me 'bout it! Miss everyone. Been a very busy summer.
Really looking forward to being around here more again.

Some of those old 4-wheel friction fence locks (especially w/ offset drives) are NO joke.
I've had a couple of them really beat me up. A Mosler 5-H left me pretty battered once.
The largest slice of humble-pie I ever ate was served up by a Yale 025-1/2 though. Mmm

VERY cool locks that deserve some respect.... and some :drool:
" Enjoy the journey AS MUCH as the destination."
<<

00247

User avatar

Familiar Face

Posts: 153

Joined: Mon Mar 16, 2015 11:04 pm

Location: Wisconsin

Post Sat Sep 16, 2017 10:49 pm

Re: Lets redo another safe!

Here are pictures of the lock. Inside it is stamped 065 1/2, the lock assembly number must be 71 as all parts are stamped with it, there is another number following two Y's laid on the side then 24200.We'll start with the empty case. Note the spring on the left side (top of case) it is for the lever operated by the time lock which blocks the friction fence. (shown later)

Image

The dial spindle is mounted inside the door and stays there unless the door is dissembled. With the lock case mounted, the spindle drive gear and the drive wheel must be timed and held in place while one reaches around the door to thread the spindle into the gear. On this lock the dial not only operates the lock and extends the lock bolt, it also moves all the linkage in the door and the four door bolts. This puts some extra pressure on the gears and fence. After the locks are removed and the 1/2" thick plate beneath them, one can see the door bolt linkage. The dial has to push the door bolt with the pin which pivots the dog leg which rotates the 1/2" thick round steel plate which pivots the other three dog legs which push out the remaining three door bolts. Whew, a lot of mass.

Image

Under the linkage is a threaded bung that holds the spindle in. Once the spindle is out you can see it is a substantial piece with a large flange to prevent punching and a taper fit to the door to prevent introduction of liquid explosives.

Image

Image

Back to the lock. Here, the spindle drive gear, the drive wheel, and the gear for the friction fence are in place.

Image

Image

On other Yales I have seen, the friction fence is an assembly consisting of the drive gear with shaft that is put through the fence and then crimped into place. Between the fence and the shaft is a spring wound around the shaft to create the needed friction to turn the fence into the gates of the wheel pack. In this lock the fence just slides over the shaft. But something is not right as enough friction is not created to consistently engage the fence. Inside the fence there are two grooves each .010 deep. I assume there should be some sort of inserts in them? This is the inside of the fence.

Image

With the fence and wheel pack in place the lock is complete. Note that the case cover has a lock tab to keep the wheel pack assembly in place and has supports for the fence bolt and the shaft that the time lock lever pivots on. A spring was added to the fence to make up for what ever is missing inside of it. Who ever adapted the spring to this application did a nice job and it does what it needs to do.

Image

Image

On most cannonball type safes the combination lock is just a day lock that makes turning the door with the crank impossible, all done on the front side of the door. The true security, the inner door bolts, are operated by the time lock. National's choice to have the dial operate everything puts quite a load on the lock internals, and the parts show it. The door linkage can keep pressure on the fence causing it to drag heavily on the drive wheel which is larger then the rest of the wheels in the wheel pack. Here is the wear pattern on the drive wheel. Very rough. The fence does't make contact with the full width of the drive wheel, hence, the uneven wear to one side.

Image

The fence is worn where it rides on the drive wheel. Also the tip of the fence and the contact edge of the drive wheel gate are rounded off from the initial contact of starting all that door linkage moving before the rest of the wheel pack gates assist it. Here you can see how the fence is kept off of the wheel pack by the slightly larger diameter of the drive wheel.

Image

So as you can see there needs to be some tweaking done to improve the performance of this lock. A shim washer under the drive wheel to align it better with the fence helps. The leading edge of the fence will need to be trued up. I am considering opening up the gates on the wheels a bit to make the dialing more forgiving and to help the fence to drop in deeper. Narrowing the fence slightly would do the same thing. I will need to add a stopper to the door linkage so it doesn't get thrown to far as it will then prevent the fence from turning in at all. I am open to any suggestions.

I don't see how this lock could be manipulated in this condition. Between the rough dialing from the bumpy drive wheel and the excessive drag from the door linkage causing the fence to drag on it, it is challenge just to dial the known combination. :slam:

On a different note: This was dropped off today. A 1907 National cash register. Its gonna look great setting on one of the safes, especially this National manganese money chest.

Image

Next time, if I can find the courage, maybe I will tell about the lock out I experienced.
It is time... stand up for a constitutional America. Without it, we have shed blood in vain.
<<

Oldfast

User avatar

OldddffAASSTT the Spin Master Extraordinaire and American Lock Slayer

Posts: 4412

Joined: Thu Mar 31, 2011 9:16 am

Location: Michigan

Post Sun Sep 17, 2017 5:02 pm

Re: Lets redo another safe!

The time you put into your wording makes for a nice easy & informative read.
And your pictures are wonderful! I for one very much appreciate your efforts.
Not only entertaining, but I'm learning new things as I follow along. Thanks!

00247 wrote:.....The dial spindle is mounted inside the door and stays there unless the door is dissembled. With the lock case mounted, the spindle drive gear and the drive wheel must be timed and held in place while one reaches around the door to thread the spindle into the gear.

Could you elaborate on this a bit? I mean, the alignment of the gears.
So I see a sort of small 'checkered' pattern stamped near the edge of the spindle gear.
Is that the area that must be aligned precisely with the drive cam gate? Like your pic shows?

00247 wrote:.....Under the linkage is a threaded bung that holds the spindle in. Once the spindle is out you can see it is a substantial piece with a large flange to prevent punching and a taper fit to the door to prevent introduction of liquid explosives.

Neat to see this and hear why it's designed like that. Interesting!
" Enjoy the journey AS MUCH as the destination."
<<

00247

User avatar

Familiar Face

Posts: 153

Joined: Mon Mar 16, 2015 11:04 pm

Location: Wisconsin

Post Sun Sep 17, 2017 9:22 pm

Re: Lets redo another safe!

Thanks for the kind words, Oldfast. You as well as anyone understand the effort it takes to attempt to put together a detailed thread. I never did pay attention in English class as a kid so I don't have any literary skills. As a kid in the 60's - 70's, I grew up reading Cars and Parts magazine that my father, a car buff who had several Model T Fords, got in the mail. Each month the authors would feature a car (on the cover also) in an in depth article that would tell how the model evolved, mechanical information, styling, and discussed good and bad features. A few wise cracks were thrown in on occasion for good measure. I try to emulate their style.

Yes, the spindle gear and the gear on the drive wheel must be timed and those checkered marks are to be aligned with the gate on the drive wheel. This leads right into the lock out situation. Note that there are two parallel lines shifted one tooth to the left of the marks. I hadn't noticed them.

Image

The lady I bought the safe from didn't have the combination. She would just close the door as tight as she could and then hide the crank. Security at its best!
I pulled the lock cover to learn the combination. After cleaning the lock I had put it on the door to fool around with it and and look for issues. I then had to leave the project and was distracted for some time. When I got back to it a day later, I got ahead of myself and started adjusting on the door. While I had adjusted the door earlier, I had not tried to get the door bolts to engage. This door wedges very tight in the opening (no early 1900's burglar was going to get nitro into this safe) so it has to wedge to the exact spot that the door bolts align with the holes in the door jamb.

Some slight adjustments and fully polishing the door and jamb had it very close. The bolts were just sliding in but not easily. I was being careful to not jamb anything but it is difficult when you are controlling all those moving parts with a dial that is recessed into the door. Suddenly the bolts stuck although they were hardly engaged. While jiggling the crank and working the dial back and forth they moved. Unfortunately, toward the lock position and because of the effort needed the wheel pack shifted ever so slightly. The combination had to be redialed. Of coarse, it didn't work. OH SHIT!

I spent three hours dialing and shifting numbers one way or the other. The bolts were putting pressure on the fence so it was dragging on the drive wheel compounding the problem. Remember all those bumps on the drive wheel? Totally frustrated I gave up and called it a day. I went at it again for a while in the morning until I decided to clear my head and think about the parts of the lock and what they are doing. I struggled some because I had not spent that much time inside of it and didn't take pictures. Then I remembered 74TR6 had sent me some pictures of the lock in the National he had worked on.

I flew to the computer to study the pictures. Now remembering the timing marks, I started second guessing myself as to whether or not I timed it correctly. If not, the combination would be shifted to different numbers but in the same pattern. Back to studying the pictures I learned there were 30 teeth on the spindle gear which is 3.3 numbers per tooth on the 100 number dial. I charted out ten teeth in each direction and started from the original combination. On the first try,three numbers larger, the fence turned into the wheel gates. Success!

For the set combination to work the two parallel marks have to be aligned with the edges of the drive wheel gate. The National employee must have missed the marks with the checkered pattern. Son of a bitch! I can only blame myself as I didn't thoroughly study the lock and document it as I usually do.

A new safe is just like a new woman. A first, lust makes you think all is wonderful. Then you notice a few things, then problems arise, and you have to make a choice. Give up or commit to working through them.
It is time... stand up for a constitutional America. Without it, we have shed blood in vain.
<<

Riyame

Keeper of the Bests / Supreme Overlord of Small Format Interchangeable Picking Nightmares

Posts: 2164

Joined: Sun Jul 24, 2011 11:16 am

Location: Canada

Post Mon Sep 18, 2017 1:08 am

Re: Lets redo another safe!

Awesome pictures. I have never seen a Yale like that before. In case you are wondering, that is called a burglar proof or punch proof spindle.
PhoneMan: I always knew I'd say something stupid and it would be someone's sig
macgng: i am an equal opportunity pervert
macgng: aww fuck thats goin in someone sig :-(

If life gives you melons, you might be dyslexic.
<<

00247

User avatar

Familiar Face

Posts: 153

Joined: Mon Mar 16, 2015 11:04 pm

Location: Wisconsin

Post Mon Oct 09, 2017 9:17 pm

Re: Lets redo another safe!

We have had some really nice fall days here in Wisconsin so I have been busy with outside work. I couldn't resist using a couple nice days to get the National safe sandblasted. First the inside was blasted which was a miserable job. This safe body is cast in one piece. It looks like a wooden plug coated with mortar was used to create the inner cavity. There was residual mortar stuck/bonded into the manganese steel especially in the corners. There were also heads of nails stuck to the casting. With extra blasting the mortar would come off but it was a dusty mess.

Some mortar still in the corner and some of the nail heads. Note the inner flange cast into the inside for the lug ring that the door locks to. A simple T headed bolt slips into the notch.

Image

The inside was quite rough where the mortar reacted with the steel creating a sort of slag. Once cleaned up the inside was painted and the door put in place so the door hinge could be removed. A necessary move on this safe. Here it is in it's naked glory.

Image

This is always a daunting time in a safe project. When one takes a look at the rough casting you have to wonder if it will ever look good again. Here the hinge is looking pretty sad. With effort, it will get better. No turning back now.

Image

The body had one major defect in the casting. It was filled with lead before the black filler that they used back then.

Image

I usually like to do some grinding on high spots that may cause issues when sanding the filler on the body. The manganese steel in this safe is extremely hard and the grinder had a hell of a time to do anything on the outside and on the rough inside. I have read old trade journals about casting manganese. Although there are different recipes of ingredients, manganese is usually annealed after casting as it is very brittle. Annealing retains it's hardness but makes the steel much more durable. This safe is very hard, much harder than the manganese in my Victor cannonball which could be ground much easier. There are regular steel inserts (can be seen in the sandblasted photo) molded into the manganese casting for the door hinge as a hole would not be able to be drilled and threaded in the manganese. I took a high quality drill bit to a small pock mark in the casting. All it did was polish the edges of the manganese and destroy itself. The door opening is made by a grinding procedure as this manganese is to hard to machine.

Image

Once blasted the safe and all parts are wire wheeled and wiped down with solvent before being primed with epoxy primer.

Image

That newly acquired cash register was one of the things I got sidetracked on. If you want a labor intense project, take on an old brass cash register. Holy shit, this thing ate up a ton of hours and it wasn't even a total restoration. More of a cosmetic refreshening. Luckily, I rounded up the missing drawer front and the top sign (not on because of no room under cabinet) so it is now complete. The parts came all the way from Mississippi. It looks great on the Mosler screw door safe.

Image

Image
It is time... stand up for a constitutional America. Without it, we have shed blood in vain.
<<

00247

User avatar

Familiar Face

Posts: 153

Joined: Mon Mar 16, 2015 11:04 pm

Location: Wisconsin

Post Thu Oct 19, 2017 9:40 pm

Re: Lets redo another safe!

Started body work on the hinge. With one layer of filler on and sanded out things are looking better. One more skim coat of filler and once sanded it should be ready for urethane primer. Removing one of the pads from the hoist turned it into a perfect work stand for the hinge.

Image

Image

The wife coerced me into going to Milwaukee this coming weekend for some family doings so that gives me the opportunity to drop off the parts that need new nickel plating. I am not preparing much this time as most parts are in relatively good shape. The shop owner will not be there to receive the parts so written instructions for each part is included with markings on each part also. The door cover will be a big job and there are lots of bolts and small parts. I'm hoping to get by for $800 but you never know. The wife knows better than to complain when parts are spread out on the kitchen table. :smile:

Image

While gathering the parts for the plater I remembered one of the knobs on the inner compartment door was missing. So I chucked up a piece of .75 round stock in the lathe, ground a piece of tool steel to the recessed curve in the knob, and turned out a new one. My machinist skills are rudimentary but I manage.

Image

Once the shape is finished the center hole is drilled and the part is polished with emery cloth. Then a parting tool cuts it off and wa-lah, a new knob is born. It kind of puts the old one to shame but once both have new nickel plating they will be equally proud.

Image

Image
It is time... stand up for a constitutional America. Without it, we have shed blood in vain.
<<

Oldfast

User avatar

OldddffAASSTT the Spin Master Extraordinaire and American Lock Slayer

Posts: 4412

Joined: Thu Mar 31, 2011 9:16 am

Location: Michigan

Post Sat Oct 21, 2017 9:51 pm

Re: Lets redo another safe!

I'm runnin' outta colorful adjectives for this thread, lol.

Nothin' new to say. What ya do with these safes is just overall fantastic.
A labor of love that could NOT happen without deep passion fueling you.

Hope you never tire of documenting at least some of your work for us. Great stuff!
" Enjoy the journey AS MUCH as the destination."
Next

Return to Safes, Strongboxes & Combination Locks

Who is online

Users browsing this forum: Majestic-12 [Bot]

Don't forget to visit our sponsors for all of your lockpicking needs!
Powered by phpBB © 2000, 2002, 2005, 2007 phpBB Grop
"CA Black" theme designed by stsoftware