Page 1 of 3

Direct Entry - Laser Rig

PostPosted: Sun Mar 29, 2015 4:41 pm
by Oldfast
Different from spring loaded fences, direct entry type locks require readings be taken via the handle.
Considering there's tons of Sentry and old antique safes out there that are of this type...
I figured it's about time I start becoming proficient at opening them.

uturn made mention awhile back about the idea of possibly using a laser for this.
Since then, several members here have given it a try and had great success.

Here's my recent attempt at this. Thought I'd just throw out a bunch of photos
in hopes that it might help get some creative juices flowing for some of you.

Image

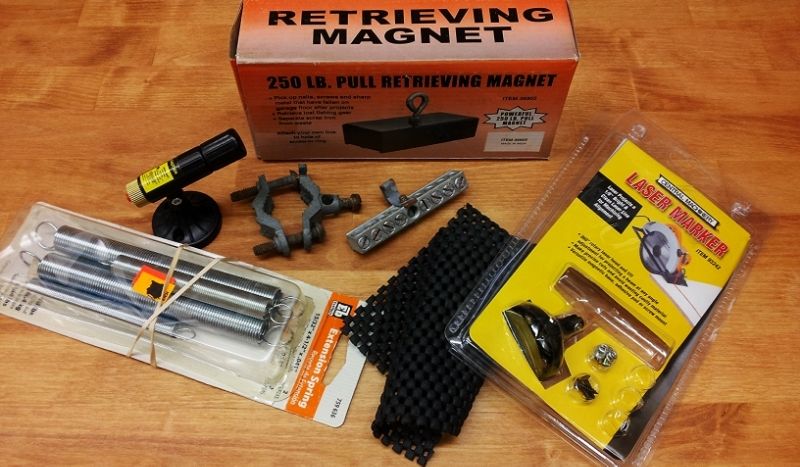
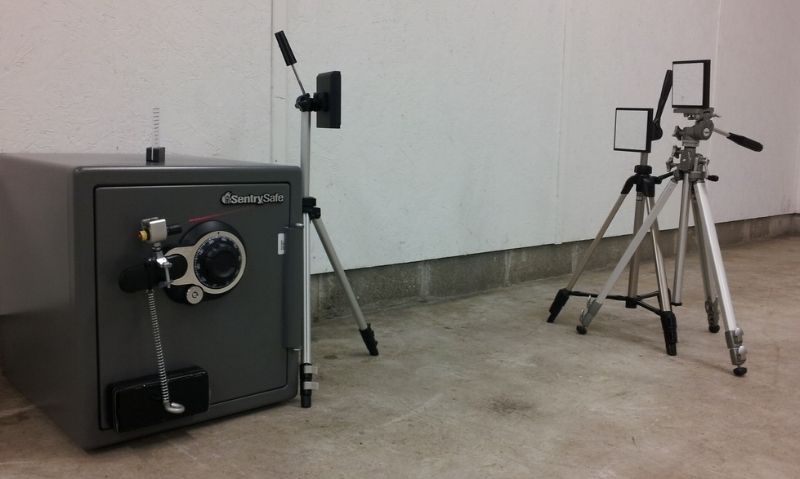
The items above: Found a couple things from down in my barn. The others I purchased from Harbor Freight.
The laser pointer projects a line rather than a beam/point & is normally used with circular saws. Only $4.99
The retrieving magnet was a bit more expensive (can't remember). I taped some drawer liner material to
the underside of it so I don't scratch the safe while putting it on or taking it off. Also gives it some grip.

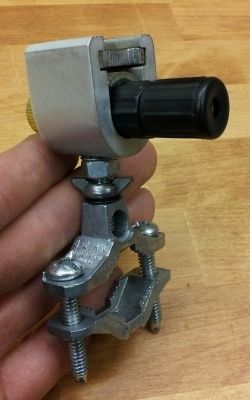
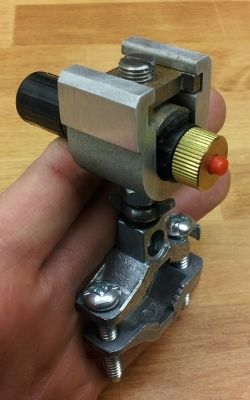
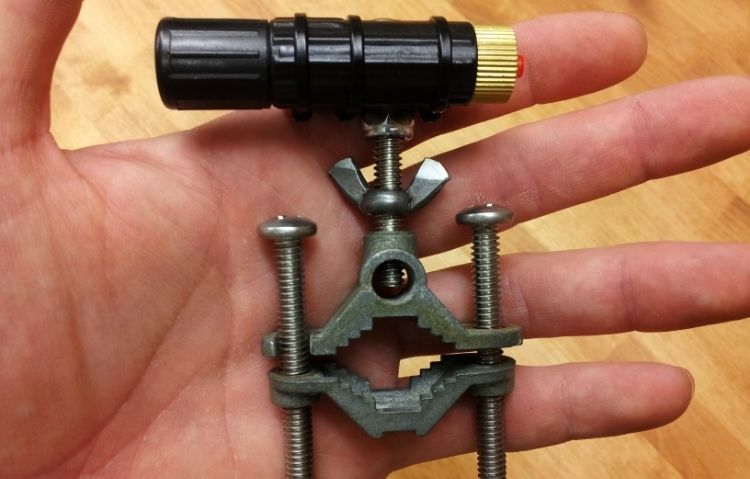
The hardware below is electric related. The clamp on the right is for ground rods.

Image

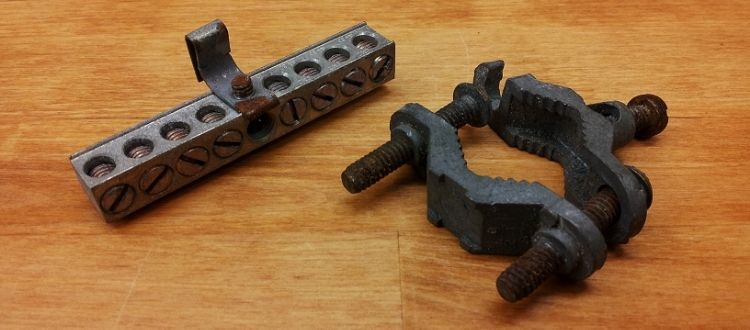
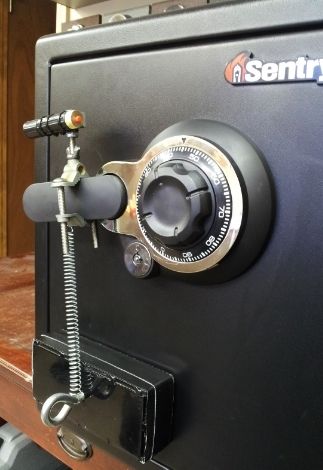
Went shopping for some new nuts & bolts -- did some cutting, filing, sanding, & drilling -- and ended up with something like this.

Image . . . Image

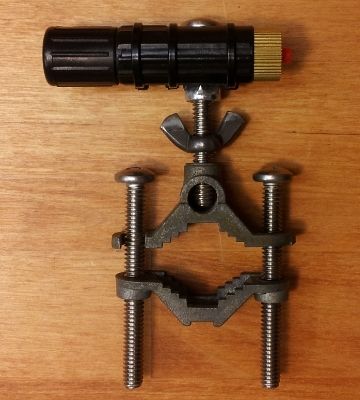
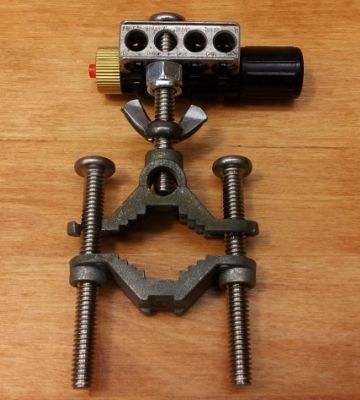
The addition of the wing nut allows me to rotate the laser to shoot left or right (as needed) and quickly tighten it down.
And, with some extra long bolts through the clamp, I'm able to attach to a wide variety of different sized handles.

There's one more 'accessory' I still need to make though. An interchangeable top portion: another laser & bolt that will
screw into the clamp - but will point vertically. Just in case I have to resort to the ceiling. Or, a more likely scenario -
I'm working on an older safe with a vertical handle - ideally I still want to be able to shoot the laser out horizontally.
So this will come in handy and will be quick and easy to simply screw in whatever laser is needed for the job.

Image

Image Image

Image

Image Image

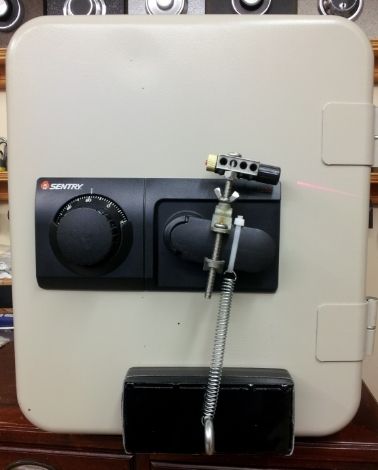
Rather than tape or cardboard/marker, an additional magnet-based laser atop the safe can be used for a reference line.
After you've brought your handle laser to its' baseline reading... simply bring the top laser down into alignment with it.
Although this seems like a great idea, I'm still experimenting quite a bit. I'm not sure yet if I really like the 2nd laser.

Image

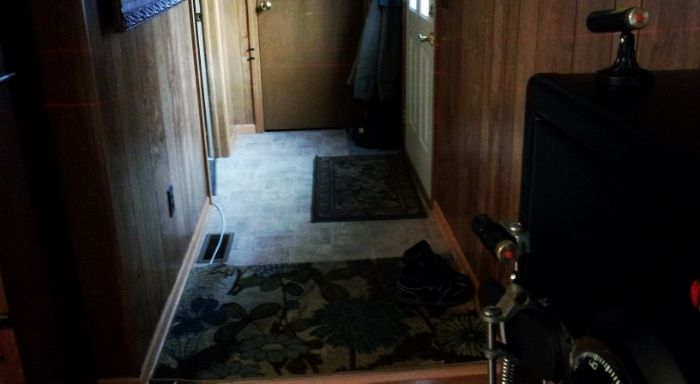
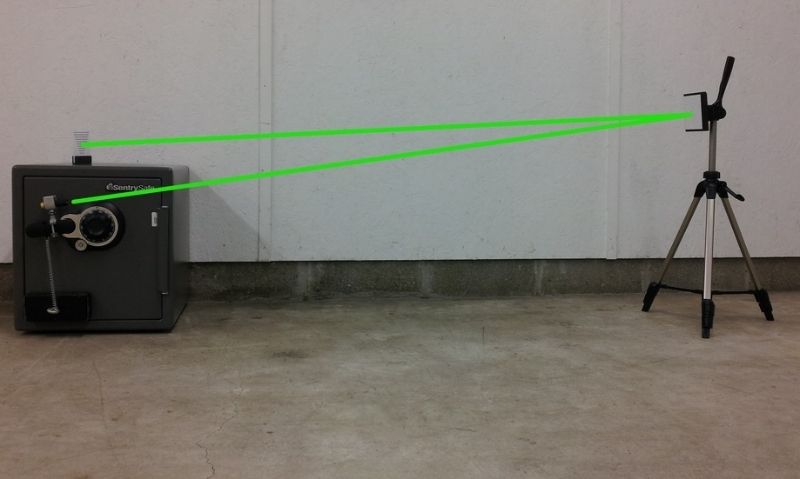
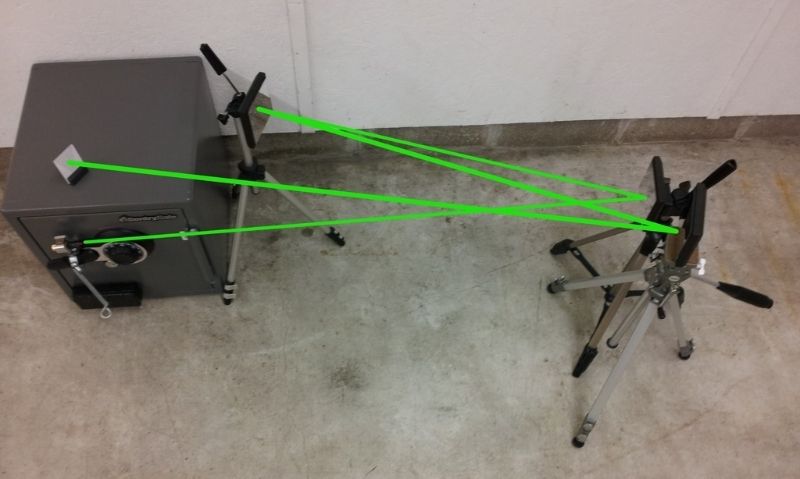
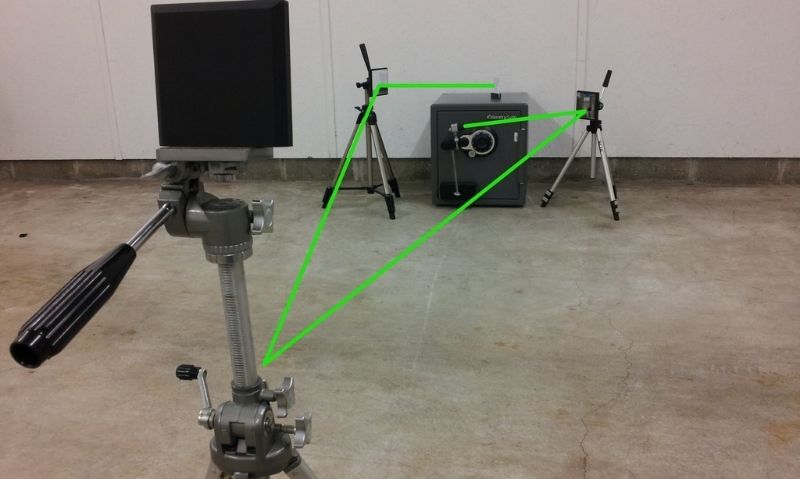
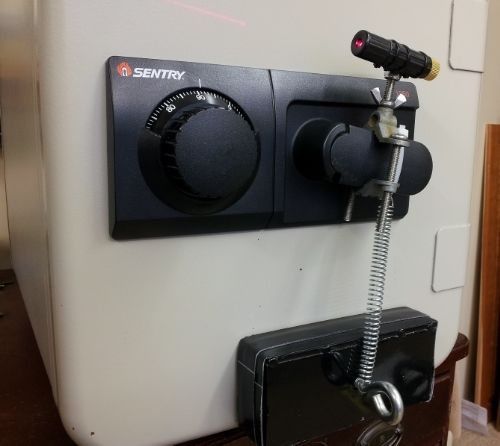
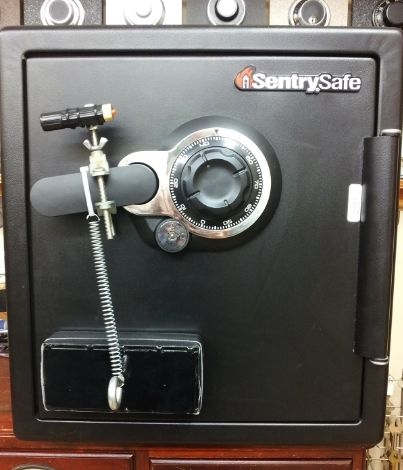
Here, I'm projecting the two lasers down the hall nearly 14 feet onto the closet door.

Image

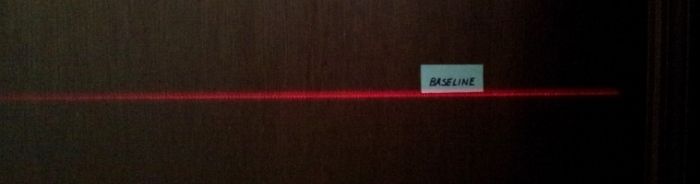
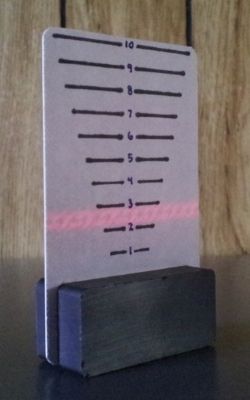
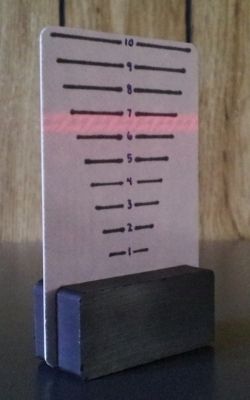
This particular gate gave me a drop of nearly 3/4 of an inch. HOWEVER, this is not normally the case!

Image

I don't have much experience to speak from with direct-entry types at this time... but my best advice to you would be:
Lower your expectations of what a gate is going to look like! This pointer is no magic tool. Even at 14' I'm finding the
gate signatures are usually VERY subtle - nothing like the fantastic drop I've pictured above. The other key point is
CONSISTENT handle pressure. Absolutely critical. Even with my magnet & spring set up I'm still struggling a little.

Re: Direct Entry - Laser Rig

PostPosted: Sun Mar 29, 2015 4:56 pm
by Riyame
Wow, that is quite the rig you made up. :D I cant wait to see more on this one.

Re: Direct Entry - Laser Rig

PostPosted: Sun Mar 29, 2015 4:59 pm
by Anarchy_won
very cool :) thanks for the tips :salute:

(Do I smell a sticky nearby? ;) )

Re: Direct Entry - Laser Rig

PostPosted: Sun Mar 29, 2015 5:06 pm
by Oldfast
Mac's lock collection thread keeps us all sticky enough around here :mrgreen:

Re: Direct Entry - Laser Rig

PostPosted: Sun Mar 29, 2015 5:09 pm
by Anarchy_won
:-) that's true enough, but thanks for the idea, I have everything but the magnet and laser pointers (I have 2 different color pointers that are just dots I could substitute with I guess. )
I will post pic's If i make one in the next week or 2.

Re: Direct Entry - Laser Rig

PostPosted: Sun Mar 29, 2015 5:22 pm
by Oldfast
Indeed, I thought the same thing Anarchy.

Having the 2nd laser of a different color would have me liking the idea a bit
more than I do now. I thought green would be nice. A little like Christmas :)

****************************
****************************

Re: Direct Entry - Laser Rig

PostPosted: Sun Mar 29, 2015 8:21 pm
by MBI
Stickied.

Re: Direct Entry - Laser Rig

PostPosted: Mon Mar 30, 2015 9:26 am
by rerun12
very cool indeed! thanks for sharin that :)

Re: Direct Entry - Laser Rig

PostPosted: Mon Mar 30, 2015 3:43 pm
by Papa Gleb
Wow Mike you never stop amazing. Kudos bud that jig is sweet just one question how do you remove that HUGE magnet lol. Speaking of that magnet, I would be very carefully with that monster.... dont leave your cell phone, laptop or anything like that within 5 ft of it. why 5 ft? to be safe

Re: Direct Entry - Laser Rig

PostPosted: Mon Mar 30, 2015 6:34 pm
by Doogs
Love it Mike looks like a really great concept coming together and the fact you can get that kind of distance with the lasers to register a gate has to be a help. Unfortunately I don't have anything to add but it looks like you have it under control.

ETA: Could you not just put some painters tape and a mark at the baseline rather than setting up the second laser?

Re: Direct Entry - Laser Rig

PostPosted: Mon Mar 30, 2015 7:46 pm
by Oldfast
Papa Gleb wrote:Wow Mike you never stop amazing. Kudos bud that jig is sweet just one question how do you remove that HUGE magnet lol. Speaking of that magnet, I would be very carefully with that monster.... dont leave your cell phone, laptop or anything like that within 5 ft of it. why 5 ft? to be safe

You're right! For a while I had it setting on a counter that I frequently pass by. I kept wanting to set my
cell phone down there... and every time I'd say to myself, again.... "no dumbass, don't do it". LOL

On the magnet.... it's powerful, but not as unmanageable as you might think. It's not too bad getting it on
and off of the safe. Also consider that Sentry's are comprised of some pretty thin metal and mostly fire-
resistant stuff. Might be a little different on a burglary safe with heavier and thicker steel though.

Doogs wrote:ETA: Could you not just put some painters tape and a mark at the baseline rather than setting up the second laser?

Yeah, absolutely. A sticky post-it note, tape, or some cardboard that you can draw on.
And actually I'm leaning more towards using one of these rather than the additional laser.
Two laser beams stacked on top of each other makes it difficult to spot the rather minute
drops that occur (which is usually what you get instead of the huge drops you're expecting).

Also, these lasers from Harbor Freight are not all created equal. What do you expect for $5? lol
Outta the 2 I currently have - one projects a fine line. The other, a fat blurred line. You can kinda
see the difference in my last picture actually. I plan to return/exchange that one and by another
two... hopefully out of a those few I'll find at least one or two more winners. lol

I like the idea of painters tape. It'll stay put and you can mark it up all you want. Think I'll try it.

Re: Direct Entry - Laser Rig

PostPosted: Fri Apr 24, 2015 2:16 pm
by g_kinz
awesome old fast
papa gleb
when you have a strong mag like that it its on real good grab a extension and roll it to the side. super easy!

Re: Direct Entry - Laser Rig

PostPosted: Fri Apr 24, 2015 5:13 pm
by Oldfast
Thanks kinz. And you're exactly right on taking the magnet off.

With this one I just grab a hold of that eyelet, tip the magnet down onto its' edge, then pull off from one end.

Re: Direct Entry - Laser Rig

PostPosted: Sun May 15, 2016 10:08 pm
by Oldfast
I've recently revisited this project. After a couple months of work I'm excited to share some MAJOR upgrades.

I've had great success with what I originally posted here a year ago.
But this setup has always had some limitations and aggravations:

1) Limited Space: Many safes are tucked away in a closet, underneath a stairwell, etc.
There's instances where you simply do not have enough room to effectively use this rig.

2) Head Movement: Regardless of where I project the laser (left or right onto a wall, or up to the ceiling),
I'm constantly turning my head 90* between taking readings and turning the dial. Additionally, my eyes are
forced to focus between long & short distances (ie. 20 ft. to a wall then back down to 2 ft. as I look at the dial)

So I set out to fix these problems.... and....

True to form (complicating the shit outta things) I decided to make a reflecting telescope. lol
Thankfully I hadn't put much time into it yet when my brother stopped by. After some thought
he said, "maybe you could just use a mirror?" Brilliant! Geez, the simplest solutions elude me.

By incorporating a mirror, I'm able to redirect the beam and land it directly in front of me.
The magnetically-based graph can be placed on the top or front of the safe. And the best part?!...
the use of a mirror (or multiple mirrors) effectively doubles, triples, even quadruples travel distance.

This is an enormous breakthrough as it allows you to fully utilize even the smallest of spaces in any given scenario.
Multiple mirrors can be used by positioning them in any number of different configurations. Lemme show you a few...


In its' simplest form (and most ideal situation), we're afforded plenty of room off to one side of the safe.
Here, a single mirror is placed to bounce the beam back to the graph sitting atop the safe. Whatever distance
the environment allows is immediately doubled. 15 feet becomes 30. 20 feet becomes 40. That's huge beam travel.

Image

The appearance of a gate at these distances will usually be quite apparent. Look at this?!
In this example I had a mirror 11 feet from the safe - so total distance of beam travel - 22 feet.
To give you some perspective; the graduations on this particular graph are spaced 1/4" apart.
You see it jumps from a baseline reading of 3... up to 7. Fluctuation of 1 inch! Easy gravy folks.

Image Image

But often times we don't have the luxury of 10 or 20 feet.
Maybe there's only about 4 ft. between the safe and a wall.

Image
Through the use of three mirrors I'm able to stretch this small 4 foot area into nearly 18 feet of beam travel.
Image

Or maybe there's limited room on either side of the safe. Instead, the majority of space is behind you.
Now it's starting to feel a little like Mission Impossible as I set inside a laser-triangle spinning a dial. lol

Image

One problem remains, and it's actually been one of my biggest frustrations through this whole project:
I've yet to find a suitable laser for this rig. I've experimented with laser-pointers as well as laser-lines.
I've tried a variety of powers and a variety of prices; $30, $50, $60 lasers. Hell, my latest attempt was
pushing $300. This one came with a set of apertures for various distances. It too, has been returned.

After all that I'm back to the best one I've found so far... a laser marker from Harbor Freight- $4.99 LoL
Even at 30+ feet of travel distance, a well defined line lands on my graph. The problem with this one is
lack of power. It's designed for a max distance of 9 feet. Yeah, it will easily shoot 3x that distance with
a clearly visible and defined line - but I find myself at a loss if I happen to be working in a well lit area.
And the quality control is hit & miss with these. Many of them project a very blurry line, or double line.
If I remember correctly, I believe I went through at least 13 of 'em in order to find 2 semi-decent ones.

I'm not all too surprised I suppose as most lasers are not designed for what I'm trying to accomplish here.
The search continues. I currently have another two on the way, so we'll see how it goes. You might notice
my new 'cradle-type' holder. This should make it easy to switch out to another laser IF I find the right one.

Image Image Image

Again, the laser nor the mirror ideas are original to me.
Thanks & credit goes to uturn (a member here) & my brother.
Feel free to throw some ideas out to improve upon this even more!

And to those of you excited to make something similar... I'll be posting again soon with some details.
I'll take some more photos, tell you about the mirrors, how I made the backings for them, what I used
to attach them with, etc. And give some tips on using this rig that will give you more success, quicker.

Happy Spinnin' :D

Re: Direct Entry - Laser Rig

PostPosted: Mon May 16, 2016 12:28 pm
by Squelchtone
this is awesome! I love all the good photos too. I have a green laser I can mail you for free, it can light a match on fire when focused properly. It's this one: http://www.ebay.com/itm/401121398160 send me a PM with address info.

Here's a video of it in action, brightness of beam shown at around 4m18s
https://www.youtube.com/watch?v=tFC5RbVyQWY