![]() Tue Nov 17, 2009 5:50 pm
Tue Nov 17, 2009 5:50 pm
How I make my picks
I have been wanting to make a step by step photo doc. while making a pick so here it is finally.
I start off with a piece of wood in this case I started with a section of 2x8. I used a circular saw to cut the block into smaller pieces.
I use the disk sander to smooth out the pieces to make blanks for the picks.
Finished blanks on the left rough cuts on the right.
I use a piece of paper and draw the blank and the pick shape I want to make. I also mark the center of the blank.
Next I use the disc sander to roughly make the shape of the pick.
The belt sander is more precise so I use it to get even closer to the shape of the pick.
Next I repeat the process to contour the sides of the blank.
I use a small saw to cut the groove the metal part of the pick will sit in. I do this step before rounding everything off because the pick handle is stronger at this point and there is less chance it will split.
I use a grinder to make a pick from a hacksaw blade.
Then I use progressively finer sandpaper to shine it up.
The blade is now set into the handle using glue.
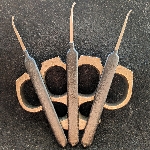
Once the glue has set I use sandpaper and go over the whole pick to smooth out all the corners and any little imperfections. This step also streamlines the pick and makes it flow, Because the blade is attached it too flows into the handle. Finally with a little stain this is the finished product.
I start off with a piece of wood in this case I started with a section of 2x8. I used a circular saw to cut the block into smaller pieces.
I use the disk sander to smooth out the pieces to make blanks for the picks.
Finished blanks on the left rough cuts on the right.
I use a piece of paper and draw the blank and the pick shape I want to make. I also mark the center of the blank.
Next I use the disc sander to roughly make the shape of the pick.
The belt sander is more precise so I use it to get even closer to the shape of the pick.
Next I repeat the process to contour the sides of the blank.
I use a small saw to cut the groove the metal part of the pick will sit in. I do this step before rounding everything off because the pick handle is stronger at this point and there is less chance it will split.
I use a grinder to make a pick from a hacksaw blade.
Then I use progressively finer sandpaper to shine it up.
The blade is now set into the handle using glue.
Once the glue has set I use sandpaper and go over the whole pick to smooth out all the corners and any little imperfections. This step also streamlines the pick and makes it flow, Because the blade is attached it too flows into the handle. Finally with a little stain this is the finished product.
You do not have the required permissions to view the files attached to this post.