![]() Sun Jan 19, 2014 11:35 am
Sun Jan 19, 2014 11:35 am
Disc detainer pick
After the second time somebody asked me to open a disc detainer lock and I had to say I didn't have the tools, I've finally decided to make some. It was a lot easier than I thought! The design (and in particular the use of a nail) was inspired by Raimundo's tool. Here is my final product:
Rai used concrete nails. I couldn't find any of those, so I used 3-1/2 inch common bright nails:
Put the nail in a drill press and work it down with a Dremel. Use a dust mask! I didn't and could feel the metal in my sinuses afterwards. The two obvious options are the grinding wheel or the cutoff wheel. It would seem that the grinding wheel would offer greater control and make it easier to achieve uniform diameter; however, the opposite seems to be true. The cutoff wheel is better. Since nails are not perfectly straight, they will not spin perfectly on-axis in the drill press "lathe". One would expect that this would correct itself once you hit it with the Dremel. But for some strange reason, sometimes the problem gets magnified and the axis grows further and further off center. Very frustrating. If this starts happening, then it is probably best to just start over.
Make sure to dip it in water often to keep it cool. I cut the axle of my tools to have a thickness just under 0.055". This is the minimum thickness such that the tool will fit into the ABA UFO lock (the tightest keyway I have). Use a digital caliper to measure, and try to get the thickness as consistent as possible. Make sure that the length is long enough for the deepest lock you want to pick, plus a bit extra. It is difficult to go back and modify after you take it out of the drill press, as it will likely be off-center if you try to do so. The exception is sanding: you can choose to sand later, since centering doesn't really matter for that step.
Once you're done with the lathe portion, it is time to sculpt the head of the nail. Grind the head down until it easily fits all of your locks. I prefer to use the thin cutoff wheel. The brittle ones that come in a little jar, the ones that can cut through steel but which somehow shatter if you touch them the wrong way. You can cut with it and also use the top portion as a precision grinder.
Make sure that the head fits into all of your locks, and also fits through the tensioning tube (see next step). Precision matters here. The tensioning tube I used had 0.189" inner diameter, so the pick head must be smaller than this. I cut one to 0.177" and this was too small to reliably turn the discs in the ABA lock. So really a few mil makes all of the difference here. Also, the pick head must be thin enough that it doesn't turn two discs at once, but not much thinner than this or it will slip off the disc too easily. A bit of roughness probably helps keep the pick from sliding around while you are turning the discs. So don't polish it down to a mirror finish like you would with ordinary lock picks.
Below are four attempts. The third is the best, although unfortunately the axle was not long enough so I had to put it back in the drill and cut some more (I did this after taking the picture). It was off center so the axle ended up being not so straight. It still works though. The fourth one is an example of how an off-center axle can become more and more off center as you are cutting. You can just barely see this in the picture, but in reality the off-centerness is quite extreme.
Once everything is done, put the nail back in the drill press and sand it. 120 grit, 220 grit, 400 grit, 600 grit. Really this is cosmetic since removing friction is not as important as it is with picks for pin tumbler locks. Only sand the axle, not the pick head. On low speed, just pinch the axle between a piece of sandpaper with your fingers, and move it about a bit since the sandpaper quickly gets worn down. The scales were made by marking depths with a pen, then putting the nail back in the drill press and cutting notches with a precision file, using the edge of one of those crescent moon shaped files. When the drill press is on low speed you can steady your hand by putting your finger on the spinning nail, and then carefully line the file up to the pen marks. It is best to practice first on a throwaway nail unless you enjoy ruining your work! The ones in the picture below were made before I realized I could steady my hand by putting my fingers on the rotating nail. So they don't look so good. About the positioning of the notches: different locks have different disc spacing so you can't make the notches match all of them. I just made mine every 2mm. They don't correspond to disc positions but they do help you to keep the tool at constant depth while turning. The first notch is lined up to the point where the pick is just beyond the tension tool (for this you of course have to make the tension tool before making the scale).
The handles are made of F4 tape (silicon tape). In general F4 tape makes excellent handles also for ordinary lock picks. It grips the metal well, grips the hands well, and never peels off. What I did was to wrap several layers along a rather long portion of the tool, and then cut off the ends with an X-Acto knife. This way the ends are nice and square and it looks like a knob. In the end, I made handles even thicker than those shown in the picture below.
After some practice this is the best one I made:
The tension tool is made of Stainless Steel 304 Hypodermic Round Tubing, 5 Gauge, 0.2200" OD, 0.189" ID, 0.0155" Wall. This is Small Parts brand, from Amazon. Amazon said 6 inches but actually they shipped 6 feet! So I have some spare. My first attempt used brass tubing, but this was not strong enough. Brass works good for a while, but eventually the prongs bend.
Shaping the tension tool is unexpectedly time consuming. First, cut off a segment of tubing that is large enough to easily hold, but not unwieldy (i.e. not the full 6 feet!) Cut out the rough shape of the prongs with the Dremel thin cutoff wheel, then touch up with a file. Dip in water often so you don't ruin the metal with heat. Again, precision matters here. Make sure it is symmetric or it will not sit right in the lock. Also make sure that it is long enough to securely grip the first disc but not touch the second disc, in all of the locks that you have. You will likely have to make two versions, because some locks have a cover disc (that just spins around and around) in the front, and tension has to be done on the disc behind that. I made one turner with prongs of depth 0.075" and another of depth 0.135". I had to touch up with a file several times in order to prevent these from rubbing on the next disc. The picture below shows my attempt to make an all-in-one tool that combines both of these. The idea is that it could reach the second disc if needed, but could also be propped up on only the first disc. This was a failure. It took hours to get the dimensions perfect, and once it was done it didn't even work very well. So I recommend just making two turners.
Once the Dremel work is done, cut off a small segment with a pipe cutter. It must be long enough to reach into the keyway of recessed locks. The most deeply recessed lock I have is my Kryptonite bike lock. I cut to 0.95" length. But there is no harm in making it a bit longer.
For a knob I used an aluminum disc that I happened to have. This will be epoxied to the tubing. But before the epoxy, I drilled and tapped some holes for screws (4-40 size). I only used two screws, but tapped four holes just in case because I didn't want to try and do this after the epoxy. You are supposed to use oil when tapping, but I didn't want to have any oil involved in something that I am about to epoxy. So I just tapped dry, and there were no issues with this.
Epoxy has not been kind to me in the past, even for plastic. So for metal I did not have faith that it would hold. But so far it has. Rough up the surfaces with a file, as this pleases the epoxy gods greatly. I used JB Weld quick set metal epoxy. The nice thing about JB Weld is that it comes in toothpaste-style tubes and is reusable. The other brands come in some sort of plunger setup that makes it impossible to dispense equal amounts and seems to get stuck after the first use. You are supposed to clean the surfaces with a degreaser, but I don't have degreaser so I just cleaned them with my shirt. Some people say to use alcohol, but JB Weld specifically says not to do this. Rotate so that the prongs are lined up with the screws. I forgot to do this but by luck they were all lined up anyway! Let it set overnight.
In the end, I decided to use a smaller knob once I realized it is the screws that I will be tensioning with not the knob itself. The knob just has to be big enough to hold the screws.
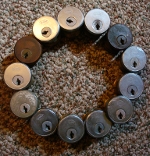
The fallen locks: a Kryptonite padlock, an ABA UFO vending machine lock, a 5-disc payphone lock, and a Chinese padlock. It took me four days to learn how to use these picks, but now it is too easy. None of these had false sets. The ABA UFO lock only had two discs that needed to be turned (and the key is cut as such). Maybe I just got a dud, as the ebay pictures show more complicated keys. The Kryptonite lock was a bit of a surprise, as somehow I expected it to be harder. I actually have two of these and they are both pretty easy.
My biggest advice is that you should go through all of the discs at most twice. If it does not open then just start over rather than trying to fix it. This is a bit counterintuitive compared to how pin tumbler locks work. Typically several discs bind at once, and you don't necessarily get much feedback through the tension tool. Of course, if the tension tool does budge this is a very good sign. One mistake I made in the beginning was underestimating how far some of the discs needed to be turned. Good luck!
Rai used concrete nails. I couldn't find any of those, so I used 3-1/2 inch common bright nails:
Put the nail in a drill press and work it down with a Dremel. Use a dust mask! I didn't and could feel the metal in my sinuses afterwards. The two obvious options are the grinding wheel or the cutoff wheel. It would seem that the grinding wheel would offer greater control and make it easier to achieve uniform diameter; however, the opposite seems to be true. The cutoff wheel is better. Since nails are not perfectly straight, they will not spin perfectly on-axis in the drill press "lathe". One would expect that this would correct itself once you hit it with the Dremel. But for some strange reason, sometimes the problem gets magnified and the axis grows further and further off center. Very frustrating. If this starts happening, then it is probably best to just start over.
Make sure to dip it in water often to keep it cool. I cut the axle of my tools to have a thickness just under 0.055". This is the minimum thickness such that the tool will fit into the ABA UFO lock (the tightest keyway I have). Use a digital caliper to measure, and try to get the thickness as consistent as possible. Make sure that the length is long enough for the deepest lock you want to pick, plus a bit extra. It is difficult to go back and modify after you take it out of the drill press, as it will likely be off-center if you try to do so. The exception is sanding: you can choose to sand later, since centering doesn't really matter for that step.
Once you're done with the lathe portion, it is time to sculpt the head of the nail. Grind the head down until it easily fits all of your locks. I prefer to use the thin cutoff wheel. The brittle ones that come in a little jar, the ones that can cut through steel but which somehow shatter if you touch them the wrong way. You can cut with it and also use the top portion as a precision grinder.
Make sure that the head fits into all of your locks, and also fits through the tensioning tube (see next step). Precision matters here. The tensioning tube I used had 0.189" inner diameter, so the pick head must be smaller than this. I cut one to 0.177" and this was too small to reliably turn the discs in the ABA lock. So really a few mil makes all of the difference here. Also, the pick head must be thin enough that it doesn't turn two discs at once, but not much thinner than this or it will slip off the disc too easily. A bit of roughness probably helps keep the pick from sliding around while you are turning the discs. So don't polish it down to a mirror finish like you would with ordinary lock picks.
Below are four attempts. The third is the best, although unfortunately the axle was not long enough so I had to put it back in the drill and cut some more (I did this after taking the picture). It was off center so the axle ended up being not so straight. It still works though. The fourth one is an example of how an off-center axle can become more and more off center as you are cutting. You can just barely see this in the picture, but in reality the off-centerness is quite extreme.
Once everything is done, put the nail back in the drill press and sand it. 120 grit, 220 grit, 400 grit, 600 grit. Really this is cosmetic since removing friction is not as important as it is with picks for pin tumbler locks. Only sand the axle, not the pick head. On low speed, just pinch the axle between a piece of sandpaper with your fingers, and move it about a bit since the sandpaper quickly gets worn down. The scales were made by marking depths with a pen, then putting the nail back in the drill press and cutting notches with a precision file, using the edge of one of those crescent moon shaped files. When the drill press is on low speed you can steady your hand by putting your finger on the spinning nail, and then carefully line the file up to the pen marks. It is best to practice first on a throwaway nail unless you enjoy ruining your work! The ones in the picture below were made before I realized I could steady my hand by putting my fingers on the rotating nail. So they don't look so good. About the positioning of the notches: different locks have different disc spacing so you can't make the notches match all of them. I just made mine every 2mm. They don't correspond to disc positions but they do help you to keep the tool at constant depth while turning. The first notch is lined up to the point where the pick is just beyond the tension tool (for this you of course have to make the tension tool before making the scale).
The handles are made of F4 tape (silicon tape). In general F4 tape makes excellent handles also for ordinary lock picks. It grips the metal well, grips the hands well, and never peels off. What I did was to wrap several layers along a rather long portion of the tool, and then cut off the ends with an X-Acto knife. This way the ends are nice and square and it looks like a knob. In the end, I made handles even thicker than those shown in the picture below.
After some practice this is the best one I made:
The tension tool is made of Stainless Steel 304 Hypodermic Round Tubing, 5 Gauge, 0.2200" OD, 0.189" ID, 0.0155" Wall. This is Small Parts brand, from Amazon. Amazon said 6 inches but actually they shipped 6 feet! So I have some spare. My first attempt used brass tubing, but this was not strong enough. Brass works good for a while, but eventually the prongs bend.
Shaping the tension tool is unexpectedly time consuming. First, cut off a segment of tubing that is large enough to easily hold, but not unwieldy (i.e. not the full 6 feet!) Cut out the rough shape of the prongs with the Dremel thin cutoff wheel, then touch up with a file. Dip in water often so you don't ruin the metal with heat. Again, precision matters here. Make sure it is symmetric or it will not sit right in the lock. Also make sure that it is long enough to securely grip the first disc but not touch the second disc, in all of the locks that you have. You will likely have to make two versions, because some locks have a cover disc (that just spins around and around) in the front, and tension has to be done on the disc behind that. I made one turner with prongs of depth 0.075" and another of depth 0.135". I had to touch up with a file several times in order to prevent these from rubbing on the next disc. The picture below shows my attempt to make an all-in-one tool that combines both of these. The idea is that it could reach the second disc if needed, but could also be propped up on only the first disc. This was a failure. It took hours to get the dimensions perfect, and once it was done it didn't even work very well. So I recommend just making two turners.
Once the Dremel work is done, cut off a small segment with a pipe cutter. It must be long enough to reach into the keyway of recessed locks. The most deeply recessed lock I have is my Kryptonite bike lock. I cut to 0.95" length. But there is no harm in making it a bit longer.
For a knob I used an aluminum disc that I happened to have. This will be epoxied to the tubing. But before the epoxy, I drilled and tapped some holes for screws (4-40 size). I only used two screws, but tapped four holes just in case because I didn't want to try and do this after the epoxy. You are supposed to use oil when tapping, but I didn't want to have any oil involved in something that I am about to epoxy. So I just tapped dry, and there were no issues with this.
Epoxy has not been kind to me in the past, even for plastic. So for metal I did not have faith that it would hold. But so far it has. Rough up the surfaces with a file, as this pleases the epoxy gods greatly. I used JB Weld quick set metal epoxy. The nice thing about JB Weld is that it comes in toothpaste-style tubes and is reusable. The other brands come in some sort of plunger setup that makes it impossible to dispense equal amounts and seems to get stuck after the first use. You are supposed to clean the surfaces with a degreaser, but I don't have degreaser so I just cleaned them with my shirt. Some people say to use alcohol, but JB Weld specifically says not to do this. Rotate so that the prongs are lined up with the screws. I forgot to do this but by luck they were all lined up anyway! Let it set overnight.
In the end, I decided to use a smaller knob once I realized it is the screws that I will be tensioning with not the knob itself. The knob just has to be big enough to hold the screws.
The fallen locks: a Kryptonite padlock, an ABA UFO vending machine lock, a 5-disc payphone lock, and a Chinese padlock. It took me four days to learn how to use these picks, but now it is too easy. None of these had false sets. The ABA UFO lock only had two discs that needed to be turned (and the key is cut as such). Maybe I just got a dud, as the ebay pictures show more complicated keys. The Kryptonite lock was a bit of a surprise, as somehow I expected it to be harder. I actually have two of these and they are both pretty easy.
My biggest advice is that you should go through all of the discs at most twice. If it does not open then just start over rather than trying to fix it. This is a bit counterintuitive compared to how pin tumbler locks work. Typically several discs bind at once, and you don't necessarily get much feedback through the tension tool. Of course, if the tension tool does budge this is a very good sign. One mistake I made in the beginning was underestimating how far some of the discs needed to be turned. Good luck!
You do not have the required permissions to view the files attached to this post.