How I make picks
Some one asked if I would do a tutorial. But I am not sure if I am giving detailed enough info to call it a tutorial, so I will just say this is how I make my picks. I listed the suppliers I use at the bottom of the post.
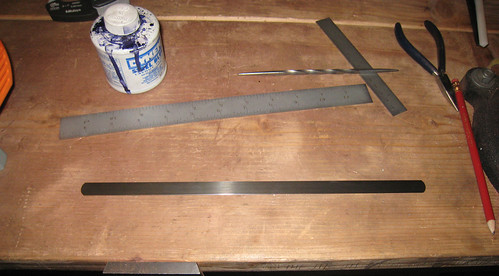
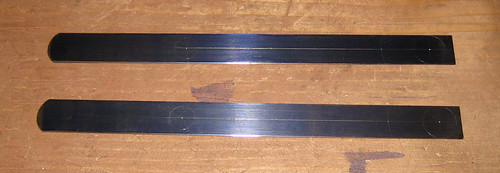
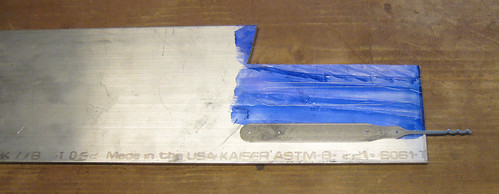
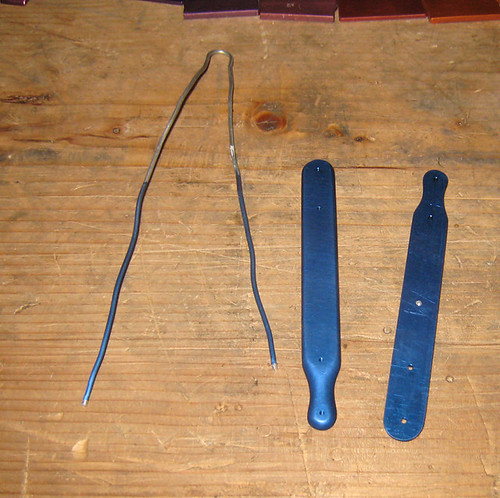
For these picks I made for HallisChalmers I used .025" high carbon steel feeler gauge stock. I like the feeler gauge stock because you can get it in any thickness, it comes flat and smooth, and seems to have a good temper. It comes in 12" pieces, they are about $1 each.
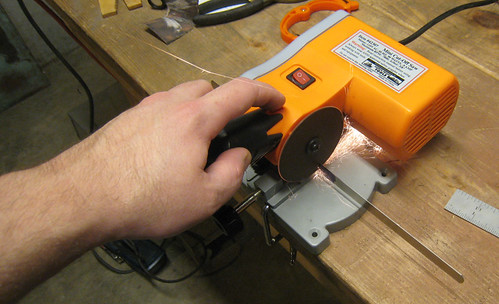
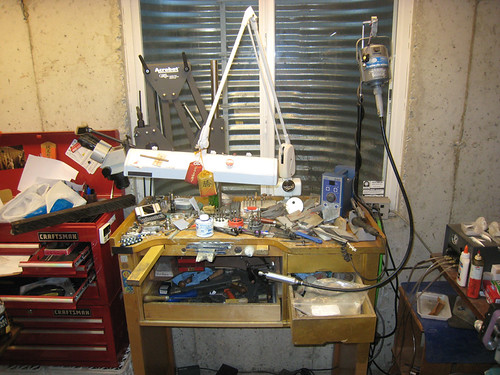
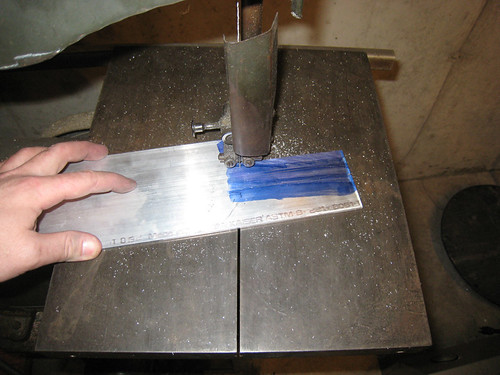
I cut it using this POS mini cut off saw from harbor freight. I got this little saw for one job last year, and I thought it sucked, but it worked pretty good for cutting the feeler gauge. However, if i didn't already own this saw I would have just used a cut off disc on a rotary tool. BTW, the disc on the saw is made for an angle grinder, not the saw.
I use Dykem layout fluid on the metal, it makes it easier to see scribe lines. The maker of Dykem should give me something for the frequency I recommend this stuff.

I scribe out guide lines using a divider and scribe. I use a center punch to mark where the screw holes will be. I try to measure and scribe guide lines for every cut I will make. That makes for more work during the layout stage, but easier in the long run since I am trying to make picks that are symmetrical and part of one set. HallisChalmers told me if he liked these he would want 2 more, so while I was doing layout for these I did the layout on a 3rd pick just to keep the measurements so I could make more picks to match these. I should in the future make templates to speed up this process. I could write a whole tutorial about layout because it's so important for making almost anything, but I really don't want to.

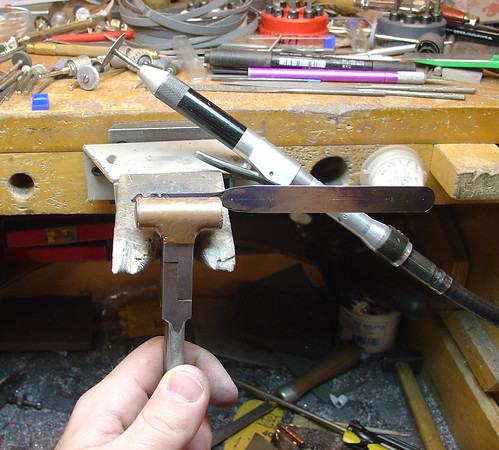
I used picks I already had to trace the working end of the picks. I used a bench grinder to remove most of the metal. Then used a rotary tool with cut off disc to rough out the shape on the pick. The rotary tool is a foredom flex shaft with a quick change hand piece. After the rotary tool I use files to finish shaping the pick. http://www.ottofrei.com is a good place to buy files. At this stage I am not polishing the pick, just shaping it. The pliers I am using are locking holding pliers. I think I got them from http://www.progresstool.com or Otto Frei. The piece of wood attached to my workbench is called a bench pin.
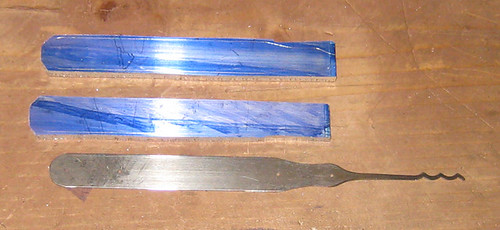
After I have shaped the pick I will mark on the aluminum how big to cut the handle pieces. I roughly cut out the pieces on the band saw at this stage. The band saw is just an old one from Sears. The blade I am using is a general purpose 1/4" wide wood cutting blade, I can't remember how many teeth per inch, maybe 10?. It works well on aluminum. The aluminum alloy I am using is 6061, it is a general purpose alloy and it anodizes well. It's 1/8" thick, so my picks are a little over 1/4" thick when finished.

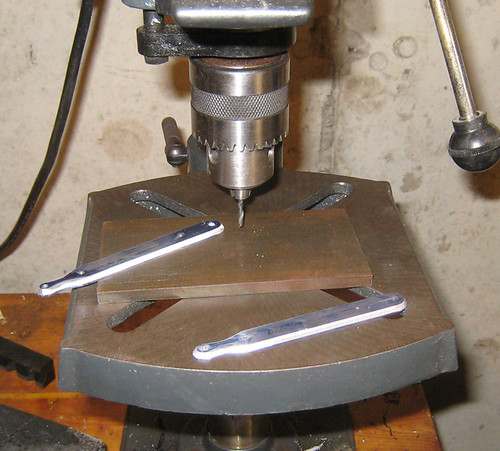
Next I will drill the screw holes one side at a time. One handle piece will be tapped, the other handle piece and the pick will not be tapped. I will start by drilling one hole.
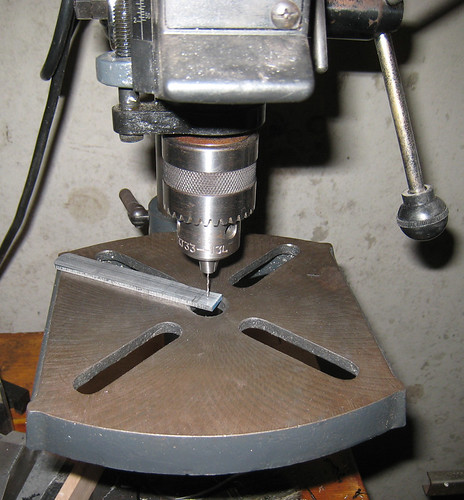
Since the screw holes have already been drilled on the pick it will serve a template for the other 3 holes. I am using 1.2mm drill bits, so after one hole is drilled I will put a drill bit through the pick and the hole I just drilled so the next hole will be in the right place. after the 2nd hole is drilled I put a drill bit in that hole, so the next two holes will be in exactly the right place.
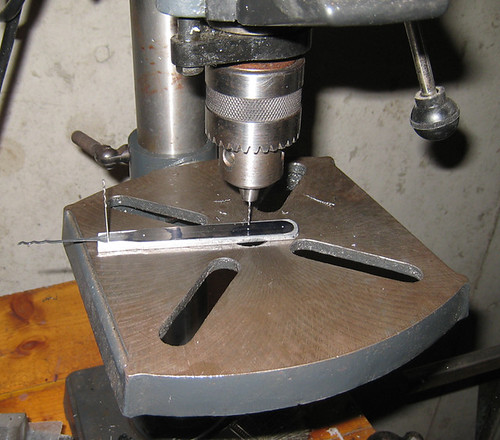
Since only one handle piece will be threaded with 0-80 threads, I leave it at 1.2mm, and enlarge the other holes to 1.6mm so the screw threads can pass through them. It is easier to drill all the holes the same size at first and then enlarge the other holes later.
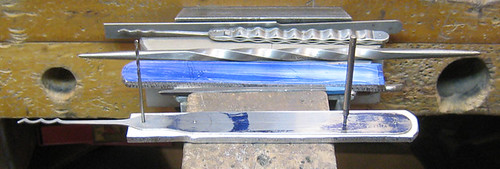
I tap one handle piece and put the whole thing together to grind it. At this stage I just grind the sides flush to the steel, I dont try to grind the curves. It seems I forgot to take a pic right after this step.

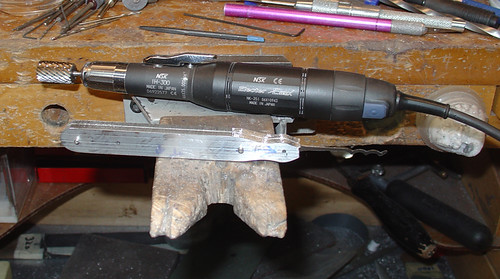
Next I finish the outline of the piece with a rotary tool. For this I used an NSK E-max micromotor and a cylinder bur. I usually prefer this over a flex shaft for carving type work.
This is a photo of the hand piece, it is attached to a control box.
I also put a slight bevel on the edges of the handle pieces. I used dividers to scribe guide lines for this too.
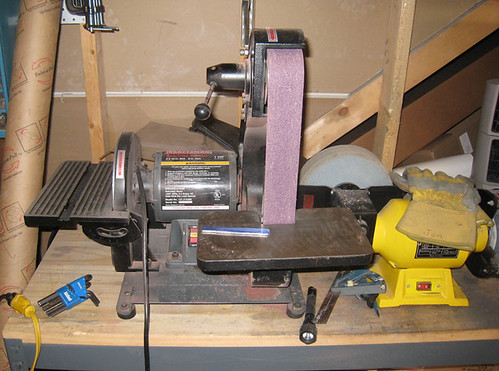
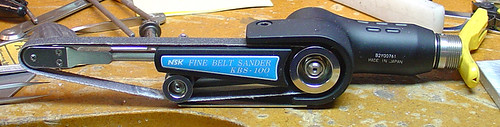
After this bevel has been ground, assemble the pick and use a small belt grinder that attaches to the NSK E-max to smooth everything out.
This is right after the grinding.

After that I disassemble the pick and polish the steel. I use the rotary tool for the edges and hand sand the sides of the working end with 1000 grit sand paper. I then polish it all on a polishing wheel with green rouge. I dont bother sanding or polishing the part that is covered by the handle.
At some point I have to counterbore the holes so the screw heads are about flush with or slightly lower than the handle piece. It doesnt really matter when this is done after the screw holes have been drilled. I don't have an actual counterbore the size I need, but for screws this small a drill bit of the appropriate diameter works well. For these 0-80 cap screws I think I used something like a 2.5mm drill bit.
Next I use sand paper or sanding sponges to sand the handles. This hand sanding is my least favorite step. I then go over them with a Scotch Brite pad in an even random pattern to make a nice finish.

Oh yeah, I almost forgot, the screws are too long. They all need to be shortened about 0.5mm. After that I give each end a quick polish with green rouge polishing compound since the ends will be visible. Dealing with the screws is an annoying task, but it doesn't take that long to do, and I think to skip this step would greatly reduce the overall quality appearance of the picks.
Anodizing comes next, which is a process of building up an oxide layer on the aluminum that is porous and can accept dye. The oxide layer also makes the aluminum more wear resistant.
Anodizing is a whole tutorial in its self, and I told someone on another forum I would make one. I will finish it eventually. But not right now. For now I will just say it involves chemicals,electricity, and dye.

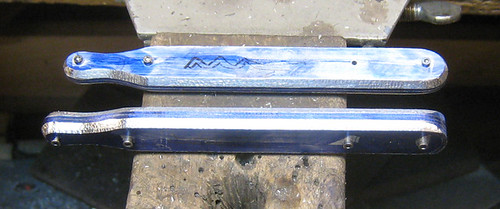
Well it looks like I didn't take a picture of them before assembly, but here's a pic of the handles from another pick right before assembly.
I clean everything, assemble them with a bit of thread lock on the screws, final inspection, and they are done.

McMaster-Carr (http://www.mcmaster.com) - Aluminum, feeler gauge stock, screws, taps, drill bits, dykem
Otto Frei (http://www.ottofrei.com) - Files, rotary tools, burs, dividers, jeweler's tools
For these picks I made for HallisChalmers I used .025" high carbon steel feeler gauge stock. I like the feeler gauge stock because you can get it in any thickness, it comes flat and smooth, and seems to have a good temper. It comes in 12" pieces, they are about $1 each.
I cut it using this POS mini cut off saw from harbor freight. I got this little saw for one job last year, and I thought it sucked, but it worked pretty good for cutting the feeler gauge. However, if i didn't already own this saw I would have just used a cut off disc on a rotary tool. BTW, the disc on the saw is made for an angle grinder, not the saw.
I use Dykem layout fluid on the metal, it makes it easier to see scribe lines. The maker of Dykem should give me something for the frequency I recommend this stuff.
I scribe out guide lines using a divider and scribe. I use a center punch to mark where the screw holes will be. I try to measure and scribe guide lines for every cut I will make. That makes for more work during the layout stage, but easier in the long run since I am trying to make picks that are symmetrical and part of one set. HallisChalmers told me if he liked these he would want 2 more, so while I was doing layout for these I did the layout on a 3rd pick just to keep the measurements so I could make more picks to match these. I should in the future make templates to speed up this process. I could write a whole tutorial about layout because it's so important for making almost anything, but I really don't want to.
I used picks I already had to trace the working end of the picks. I used a bench grinder to remove most of the metal. Then used a rotary tool with cut off disc to rough out the shape on the pick. The rotary tool is a foredom flex shaft with a quick change hand piece. After the rotary tool I use files to finish shaping the pick. http://www.ottofrei.com is a good place to buy files. At this stage I am not polishing the pick, just shaping it. The pliers I am using are locking holding pliers. I think I got them from http://www.progresstool.com or Otto Frei. The piece of wood attached to my workbench is called a bench pin.
After I have shaped the pick I will mark on the aluminum how big to cut the handle pieces. I roughly cut out the pieces on the band saw at this stage. The band saw is just an old one from Sears. The blade I am using is a general purpose 1/4" wide wood cutting blade, I can't remember how many teeth per inch, maybe 10?. It works well on aluminum. The aluminum alloy I am using is 6061, it is a general purpose alloy and it anodizes well. It's 1/8" thick, so my picks are a little over 1/4" thick when finished.
Next I will drill the screw holes one side at a time. One handle piece will be tapped, the other handle piece and the pick will not be tapped. I will start by drilling one hole.
Since the screw holes have already been drilled on the pick it will serve a template for the other 3 holes. I am using 1.2mm drill bits, so after one hole is drilled I will put a drill bit through the pick and the hole I just drilled so the next hole will be in the right place. after the 2nd hole is drilled I put a drill bit in that hole, so the next two holes will be in exactly the right place.
Since only one handle piece will be threaded with 0-80 threads, I leave it at 1.2mm, and enlarge the other holes to 1.6mm so the screw threads can pass through them. It is easier to drill all the holes the same size at first and then enlarge the other holes later.
I tap one handle piece and put the whole thing together to grind it. At this stage I just grind the sides flush to the steel, I dont try to grind the curves. It seems I forgot to take a pic right after this step.
Next I finish the outline of the piece with a rotary tool. For this I used an NSK E-max micromotor and a cylinder bur. I usually prefer this over a flex shaft for carving type work.
This is a photo of the hand piece, it is attached to a control box.
I also put a slight bevel on the edges of the handle pieces. I used dividers to scribe guide lines for this too.
After this bevel has been ground, assemble the pick and use a small belt grinder that attaches to the NSK E-max to smooth everything out.
This is right after the grinding.
After that I disassemble the pick and polish the steel. I use the rotary tool for the edges and hand sand the sides of the working end with 1000 grit sand paper. I then polish it all on a polishing wheel with green rouge. I dont bother sanding or polishing the part that is covered by the handle.
At some point I have to counterbore the holes so the screw heads are about flush with or slightly lower than the handle piece. It doesnt really matter when this is done after the screw holes have been drilled. I don't have an actual counterbore the size I need, but for screws this small a drill bit of the appropriate diameter works well. For these 0-80 cap screws I think I used something like a 2.5mm drill bit.
Next I use sand paper or sanding sponges to sand the handles. This hand sanding is my least favorite step. I then go over them with a Scotch Brite pad in an even random pattern to make a nice finish.
Oh yeah, I almost forgot, the screws are too long. They all need to be shortened about 0.5mm. After that I give each end a quick polish with green rouge polishing compound since the ends will be visible. Dealing with the screws is an annoying task, but it doesn't take that long to do, and I think to skip this step would greatly reduce the overall quality appearance of the picks.
Anodizing comes next, which is a process of building up an oxide layer on the aluminum that is porous and can accept dye. The oxide layer also makes the aluminum more wear resistant.
Anodizing is a whole tutorial in its self, and I told someone on another forum I would make one. I will finish it eventually. But not right now. For now I will just say it involves chemicals,electricity, and dye.
Well it looks like I didn't take a picture of them before assembly, but here's a pic of the handles from another pick right before assembly.
I clean everything, assemble them with a bit of thread lock on the screws, final inspection, and they are done.
McMaster-Carr (http://www.mcmaster.com) - Aluminum, feeler gauge stock, screws, taps, drill bits, dykem
Otto Frei (http://www.ottofrei.com) - Files, rotary tools, burs, dividers, jeweler's tools
 thanks for the lesson in making picks great guide.
  cough - kloms