First Impressioning Attempt

Posted:
Mon Mar 31, 2014 7:26 pmby jimylongs
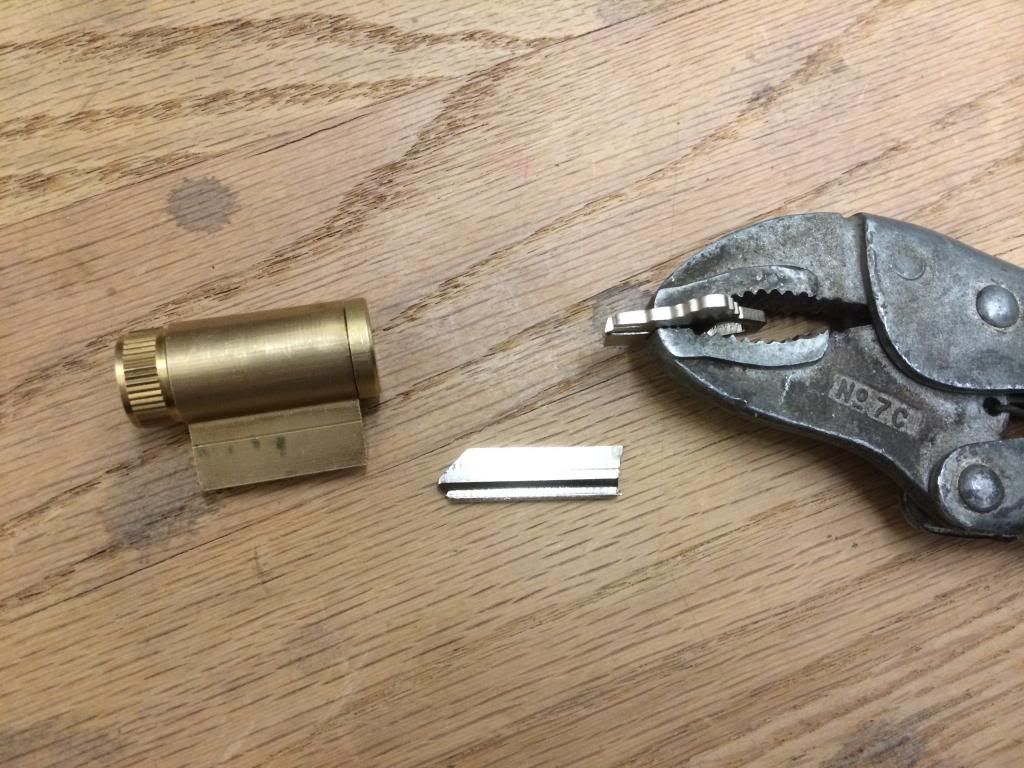
And I failed... Are some keys stronger than others? This was Axxess+ blank I bought from Home Depot. I don't think it was aluminum, but maybe it was. I was using a #2 Nicholson file for its initial surface. I attempted to twist/pull/wiggle it a few times and wasn't seeing any indication of pin marks. On the 5th attempt, it broke.

I bought a few blanks, so I'll try again tomorrow when I get some free time.
Re: First Impressioning Attempt
Posted:
Mon Mar 31, 2014 7:34 pmby GWiens2001
It takes practice to not put too much tension. We all begin with a few snapped key blanks. As you gain experience, you learn what is needed. Don't give up!
I suggest getting brass blanks for impressioning until you get better, as nickle-silver blanks do not take an impression as easily.
Gordon
Re: First Impressioning Attempt
Posted:
Mon Mar 31, 2014 7:42 pmby Oldfast
jimylongs wrote:And I failed...
Well, not a complete failure.... you did learn something

jimylongs wrote:I don't think it was aluminum, but maybe it was.
Hard to tell from the picks. Does it look like brass inside? If so, it's just nickel plated.
Be sure to prep the blank by taking the layer off so you're down to brass.
Also, be careful of how you're placing that cylinder in the vice. If you bind it by making
contact with the back end or face of the plug... or simply tighten the vice too much -
it would explain why you weren't able to produce good marks even with that force.
I look forward to hearing about round 2!
Re: First Impressioning Attempt
Posted:
Mon Mar 31, 2014 8:55 pmby Altashot
Use smaller vice grips too. You'll get better feel with less weight in your hand.
I prefer 4" or 6", depending on the type of lock, but no bigger.
M.
Re: First Impressioning Attempt
Posted:
Mon Mar 31, 2014 9:14 pmby jharveee
I started with a 4 pin master lock padlock.
Will be working my way up to 5 pins.
Keep with it.
It's worth it!!
Re: First Impressioning Attempt
Posted:
Mon Mar 31, 2014 10:53 pmby faygo6
Breaking a blank isn't failure. Its a step towards progress. That's the only way to learn when the blanks are going to break.
Re: First Impressioning Attempt
Posted:
Mon Mar 31, 2014 10:54 pmby jimylongs
Oldfast wrote:Also, be careful of how you're placing that cylinder in the vice. If you bind it by making
contact with the back end or face of the plug... or simply tighten the vice too much -
it would explain why you weren't able to produce good marks even with that force.
I look forward to hearing about round 2!
That makes sense, and after looking at the key and the lock again, that might be what was happening.
jharveee wrote:I started with a 4 pin master lock padlock.
Will be working my way up to 5 pins.
Keep with it.
It's worth it!!
I'll keep at it! I bought a couple blanks for a 4 pin master padlock as well, I think that's what I'll try tomorrow.
Altashot wrote:Use smaller vice grips too. You'll get better feel with less weight in your hand.
I prefer 4" or 6", depending on the type of lock, but no bigger.
M.
This sounds like a great idea, I'll pick some up tomorrow.
Re: First Impressioning Attempt
Posted:
Mon Mar 31, 2014 11:37 pmby escher7
I am not yet an impression pro but the cleaness of that fracture suggests that the blank may have had a flaw in the metal.
Re: First Impressioning Attempt
Posted:
Tue Apr 01, 2014 8:04 amby huxleypig
I broke a couple of blanks too! I don't use vice grips any more, I have a rather nice impressioning handle but the only difference is the amount of force it encourages you to use.
I only ever broke blanks when I had gotten a ways through the process though, never right at the start.
Re: First Impressioning Attempt
Posted:
Tue Apr 01, 2014 8:24 amby jharveee
Optics and light
Smoke and mirrors. OK I don't use mirrors. Tried smoking.......made me sick.
I use a 5 power magnifying glass that has a small 10 power spot on it.
wont impression without it..........less I had something better.
well lite area or I prefer sunlight. I like to roll the key in the light to pick up marks otherwise not seen.
Marks.......you'd expect to see something, Sometimes it is a difference in the way the surface reflects the light.
I suggest reading everyone's prior posting..........you will succeed.
File on!

Re: First Impressioning Attempt
Posted:
Tue Apr 01, 2014 9:23 amby jimylongs
jharveee wrote:Optics and light
I use a 5 power magnifying glass that has a small 10 power spot on it.
wont impression without it..........less I had something better.
well lite area or I prefer sunlight. I like to roll the key in the light to pick up marks otherwise not seen.
Marks.......you'd expect to see something, Sometimes it is a difference in the way the surface reflects the light.
I suggest reading everyone's prior posting..........you will succeed.
File on!
I know nothing about magnifying glasses.... I looked at the TOOOL sight and they use one similar to this one on Amazon:
http://www.amazon.com/SE-Microscope-Illuminated-Mini-5in/dp/B0053VIHGA/ref=sr_1_1?rps=1&ie=UTF8&qid=1396365431&sr=8-1&keywords=45x+mini-magnifier+with+LEDIt was only $6, I should have it on Thursday.
escher7 wrote:I am not yet an impression pro but the cleaness of that fracture suggests that the blank may have had a flaw in the metal.
I hope this was the reason!
huxleypig wrote:I broke a couple of blanks too! I don't use vice grips any more, I have a rather nice impressioning handle but the only difference is the amount of force it encourages you to use.
I only ever broke blanks when I had gotten a ways through the process though, never right at the start.
Maybe I can figure out how to make a nice handle. Honestly I didn't think I put that much force on it, it gave away pretty easy. The large vice grips may have had more leverage than I would expect... IDK.
We'll see again later today!
Re: First Impressioning Attempt
Posted:
Tue Apr 01, 2014 9:27 amby rai
breaking blanks in impressioning is not a fail, its a common part of the process, you just start another one
as alta shot said
nickel silver is very hard to impression, look in your keyway toward the top, is the bottom point of the pin centered in that keyway? or is it to the left or right,
determine where the center of the pin collums runs and then file a forty five degree angle from both sides of the blank so that the center line directly under the pins rests on the edge.
this will put a weak edge under the pins and you can look for impressions on that. Its important that you try to file this edge without changing the angle of the file stroke as you push it across the blank, so that the work is one flat plane, not several, you need the clean surface to see the impressions on.The impressions for this edge are best made by bumping up while binding then bumping down while binding and doing it both left binding and right binding. pulling would only confuse the pin location on the blank
if you do file a knife edge, remember that there is room in the plug for top of keyway tension because the pins are a little further in the keyway than the shoulder of the key, file the knife edge where the pins are, do not carry that knife edge to the shoulder because everyone breaks blanks right at the shoulder where the forces shear the blank just as you have done in the photo, this area where the blanks break should never be filed in any way
I used to impression by eye in daylight, but now I use a ten power loupe. if working indoors, a direct strong light from a point source may be better than diffuse light from long fluorescent tubes.
you can also enhance the search for useable marks by putting black marker on the edge, but you must distinguish between bumps and the effects or
pushing the blank in and pulling it out, these marks should be ignored.
once you get the first marks, learn to push the file through one time in a very even manner so that at no time in the stroke of the file does the angle of the file change,
this will leave a flat that is easy to read marks on, if you change the angle during the file stroke, it will leave a multi faceted surface that makes distinguishing marks difficult.
you have to think of the mechanics of the shoulder/upper arm push and the elbow and wrist mechanics as the file is pushed through
arrange for the right height above whatever bench you work on so that doing it well does not require much adjustment during the file stroke
large vise grips make it difficult to avoid breaking blanks, use the two smaller ones they will just work better, when I use them, I also try to bite the wire cutter in the vice grip into the edge of the bow of the key, usually I notch it with a triangle file to help make it bite
this will prevent the blank from slipping on the keybow.
If you are impressioning a lock that has a loose cylinder rattling in it, such as an american lock or master padlock, I used to reccommend that the shoulder itself be filed where it touches the cap lamination or the drillbreaker on an american lock, because in the past it could be that the attempt to bump is causing the the shoulder to take the bump on the drillbreaker leaving the blank in the cylinder unmarked, but more recently
I have seen that this is not a problem any more, its probably a matter of what blank you are using
brass is heavy aluminum is light, you drop these blanks on a hard surface to listen to the ring they make, this usually tells something about how hard a metal is with hardness making a higher pitched sound. an allen wrench is very hard steel, drop one and listen, then drop a piece of other metal of similiar size and you can compare probable hardness, its not scientific but its pretty good SWAG (Scientific Wild Ass Guess)
brass is yellow, aluminum is white, steel is greyish, stainless is silvery,Nickle silver is the color of a nickle, greyishsilver eventually you will just
know what metal you are working with. metal color is affected by oxidation and other staining, copper is redishbrown, brown or even red if its been in heat. you can see this in pennies especially the ones before 1982
Do not trust an impression that is not consistant with the known pin spacing, if an impression is out of spacing, this could be from not holding the shoulder of the key against the plug face as you bump, or it could be lateral drift of the file stroke.
Impressions can drift off center as you continue to make progress, if you do not see an impression, look to the top edges of your cut, and if you think an impression is actualy hiding on this point or the very tip of the key where the forty five degree angle meets the top edge of the blank, some blanks actually have to be filed on this place
most of this is already here in the very good posts from altashot and Gweins, and others.
Re: First Impressioning Attempt
Posted:
Tue Apr 01, 2014 11:18 amby MrAnybody
Now THAT is what I call a post! Huge thanks for that rai. So many points to note I lost count. Really useful.
You ever impressioned on a steel blank using UV light and marker? I've been told it's useful for picking up marks on a steel blank. Any thoughts on that?
You find you need UV safety glasses when using UV under magnification?
Is my Grobet gonna be messed up using it on steel blanks rather than brass?
rai wrote:breaking blanks in impressioning is not a fail, its a common part of the process, you just start another one
as alta shot said
nickel silver is very hard to impression, look in your keyway toward the top, is the bottom point of the pin centered in that keyway? or is it to the left or right,
determine where the center of the pin collums runs and then file a forty five degree angle from both sides of the blank so that the center line directly under the pins rests on the edge.
this will put a weak edge under the pins and you can look for impressions on that. Its important that you try to file this edge without changing the angle of the file stroke as you push it across the blank, so that the work is one flat plane, not several, you need the clean surface to see the impressions on.The impressions for this edge are best made by bumping up while binding then bumping down while binding and doing it both left binding and right binding. pulling would only confuse the pin location on the blank
if you do file a knife edge, remember that there is room in the plug for top of keyway tension because the pins are a little further in the keyway than the shoulder of the key, file the knife edge where the pins are, do not carry that knife edge to the shoulder because everyone breaks blanks right at the shoulder where the forces shear the blank just as you have done in the photo, this area where the blanks break should never be filed in any way
I used to impression by eye in daylight, but now I use a ten power loupe. if working indoors, a direct strong light from a point source may be better than diffuse light from long fluorescent tubes.
you can also enhance the search for useable marks by putting black marker on the edge, but you must distinguish between bumps and the effects or
pushing the blank in and pulling it out, these marks should be ignored.
once you get the first marks, learn to push the file through one time in a very even manner so that at no time in the stroke of the file does the angle of the file change,
this will leave a flat that is easy to read marks on, if you change the angle during the file stroke, it will leave a multi faceted surface that makes distinguishing marks difficult.
you have to think of the mechanics of the shoulder/upper arm push and the elbow and wrist mechanics as the file is pushed through
arrange for the right height above whatever bench you work on so that doing it well does not require much adjustment during the file stroke
large vise grips make it difficult to avoid breaking blanks, use the two smaller ones they will just work better, when I use them, I also try to bite the wire cutter in the vice grip into the edge of the bow of the key, usually I notch it with a triangle file to help make it bite
this will prevent the blank from slipping on the keybow.
If you are impressioning a lock that has a loose cylinder rattling in it, such as an american lock or master padlock, I used to reccommend that the shoulder itself be filed where it touches the cap lamination or the drillbreaker on an american lock, because in the past it could be that the attempt to bump is causing the the shoulder to take the bump on the drillbreaker leaving the blank in the cylinder unmarked, but more recently
I have seen that this is not a problem any more, its probably a matter of what blank you are using
brass is heavy aluminum is light, you drop these blanks on a hard surface to listen to the ring they make, this usually tells something about how hard a metal is with hardness making a higher pitched sound. an allen wrench is very hard steel, drop one and listen, then drop a piece of other metal of similiar size and you can compare probable hardness, its not scientific but its pretty good SWAG (Scientific Wild Ass Guess)
brass is yellow, aluminum is white, steel is greyish, stainless is silvery,Nickle silver is the color of a nickle, greyishsilver eventually you will just
know what metal you are working with. metal color is affected by oxidation and other staining, copper is redishbrown, brown or even red if its been in heat. you can see this in pennies especially the ones before 1982
Do not trust an impression that is not consistant with the known pin spacing, if an impression is out of spacing, this could be from not holding the shoulder of the key against the plug face as you bump, or it could be lateral drift of the file stroke.
Impressions can drift off center as you continue to make progress, if you do not see an impression, look to the top edges of your cut, and if you think an impression is actualy hiding on this point or the very tip of the key where the forty five degree angle meets the top edge of the blank, some blanks actually have to be filed on this place
most of this is already here in the very good posts from altashot and Gweins, and others.
Re: First Impressioning Attempt
Posted:
Tue Apr 01, 2014 10:41 pmby jimylongs
2nd Impressioning Attempt
I decided to try a cheap master lock with the same brand of Axxess+ key blank. After looking at the color, I believe it's brass, still not 100% sure though. I also tried smaller vice grips. I used the same Nicholson #2 file to get the initial finish. It took a few passes to get the chrome coating off, but I believe I got it pretty level and constant surface. Tried to get an impression only by turning the key clockwise and then rocking back and forth. The lock doesn't turn left, so I wonder if this is correct. I looked at the key blank under a couple light sources and really couldn't identify any markings. Took a couple more tries, and focused more on rocking the key up and down than twisting harder. So I didn't break the blank this time, but didn't get to much further.
My magnifier should show up with in the next day or so, so that'll be the next attempt. I believe I need to find a #4 file as well.
rai wrote:you can also enhance the search for useable marks by putting black marker on the edge, but you must distinguish between bumps and the effects or
pushing the blank in and pulling it out, these marks should be ignored.
I tried a sharpy, maybe my eyes are getting old.
rai wrote:brass is heavy aluminum is light, you drop these blanks on a hard surface to listen to the ring they make, this usually tells something about how hard a metal is with hardness making a higher pitched sound. an allen wrench is very hard steel, drop one and listen, then drop a piece of other metal of similiar size and you can compare probable hardness, its not scientific but its pretty good SWAG (Scientific Wild Ass Guess)
brass is yellow, aluminum is white, steel is greyish, stainless is silvery,Nickle silver is the color of a nickle, greyishsilver eventually you will just
know what metal you are working with. metal color is affected by oxidation and other staining, copper is redishbrown, brown or even red if its been in heat. you can see this in pennies especially the ones before 1982
I'm pretty sure the blank is brass, so I'm thinking even though they're a bit expensive (about $2.50) they should work.
Thanks Rai, and everyone else too. I really appreciate all the suggestions.
Re: First Impressioning Attempt
Posted:
Tue Apr 01, 2014 11:07 pmby GringoLocksmith
Great post, rai. I think it was you who recommended the Grobet 4 cut in another post. I bought one and impressioning has become much easier.
I also want to second that advice about starting by running a Sharpie over the top of the key. I only use that to center my cuts. Thereafter it just kind of obscures the marks for me. Sometimes at the very start of the process when I've blackened the key and jiggled it around in the lock for the first time, it makes clear marks on the sides of the key that don't perfectly align with the fainter ones on the top. The marks on the sides are almost always in the wrong spots.
Lastly -- and maybe I'll be scolded for admitting this -- sometimes when I don't see any marks, I whack the bow with the handle of a screwdriver as I turn it with the other hand. That usually marks it pretty good.
