Page 1 of 1

old corbin padlock

PostPosted: Fri Jun 07, 2013 8:55 am
by femurat
Image

Image

Image

Image

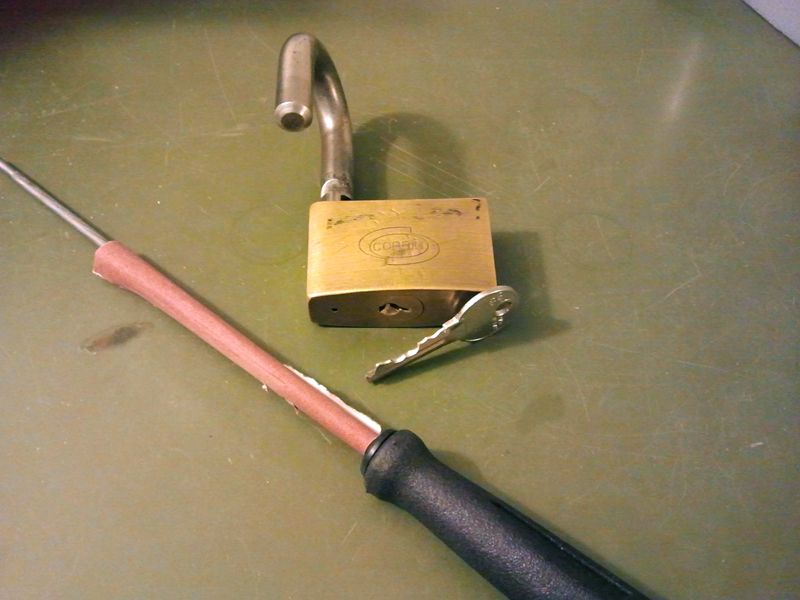
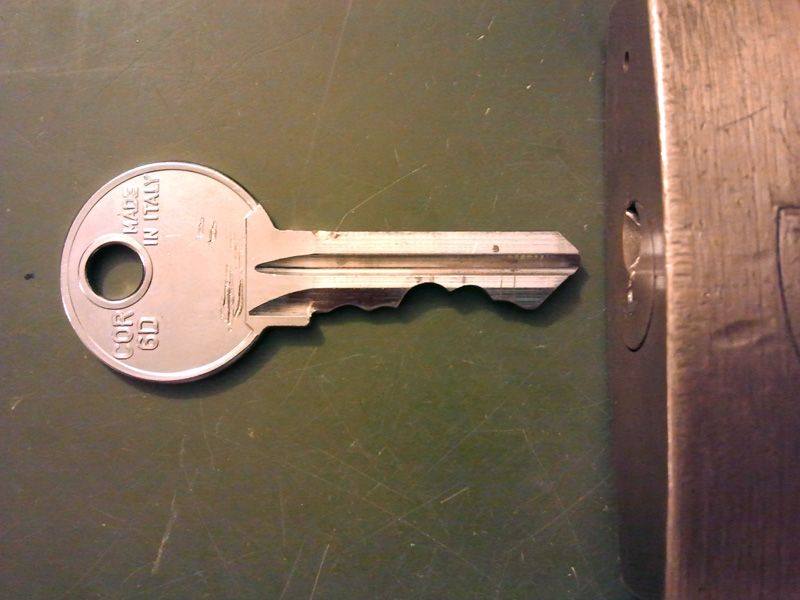
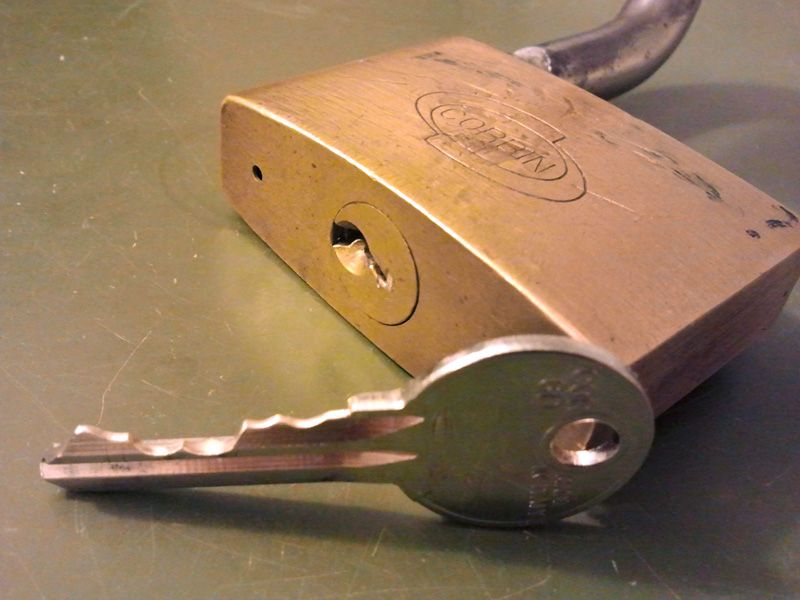
I got this old padlock without a key. It was a bit stiff, the feedback was strange and inconsistent. I tried to pick it with no success... I was going to oil it a little but then decided to impression a key before adding anything in the keyway. The marks were barely visible, and I had to giggle a lot before getting one. The plug was a bit loose and I guess the 5 pins are very worn out and gunky.
I had to roll some 320 grit sandpaper around the file to get a finish smooth enough to allow me to see the marks. So every time I saw a mark I filed it away and then finished the surface with sandpaper. A pita but it was the only way for me to get a working key.
Now I can copy the shark-bitted key to a new blank, and then spray some oil in that poor old padlock and pick it...

Cheers :)

Re: old corbin padlock

PostPosted: Fri Jun 07, 2013 8:57 am
by xeo
Nice work. Try super hard tension to find the binding pin.

Re: old corbin padlock

PostPosted: Fri Jun 07, 2013 11:45 am
by Oldfast
Great work!!

femurat wrote:....had to roll some 320 grit sandpaper around the file to get a finish smooth enough to allow me to see the marks.
You know, I've done this a couple of times too. You're right... it is a pain in the ass... but it is a way out if ya get stuck.

Re: old corbin padlock

PostPosted: Fri Jun 07, 2013 12:52 pm
by femurat
I'll try that xeo :)

thanks oldfast, I thought I was the only one...

cheers :)

Re: old corbin padlock

PostPosted: Fri Jun 07, 2013 11:29 pm
by GWiens2001
I have also used very fine sanding sponges to give a shiny smooth surface that makes spotting impressioning marks easier. I tied using a buffing wheel, but found it not to work very well.

Gordon

Re: old corbin padlock

PostPosted: Tue Jul 01, 2014 12:50 am
by jones
I like to keep a 10x or larger magnifying loupe handy. You won't believe what you can see through a good magnifying glass, in the right light. I use #4 cut files for my impressioning and when I can't see marks, I always find some with my 10x loupe!

I recall reading about an old locksmith who said he could impression GM sidebar keys. He said instead of binding the cylinder and lifting the key up and down, he would simply wiggle the key from left to right, He would then magnify the surface of the key and look for faint lines. When the tumbler's sidebar cut-out reached the sidebar, he said the line for that cut would disappear. Just one more skill I never became any good at (sidebar impressioning)

Re: old corbin padlock

PostPosted: Tue Jul 01, 2014 7:26 am
by jharveee
Sandpaper?! Really!
I will be giving this a try.
I sometimes use it to prepare the blank at the beginning.
From what I understand by reading your post, you also use after filing marks. Before re-inserting and re-marking.
Eureka!
Brilliant.
I feel like I'm the last one at the party again.
Nice job on that old Corbin, now to return it to service. :smile:

Re: old corbin padlock

PostPosted: Tue Jul 01, 2014 7:42 am
by femurat
Hey jones, I've played with lenses and even with a nice small "microscope" with led light that many people use for impressioning. I decided that it's not worth the effort. For now I get best results by naked eye. I'll see if in a few years I'll need some sort of aid but for now I still see good enough.
Keep in mind that I've only impressioned pin tumbler locks. If you work with cars, wafer locks and sidebar locks the situation is different.

Thanks jharveee, I had this idea when I only had a very rough round file. It took long but worked surprisingly well. Yes I smooth the surface with sandpaper every time, after I file. If you have a #4 round file you don't need the sandpaper because the surface is already nice and smooth and you can clearly see the marks.

Cheers :)

Re: old corbin padlock

PostPosted: Tue Jul 01, 2014 8:01 am
by GWiens2001
I normally use 400 grit sandpaper when using this method. When making a key at work, only have rough files. Just as Femurat said, wrap some sandpaper around a small screwdriver. Then the file teeth don't cut through the sandpaper. As small a diameter screwdriver works well so you don't affect the other parts of they key and can sand/polish only the area you want.

Gordon

Re: old corbin padlock

PostPosted: Wed Jul 02, 2014 12:32 am
by elbowmacaroni
Yeah, as it was mentioned, 400grit paper is handy for refreshing the surface to get more clear visually marks while impressioning. Another you might want to try if you're using a #4 swiss-cut is to ever-so-lightly glide the file across the surface of the top of the key blade, you want the file to be moving at all times while in contact with the blade of the key, so you begin the stroke of the file before dropping it to the key surface very lightly and just before you get to the end of the file gently lift it away while still moving. Once you get the hang of doing this, you will start to be leaving a near pristine mirror finish on the top of the key blade against which pin marks will show up in stark contrast to the shininess of the surrounding metal.


-Elbow


jharveee wrote:Sandpaper?! Really!
I will be giving this a try.
I sometimes use it to prepare the blank at the beginning.
From what I understand by reading your post, you also use after filing marks. Before re-inserting and re-marking.
Eureka!
Brilliant.
I feel like I'm the last one at the party again.
Nice job on that old Corbin, now to return it to service. :smile: