Impressioning an american 5200 Lock
This is going(editing) to be a slow growing post as I do this I have crappy internet and am working out in Iraq so doing this gets regularly interupted, but heres the start. I am also planning on doing a video but don't hold your breath. And please feel free to correct me add pointers to my way of doing it, i've only been doing this 2 weeks and have only impressioned 8 locks.
Tools I use:
1. Key holder(will post picture of all tools when complete)
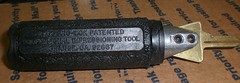
KeyHolder by xpakratx, on Flickr
2. Vice

Vise by xpakratx, on Flickr
3. Fine swiss cut round file

CIMG1038 by xpakratx, on Flickr
4. Head magnification unit, though I dont' always use this, it's very helpful.

5. Depth gauge for measuring the key depth. You don't need this at all, but it helps me learn as I go, I don't usually use it till i'm done, or till I'm not marking anymore and I want to make a copy of the key.
Prepare the key by filing the dull coating till it's a solid smoothness, (this is not needed but very VERY helpful) do not file it to a knife point, this is done for wafer locks, not pin tumblers.
Step 1: Secure your key in your key holder(vice grips can be used, but advised against by many) and your lock in your vice(i slant the head so that the keyway is straight up so that the up and down wiggling is not sideways)
Step 2: in sert the key and turn as in opening the lock, it is important not to put to much pressure, just till the key stops.
Step 3: Wiggle the key up and down, no sideways motion what so ever, some have said vigorously, some have said gently I just wiggle a little and experience has given me what i need.
Step 4: remove key find marks on key and file them down smoothly centering the tip of you file on the mark and file straght accros parralel to the groud I usually do 3 or 4 full strokes of the file, this is again something yuo will learn from experience. NOTE: Do not let youf cuts get any lower then 45 degres from each edge to the bottom a U or V can be cut but if it is smaller then 45ish your pins will stick also as you go file down the points left over so they are not smaller than 45(this was read in a book, the exact degree i have found is guess work)
Return to step 1 and continue until the key stops marking or the lock opens, if the key does not mark take a tooth brush stiff britstle and wipe off any dirt from the lock re mark it look at the look at many angles and use magnification and better lighting.
you can also cheat on this lock and pick it open, pull out the cylindar and put the key in the cylindar with it in the postion to change the key pins out and see where you need to file. I did this a lot on my first few while I was learning. I will try to post pics as I go now:
1st Pass:
1st pass by xpakratx, on Flickr
2nd Pass after the 1st cut:
2ndPass by xpakratx, on Flickr
Now at this poing I have all five pins marking, you could file down a whole key depth, or do like i do and only go anough to notice. I do this just in case, the file slips your eyes saw soemthing that wasn't really a mark, just in case.
2nd Cut
2ndCut by xpakratx, on Flickr
3rd Pass-Lighting is bad camera is bad, middle one hard to see at this angle.
3rdPassEdit by xpakratx, on Flickr
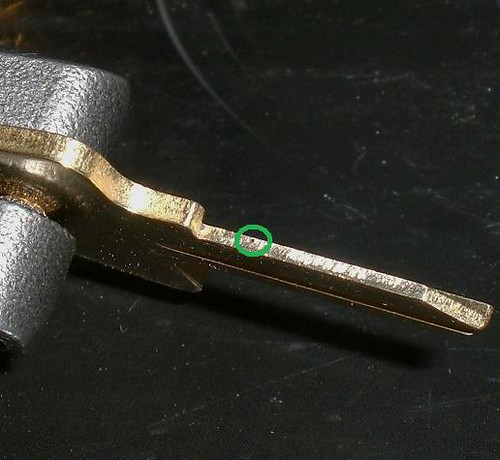
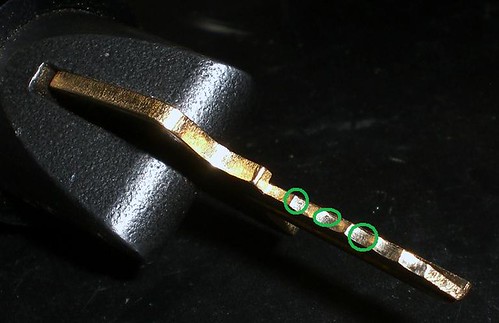
4th Pass- One really good mark here, there are two others but the camera angle is straight crap but basically you keep doing this over and over until you have a key.

4thPass by xpakratx, on Flickr
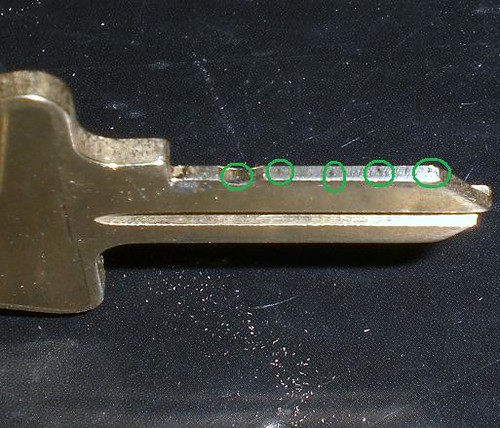
If you notice here your marks and cuts will not start out straight with the plug where you'd think the pins would mark:
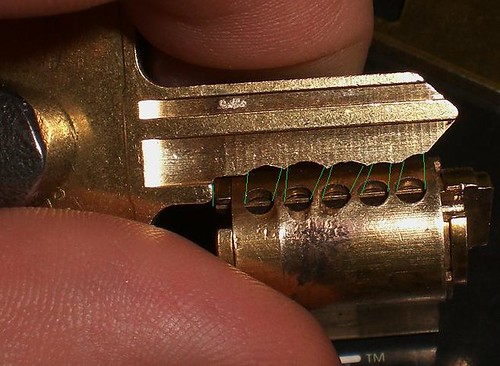
Key2Plug by xpakratx, on Flickr
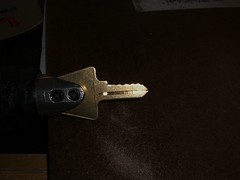
Here is a working key for the same lock i am making one for now, notice it does not have to be pretty to work. I am still new at this and learning but the key I'm making now is lineing up just like the first one I did for this lock.:
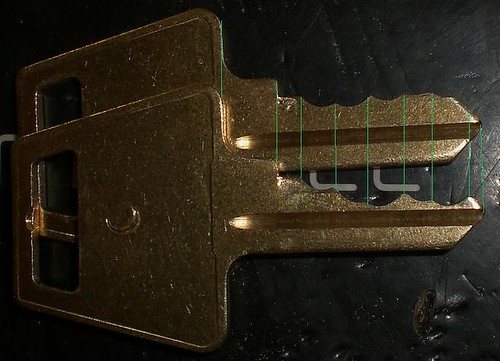
key2key by xpakratx, on Flickr
Due to the amount of patience i use and the slowness it takes me and the fact I take 40 pictures to get one that is good I am not going to post more pictures. You see the finished key and the way the new key is going.
Thinkgs to worry about:
1. Patience - can never be to patient when you are learning
2. Practice - Nough said!
3. Good light and good magnification.
4. Don't worry about breaking a key, overfileing, not getting it right away, thats where 1 and 2 come back.
5. You will make mistakes, it's a fact, learn from them
6. Overfiling is common in begginers, learn how far your file cuts with one full stroke at a certian amount of force behind it.
I bought a bag of 25 key blanks impressioned/keyed 8 locks total of 11 keys and I have 9 blanks from that bag left so I've broken or overfiled 5 out of this bag and probably a couple more loose one's I had.
Again I'm not that great at it, but a lot of people have told me that a 5200 is a hard lock to learn to impression and considering it's the only type of lock I've impressioned I think I'm doing good and still a begginer but others can learn from me.
My messed up camera, half the screen is smashed thats why my shots suck.

Broken Camera by xpakratx, on Flickr
Tools I use:
1. Key holder(will post picture of all tools when complete)
KeyHolder by xpakratx, on Flickr
2. Vice
Vise by xpakratx, on Flickr
3. Fine swiss cut round file
CIMG1038 by xpakratx, on Flickr
4. Head magnification unit, though I dont' always use this, it's very helpful.
5. Depth gauge for measuring the key depth. You don't need this at all, but it helps me learn as I go, I don't usually use it till i'm done, or till I'm not marking anymore and I want to make a copy of the key.
Prepare the key by filing the dull coating till it's a solid smoothness, (this is not needed but very VERY helpful) do not file it to a knife point, this is done for wafer locks, not pin tumblers.
Step 1: Secure your key in your key holder(vice grips can be used, but advised against by many) and your lock in your vice(i slant the head so that the keyway is straight up so that the up and down wiggling is not sideways)
Step 2: in sert the key and turn as in opening the lock, it is important not to put to much pressure, just till the key stops.
Step 3: Wiggle the key up and down, no sideways motion what so ever, some have said vigorously, some have said gently I just wiggle a little and experience has given me what i need.
Step 4: remove key find marks on key and file them down smoothly centering the tip of you file on the mark and file straght accros parralel to the groud I usually do 3 or 4 full strokes of the file, this is again something yuo will learn from experience. NOTE: Do not let youf cuts get any lower then 45 degres from each edge to the bottom a U or V can be cut but if it is smaller then 45ish your pins will stick also as you go file down the points left over so they are not smaller than 45(this was read in a book, the exact degree i have found is guess work)
Return to step 1 and continue until the key stops marking or the lock opens, if the key does not mark take a tooth brush stiff britstle and wipe off any dirt from the lock re mark it look at the look at many angles and use magnification and better lighting.
you can also cheat on this lock and pick it open, pull out the cylindar and put the key in the cylindar with it in the postion to change the key pins out and see where you need to file. I did this a lot on my first few while I was learning. I will try to post pics as I go now:
1st Pass:
1st pass by xpakratx, on Flickr
2nd Pass after the 1st cut:
2ndPass by xpakratx, on Flickr
Now at this poing I have all five pins marking, you could file down a whole key depth, or do like i do and only go anough to notice. I do this just in case, the file slips your eyes saw soemthing that wasn't really a mark, just in case.
2nd Cut
2ndCut by xpakratx, on Flickr
3rd Pass-Lighting is bad camera is bad, middle one hard to see at this angle.
3rdPassEdit by xpakratx, on Flickr
4th Pass- One really good mark here, there are two others but the camera angle is straight crap but basically you keep doing this over and over until you have a key.
4thPass by xpakratx, on Flickr
If you notice here your marks and cuts will not start out straight with the plug where you'd think the pins would mark:
Key2Plug by xpakratx, on Flickr
Here is a working key for the same lock i am making one for now, notice it does not have to be pretty to work. I am still new at this and learning but the key I'm making now is lineing up just like the first one I did for this lock.:
key2key by xpakratx, on Flickr
Due to the amount of patience i use and the slowness it takes me and the fact I take 40 pictures to get one that is good I am not going to post more pictures. You see the finished key and the way the new key is going.
Thinkgs to worry about:
1. Patience - can never be to patient when you are learning
2. Practice - Nough said!
3. Good light and good magnification.
4. Don't worry about breaking a key, overfileing, not getting it right away, thats where 1 and 2 come back.
5. You will make mistakes, it's a fact, learn from them
6. Overfiling is common in begginers, learn how far your file cuts with one full stroke at a certian amount of force behind it.
I bought a bag of 25 key blanks impressioned/keyed 8 locks total of 11 keys and I have 9 blanks from that bag left so I've broken or overfiled 5 out of this bag and probably a couple more loose one's I had.
Again I'm not that great at it, but a lot of people have told me that a 5200 is a hard lock to learn to impression and considering it's the only type of lock I've impressioned I think I'm doing good and still a begginer but others can learn from me.
My messed up camera, half the screen is smashed thats why my shots suck.
Broken Camera by xpakratx, on Flickr
 - you get a sticky - and a bump for "Best of 2010".