FAQ  •  Register  •  Login
UKLockpickers.co.uk Lockpicking supplies such as Lockpicks, tools, and more! COMMANDOLOCK.COM Military grade padlock systems lockpickshop.com A source for lockpicking supplies such as lockpicks, locksmith tools, and more!

LocksportSouth's Stash

<<

Riyame

Keeper of the Bests / Supreme Overlord of Small Format Interchangeable Picking Nightmares

Posts: 2164

Joined: Sun Jul 24, 2011 11:16 am

Location: Canada

Post Sat Apr 09, 2016 5:32 pm

Re: LocksportSouth's Stash

Not really a find since it is my video :P It gets easier with practice and the A model is a lot easier since the shackle is thinner.
PhoneMan: I always knew I'd say something stupid and it would be someone's sig
macgng: i am an equal opportunity pervert
macgng: aww fuck thats goin in someone sig :-(

If life gives you melons, you might be dyslexic.
<<

LocksportSouth

User avatar

Active Member

Posts: 369

Joined: Wed Dec 02, 2015 6:51 pm

Location: UK

Post Sat Apr 09, 2016 5:45 pm

Re: LocksportSouth's Stash

Ahh fair play hehe, didn't realise it was your channel :). Good vid!
I've had no luck finding an 826C so far sadly, please do let me know if you ever have one come up spare :)
<<

LocksportSouth

User avatar

Active Member

Posts: 369

Joined: Wed Dec 02, 2015 6:51 pm

Location: UK

Post Sun Apr 10, 2016 7:04 am

Re: LocksportSouth's Stash

Ok – this REALLY IS the final lock update, for now. really :D.
(Edit: It isn’t. Lol.)
It’s a cool one though!

Image

This seems to be an older style of box, I’m not 100% sure but the phrase “cast body padlock” doesn’t turn up anywhere else and seems a little... vague? The design of the box is also a lot more simplistic than the later ones – and the lock itself is stamped 1973, so it is pretty old :).

Image

Ah hah! Spoilers....

Image

Image

Image

Instructions:

Image

Image

Image

Image

Image

It’s an 826A! For those not in the know, along with the “big” Sargent & Greenleaf locks (the 831, 833 and 951) they also produce a line of smaller locks with open shackles, for situations where the special NAPEC hasps can’t be used, or a smaller lock (or hasp/chain that requires an open shackle) is called for.

The 826 series is that range. The model numbers include the 826A, the 826C and 826D. There MAY be an 826B, but I’ve not seen or heard of it. I wonder also if there was just a plain “826” before the A designation, but again I’ve not come across any evidence of this so far. All of these locks are hard to find generally, but I have it on good authority that the A series is especially rare, and so I am correspondingly especially happy to have a “new” box 826A with instructions, chain and all the keys!

Image

The cylinder that’s fitted to this one actually isn’t the *original* cylinder for this lock, but it IS a genuine 826A replacement cylinder, brand new, which is just as good :).

The chain and staple is in great condition:

Image

Attached to the lock body (I did try to remove it without much luck. It’s held in with a roll pin which can only be accessed by one side. Oh well – it’ll have to be mounted with the chain, no biggie :). Maybe I’ll re-attach the chains to all of the ones I have chains for, for uniformity...

Image

The usual Medeco keys. Out of curiosity I checked to see whether the keys would fit into the 833/951 since it’s much older and might be a different key profile, but it does fit :)

Image

Image

Image

Image

Lock body, stamped with the 826A designation and date of manufacture – 1973. Dayum!

Image

Image

Side shot, with drain hole and disassembly plate. The method for disassembling these is similar to the 831:

Image

Back of the lock body:

Image

Chain attach point and roll pin:

Image

Top down. Love how shiny the shackle is!

Image

Bottom of the lock – the keyway cutout looks similar to the 831, and operates in much the same way (neither have a protective anti-drill plate, etc) – I believe that the 826 and 831 are two of an era, and the 833 and 951 are two of an era from observations of their design. One design philosophy definitely influences other locks in that era. On the bottom, “PAT.PEND.” is stamped along with a serial number – 01155 in this case. Since that’s not stamped into the key also I assume it’s a UID to protect against destruction/replacement of the lock body:

Image

Unlocked:

Image

Image

Unlocked with the control key:

Image

To strip the lock, first rotate the control key counter-clockwise, same as other S&G models. Then unlock the shackle, and slide the plate on the top of the lock sideways and off of the lock:

Image

The top cover plate:

Image

Image

The alternating tongue and groove style slotting in the edge of the plate is to allow it to fit correctly and securely into the lock side.

Image

The notch on the left hand side, underside of the top plate is held in by the actuator in locked and normal open positions, preventing disassembly of the lock.

Without the top plate, looking down inside the lock you can see the actuator (the large silver bar on the top) and the cylinder below that:

Image

Image

To remove the cylinder, rotate the shackle until it sits alongside the body – this allows the actuator (which is also the locking bar for both parts of the shackle) to fit into the notch in the shackle rear. You can then turn the key a bit, and dislodge the actuator/locking bar from the top of the cylinder, allowing it to be removed:

Image

The device that acts as both the actuator and the locking bar. The nub on the top is what slots into that cutout in the top plate, preventing it from sliding out except in disassembly position:

Image

Underside of the locking bar. The round hole is for the top of the cylinder to fit into and the proud bars on the edges hold the plat sides of the cylinder in place:

Image

With the actuator removed, you can see the cylinder clearly in the lock body. It’s not actually held in with anything else, nor does it sit on an anti-drill plate like the 833/951 – it simply slots into the body and sits against the bottom of the body and the keyhole cutout:

Image

Image

This cylinder, like the 831, is brass rather than the green Teflon cylinders of the 833 and 951 – I believe that’s a trait of the older series of locks.

Image

The other side of the cylinder has a label marked: B’88

Image

You can also see an anti-drill pin in the edge of the keyway entrance on the plug from here.
The back of the lock – Interestingly the actuator part has a half-round cutout just like the 833 and 951 locks do – except that in those locks, it’s designed to fit with a nub on the back of the actuator. The actuator bar in this lock, however, doesn’t have one of those nubs – so maybe this is a newer cylinder retconned to work with the older style of locks? Or S&G had locks around the same age that *did* use that style of actuator maybe?

Image

Cylinder front:

Image

Let’s strip the cylinder down, starting with the C-Clip:

Image

Plug with Medeco pins:

Image

Standard Medeco wedge key pins:

Image

Sidebar and springs:

Image

De-pinned plug:

Image

All pins and parts laid out:

Image

The driver pins are mostly standard, except for one mushroom, and appear to be a mix of brass and steel:

Image

Lock bits all laid out:

Image

Reassembling:

Image

Putting the actuator/locking bar back in is a bit of a dark art. There’s supposedly a technique to it, but I find that the easiest method is to rotate the shackle up against the side of the body (you HAVE to do this or the actuator will not fit back in), insert the control key into the cylinder and place the actuator bar on top of the cylinder as best as it possible, and just jiggle the actuator and key around until it fits into place:

Image

And finally here’s the lock re-assembled and ready for tagging:

Image

Phew! It’s been a bit of a journey... And sadly we’re now at the end of it, for now at least. But fear not! I have no intention to quit collecting :). Pop me a message or post with any questions, ideas, suggestions or tips and I’ll endeavour to make new posts soon... And thank you all for reading along!
<<

LocksportSouth

User avatar

Active Member

Posts: 369

Joined: Wed Dec 02, 2015 6:51 pm

Location: UK

Post Sun Apr 10, 2016 1:23 pm

Re: LocksportSouth's Stash

You may or may not be aware of all the hassle that I had trying to find a good core that will work “off the shelf” in my Rotalok. Whilst that project is still ongoing, I did come across this beauty on eBay and had to pick it up:

Image

The Rotalok that I already have is the semi-closed shackle version and this one is Open, so it adds nicely to the collection anyway. This one comes with a Cisa Astral core and I was very keen to see how the insides differ as I’ve seen two different kinds of Rotaloks now – one (the one I have) with the smooth inside bottom plate, all silver metal (even inside) and single Euro cut-out hole in the body, and also another one which is black inside, has a Euro-shaped cut-out on the bottom plate for the Euro cylinder to fit into, and two different height cutouts in the body to take smaller cylinder types, so it’ll be interesting to see if this lock conforms to one of the these two!

Unlike most of my other locks, I actually photographed this as I went along opening it up for the first time, so although I’m doing the write-up after, this is the first time I’ve seen inside this lock. Let’s get too the photos!

Cisa Astral dimple key:

Image

The other side:

Image

The front with the usual “Rotalok / Made In England” – note that this lock is also one of the earlier models as the newest versions since being sold to Pickersgill-Kaye are stamped “Kaye-Rota”:

Image

Image

You can just about see the hex set-screw inside this hole – like my other Rota, this holds back a metal rod that holds the shackle in. The shackle must be removed to disassemble the lock since there are two screws holding the bottom plate in – one at the bottom of each shackle hole:

Image

Interesting shackle shape – it seems slightly thicker at the bottom before rounding out into the top rounded portion:

Image

“back” of the lock. Note that there’s only one hole – the useful one – for the screw and retaining rod – I think in future I’ll do a breakdown showing both Rotas at once so you can see how they differ:

Image

Image

Bottom of the lock, and the cylinder. Note that the (what I thought was a) white stain at the bottom is actually a scratch in the coating. I covered it up with some sharpie that seems to work quite well :D

Image

Unlocked:

Image

The shackle is a little dirty:

Image

There’s one of those screws – I couldn’t get the camera to co-operate but you can just about see it at the bottom of the open shackle hole:

Image

As previously mentioned, to disassemble, you first need to take this side screw out:

Image

And then tap the rod out:

Image

The shackle will now come out:

Image

And now you can see both of the bottom plate removal screws:

Image

Holding the bottom on, or putting it in a vice, remove the two screws:

Image

Woah!! Here’s the inside of the lock:

Image

VERY different to mine. Obviously the two round holes on the left and right side are for the screws that hold the bottom plate on (although I’m not sure why thee need cut-outs that connect to the lower triangular parts) and the middle section is for housing the cylinder (Euros, but it looks like it’ll take ovals too), but I have NO idea what those triangular cutouts on the lower left and right are. They obviously have SOME purpose, but I can’t imagine what it would be. Oddly-shaped angular cylinders? Some convoluted extra lockdown for the bottom plate that attaches to where the screws fit? I have no idea. Interestingly this lock is a different design to BOTH of those I mentioned earlier. So, there are at least THREE different Rotalok designs, plus whatever has changed since they merged to be Kaye-Rota. Yeesh!

The cylinder on the bottom plate:

Image

I can see another addition here too – an actuator piece that goes between the cylinder and the body – oddly my older Rota doesn’t have this and the cylinders fit fine – obviously a different design.

The bottom plate:

Image

It looks pretty similar to the other (second) Rota that I described earlier, that I’ve only seen online, with the Euro cutouts in it. I’m not sure what the purpose of the semi-circular cutouts that intersect with the cylinder cutouts are, though?

The cylinder, with the actuator on the back:

Image

We can see that the cylinder has been cut from a double Euro, or at least a Euro that had that connecting part in the middle, since the rear bottom of the bible is slanted where there is cut-off. The front of the cylinder doesn’t seem to have been modified though.

Front of the cylinder showing that it has not been ground or modified – also an interesting “halo” ring has been added which holds the cylinder in the bottom plate. I assume that’s necessary because the body seems to take Ovals as well?:

Image

The actuator piece on the back of the cylinder. The legs on the right hand side lock into the back of the plug and the cut-out mouth fits into the actuator in the back of the padlock:

Image

Image

On the back of the cylinder we can see where it was cut off – although the plug part didn’t seem to need any kind of cutting off unlike my old one:

Image

Image

Side-front of the cylinder again. I’m not sure if that ring was added by the factory, Cisa themselves or the reseller...

Image

All the parts:

Image

Something I didn’t notice before – the side of the actuator is stamped “24”. I wonder what that means? I’ve been in discussion with a UK supplier of these and it turns out that the ones they sell also have these actuator in-between pieces (“Cam interface”, they call it) which are simply numbered 1-4. I assume this is a variation on that:

Image

Re-assembled:

Image

I didn’t strip down the Cisa cylinder this time, partly because I’ve not had much time and this was really just a brief first look as I figured out for myself how different they are, partly because I’ve not disassembled a Dimple cylinder before and need to figure out if there’s anything special that I need to do in order to not break it vs a normal pin tumbler, and partly because I’m hoping to replace the cylinders in these anyway. I do have a couple of cylinders on order (an EVVA MCS and a DOM Diamant, though they are delayed and will likely be at least another month according to my supplier) so when they turn up I’ll take a look and see what can be done.

In the meantime, I hope you’ve enjoyed this look at the Rotalok Open Shackle! I’ll try to find time to do a comparison shoot, too...
<<

Riyame

Keeper of the Bests / Supreme Overlord of Small Format Interchangeable Picking Nightmares

Posts: 2164

Joined: Sun Jul 24, 2011 11:16 am

Location: Canada

Post Sun Apr 10, 2016 3:35 pm

Re: LocksportSouth's Stash

Actually, the number on the bottom of the 826A was stamped into the original key but you wanted a core with all 3 keys.
PhoneMan: I always knew I'd say something stupid and it would be someone's sig
macgng: i am an equal opportunity pervert
macgng: aww fuck thats goin in someone sig :-(

If life gives you melons, you might be dyslexic.
<<

LocksportSouth

User avatar

Active Member

Posts: 369

Joined: Wed Dec 02, 2015 6:51 pm

Location: UK

Post Sun Apr 10, 2016 3:43 pm

Re: LocksportSouth's Stash

Riyame wrote:Actually, the number on the bottom of the 826A was stamped into the original key but you wanted a core with all 3 keys.


Ohhhh yeah. Oops. My bad :oops: :oops: :oops: :oops: :oops:
<<

LocksportSouth

User avatar

Active Member

Posts: 369

Joined: Wed Dec 02, 2015 6:51 pm

Location: UK

Post Mon Apr 11, 2016 12:28 pm

Re: LocksportSouth's Stash

If you came here looking for a new lock update, I'm afraid I have to disappoint - All my locks are now posted! Of course I'll update when I do get new locks arrive (and I do some have some in transit at the moment...) but for now, that's all there is.

I do have a few things that I want to cover though - some key and keyway comparisons, lock comparisons and such. Let's start things off with a quick summary of my good padlocks so far!

Here's everything, laid out on the floor. Looks a lot smaller compressed into this space!

Image

You may have also noticed that post a week or two back with a mystery piece of wood and lots of locks - after lots of research, deliberating and trying to solve all the various issues, I decided that for display purposes I'll attach Staple-on-plates to a nice Oak board and stand it up for display. It has the added advantage of not needing to be drilled into the wall either - the board has some straight metal rods at the back to tuck it behind the drawer units (which are themselves fixed to the wall) and then three brackets on the front to hold it in place and stop it tipping forward. Other than that it's pretty much free-standing:

Image

I did leave gaps between the locks for locks that are part of a series, which I'd like to get. For now I've printed out photos of these and affixed them inbetween the real locks but I haven't yet decided whether to leave them there or remove them and leave the "gaps" blank. Here's another angle:

Image

I do have chains for the 833 and 951 as well, and after much deliberating I decided to mount them without the chains (the 826 chain is nigh-impossible to remove non-destructively).

I store the keys organised into IKEA plastic pots, labelled with the lock type, like so:

Image

And another drawer for my cheapie lock keys / keyrings and such:

Image

I have plenty of other stuff I could photo too but I'll try to keep it brief for now. Thanks for reading!
<<

LocksportSouth

User avatar

Active Member

Posts: 369

Joined: Wed Dec 02, 2015 6:51 pm

Location: UK

Post Mon Apr 11, 2016 3:06 pm

Re: LocksportSouth's Stash

Another mini update - just wanted to show all my Abloys laid out together :)

Image

Image

Image

Image

Image
<<

Riyame

Keeper of the Bests / Supreme Overlord of Small Format Interchangeable Picking Nightmares

Posts: 2164

Joined: Sun Jul 24, 2011 11:16 am

Location: Canada

Post Mon Apr 11, 2016 6:28 pm

Re: LocksportSouth's Stash

LOL, I recognize that picture of the 826C. It is cropped out of a set of 3 S&G padlocks of mine :P

Very nice setup. I wish I had enough wall space to do something similar.
PhoneMan: I always knew I'd say something stupid and it would be someone's sig
macgng: i am an equal opportunity pervert
macgng: aww fuck thats goin in someone sig :-(

If life gives you melons, you might be dyslexic.
<<

LocksportSouth

User avatar

Active Member

Posts: 369

Joined: Wed Dec 02, 2015 6:51 pm

Location: UK

Post Mon Apr 11, 2016 6:43 pm

Re: LocksportSouth's Stash

Riyame wrote:LOL, I recognize that picture of the 826C. It is cropped out of a set of 3 S&G padlocks of mine :P

Very nice setup. I wish I had enough wall space to do something similar.


Heh, cool :). Figures most of the pics on that wall come from collectors - I Google Image searched most of them but in a lot of cases the results were from one of two forums, heh - and I believe there's only one set of DCP pics out there at all :o.

Thank you! I did consider display cabinets and such since there's the space on the cabinet top but then there's the issue of S&Gs and Ingersolls not having flat bottoms, so this worked out quite nicely - I'm happy with it :). Just got to figure out what to do when I run out of room... Don't want to cram locks in every ol' gap!
<<

LocksportSouth

User avatar

Active Member

Posts: 369

Joined: Wed Dec 02, 2015 6:51 pm

Location: UK

Post Mon Apr 11, 2016 6:51 pm

Re: LocksportSouth's Stash

Another quick update just to compare the Abloy keys and keyways :)

Image

From the left we have:
1 Protec2
2 Protec
3 Sentry
4 High Profile*
5 High Profile*

* From studying Han Fey's guide I believe that these are both "High Profile" and not "Profile" keys, both with different key profiles. If you believe that one or both are Profile, not HP let me know!

We can identify Abloy keys thusly:

Protec2: Narrow triangle key bow (head) with centrally aligned, oval cutout for keyrings. The key shast is somewhat rounded when viewed from the end. There will be a ball bearing (active element) about half way down the key which is visible from both sides. Default dot colour is red **

** Note that all the Protec/Protec2 keys I've seen are red-dot and all the Sentries are green. However these CAN be customised so don't use this as your major deciding factor!

Protec: Same key bow shape and key profile as Protec2, also use the red dot as standard. However rather than having a ball bearing in the middle of the key, there will be two small divots instead. Note that there is another small difference between the Protec and Protec2, and that is the AWS, or Anti-Wear System. This is a slight modification to the nubs at the very end of the key which is designed to make the key last longer from continuous use, however after analysing mine the difference is quite small and won't be easy to tell if you only have a Protec OR Protec2 key to hand, so use the ball bearing as the best guide.

Sentry: Sentry keys have a broader key bow with a larger, offset, not-quite-oval shaped keyring cutout. The default dot colour is green. The word "Abloy" is horizontal rather than at an angle as on the Protec keys. The key itself is thicker and sturdier, and takes on a more square shape - the cuts in the key are more angular and square (I believe that there are less possible angles of variation on the cuts too, so it looks a lot "blockier". Viewed from the end, the Sentry looks more oblong than the oval-ish shape of the Protecs.

High Profile: Profile and High Profile keys look quite similar. I *believe* that Profile has less warding on it. Profile series keys have a diamond shape key bow with a round, circular cutout hole for keyrings. The bow is covered with a "dotty" effect in the metal, and the Abloy logo is significantly different and older-looking. The keys themselves are significantly shorter, and do now feature the coloured dot of the Protec/Sentry keys. The key shaft itself is flat on one side (as seen above) and rounded on the other, such that the end of the key (and keyhole shape) are somewhat "C" or "D"-shaped***.

*** Note that whilst I don't own a "Classic" Abloy key, they are completely D-shaped from the end view, whereas the Profile series keys are more "C" shaped.

Note that there are lots of other Abloy key types out there too, such as Exec and DiskLock - I can only cover what I own, however :).

Here's another shot at a slight angle - notice how the Sentry seems thicker/squarer than the Protec, and the end of the Profile series has a kinda C/D shape:

Image

Here we compare the Protec (top) and Protec2 (bottom). As previously mentioned, the ball bearing (Protec2) is the dead giveaway, although those with sharp eyes may notice the slightly different design of the very end of the key.

Image

Here we see the Sentry (left) and Protec and Protec2 (right; not sure which is which off the top of my head!) from the end. Notice how the Sentry is much squarer:

Image

A few pics of the High Profile keys. I originally believed that these were Profile and High Profile respectively however I believe that they are both HP with a lightly different key profile, which was part of the upgrade in HP from Profile.

Image

Image

Image

Image

Now let's take a look at some locks which accept these keys:

Image

On the left is an Protec keyway - notice the kinda rounded, almost double-D or bat-logo shape. Next in (second from the left) is the Sentry - note the square/oblong shape with the little nodules in the middle of the bottom disk. Next to the right we have a High Profile keyway with that one-sided, C shape keyway.

Here's the two High Profiles together:

Image

Here's a shot of the four locks with their respective key in front of them:

Image

I just want to take a brief look at inserting a Protec or Protec2 key into a Protec keyway. In this example, the correct key has been inserted - however, any Protec key would fit fine into this Protec keyway, it just won't turn:

Image

In the next photo, I've inserted the Protec2 key into the same Protec lock:

Image

Notice how it doesn't go in quite as far? You can see the two lines of warding just after the "7Z" stamp on the key, which you couldn't see on the other key when fully inserted. It's subtle but it's there - you can't insert a Protec2 key fully into a Protec cylinder.

Hope you've enjoyed this brief Abloy tour!
<<

LocksportSouth

User avatar

Active Member

Posts: 369

Joined: Wed Dec 02, 2015 6:51 pm

Location: UK

Post Tue Apr 12, 2016 4:27 pm

Re: LocksportSouth's Stash

In the last update, I compared my Abloy keys and cylinders and talked a bit about the differences between those. First up, let's take a look at the difference between ASSA D12 and 1200 series keys. I have an identical Ruko lock with both cores and whilst they're very similar, there are differences and a 1200 key will not fit into a D12 lock and vice versa.

Image

Pn the left is a D12 key, and on the right is a 1200 series key. The bows and general key shape (12 cuts in the key etc) are fairly similar, but from here there are four main differences:

1. Note that the D12 bow lettering is stamped ASSA whereas the 1200 is stamped Ruko. I don't know if the 1200 is just Ruko's special version of the D12 or if there are also Ruko D12s* and ASSA 1200s, but with my small sample size of 1 there does seem to be that difference.

* Note that both of these keys are for snowman cores both found inside a Ruko padlock, so whether or not they were meant for that purpose, D12s CAN be found inside of Ruko locks.

2. Whereas the D12 key bow has a single large D shaped keyring cut-out which is centre aligned in the middle of the key, the 1200 key has two cutouts - a round one and an oval one which are both slightly offset from the centre.

3. The D12 key has the 'd12' logo stamped onto the left hand side of the key bow.

4. Somewhat subtle, but it's there - on the main key shaft, on the lefthand-most edge after the drop from the main raised portion, the side bit is slightly wider on the 1200 series and slightly shorter on the D12.

Image

From the back of the key, you'll notice that there are more and finer key profile / warding lines in the deep cutout on the left hand (D12) key. Most significantly, on the right hand portion of the key near the tip, you can see a couple of small cutouts which looks to be for some kind of side-pins, which isn't present on the 1200 series. I didn't notice any of these pins when I disassembled the core so I'll need to strip two cores down again sometime soon and check for that.

Image

Another look at the key bows from the front, close up so you can see the text and logo differences etc. A few other things to note - both keys have a little divot on the right hand side of the key, opposite the shoulder. Both keys have that two-dashes-and-a-dot logo (I'm not sure what it is) - on the bottom right on the 1200 key and top-middle-right on the D12. Maybe it's just mine, but the 1200 key is shinier and the D12 key has noticible horizontal lines all across the bow.

Image

Another look at the backs, comparing the inner grooze lines and the back-of-the-key bitting. Note also that the D12 keys have a number stamped in (which is part of, but not all of, the number on the key card) and the word Patented.

Image

Closeup of those sidepin-style bittings on the back of the D12 key, also a good closeup of the grooves in the key.

Image

In profile, we can see that they look quite different, with the D12 having a more rounded bottom slope and a slightly different central cutout shape.

Again from a slight angle:

Image


Ok, now let's compare the keyways. Here's the 1200 series, D12, and Garant Plus padlocks next to each other (I tried to pick as similar padlocks as possible):

Image

Image

Note that the Garant Plus core is a silvery gunmetal grey, whereas the 1200 and D12 are brassy.

Image

Whereas both the 1200 series and D12 have that kinda "d" shaped paracentric keyway (hence the name), the Garant has a fairly wide, open, standard looking keyway.

Image

D12 on the top, 1200 series below (I think!). Very subtle difference - mostly in the shape of the "teeth" at the top of the square mountain part of the d.

And we're done!
<<

LocksportSouth

User avatar

Active Member

Posts: 369

Joined: Wed Dec 02, 2015 6:51 pm

Location: UK

Post Wed Apr 13, 2016 9:21 am

Re: LocksportSouth's Stash

In this post, my final update for now, we'll be comparing my two Rotaloks and looking at the differences between them.

This is an especially interesting topic for me because my semi-closed shackle (all silver) Rotolok is a bit of a work in progress as I try to find or modify a suitable core for it. I've bought, tested, modified and re-tested a couple of different cores now, and have two more on order, as well as several threads out there but have never really gotten down to the nitty gritty of why these locks come in so many different versions or why some seem to work fine with drop-in cores and some seem to need modification.

In addition to the two that I now own, I've seen three or four others on the web, two in a good amount of detail - one being BosnianBill's video about the Rotalok, and one being a forum post. both of these locks appear to be different from my two, and in addition the company who previously owned Rotalok (which I've never fully discerned, but it might have been 'Federal'), has now sold them to Pickersgill-Kaye, with the new locks being branded Kaye-Rota. I've never seen one of these outside of their own site but considering that these are primarily designed for the prisons sector and other high security areas, it begins to make more sense why it's so hard to find out any official information on these.

Luckily I did make somewhat of a breakthrough lately after speaking with Insight Security, who supply these, as they wee able to supply a spec sheet with breakdown for these locks. It turns out that at least some of these locks have a cam interface part which fits between the back of the cylinder and the cam in the back of the lock - there are several of these which are designed to work with different cylinders. Once I recieve my two new test cylinder in the post, I may contact them again to see if they can supply these interface cams (although my older Rota doesn't seem to need them as the 30mm cylinder fits flush at the front of the lock when fitted properly in place - and seems to require mostly a lot of hacking away at the cylinder to make it fit. But I digress). I'm also hoping to get my final Rotalok (fully closed shackle) from Insight so I can see how theirs differs from mine - it's probably totally different!

Anyway, let's stop blathering and get on with the comparison :)
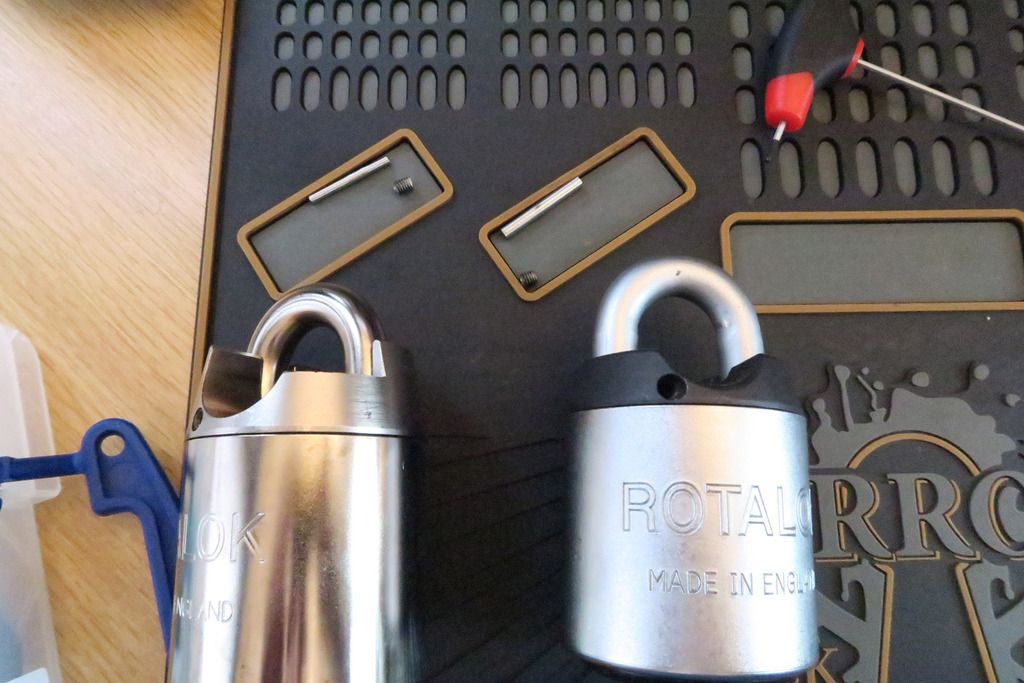
. Both of these locks were sourced from eBay, £125 for the newer open shackle and £150 for the older semi-closed shackle. By the way, when I refer to the locks as "older" and "newer", I'm talking about the order in which I bought them, not the actual age of the locks. The "older" Rotalok is the semi-closed shackle which I bought in early Jan this year. It's the shiny, all silver one. The "newer" Rotalok is the open-shackle one with a black top and bottom, which I got in late March. There are currently two other Rotaloks for sale on eBay, if anyone is interested, or you can source them new from Insight.

Image

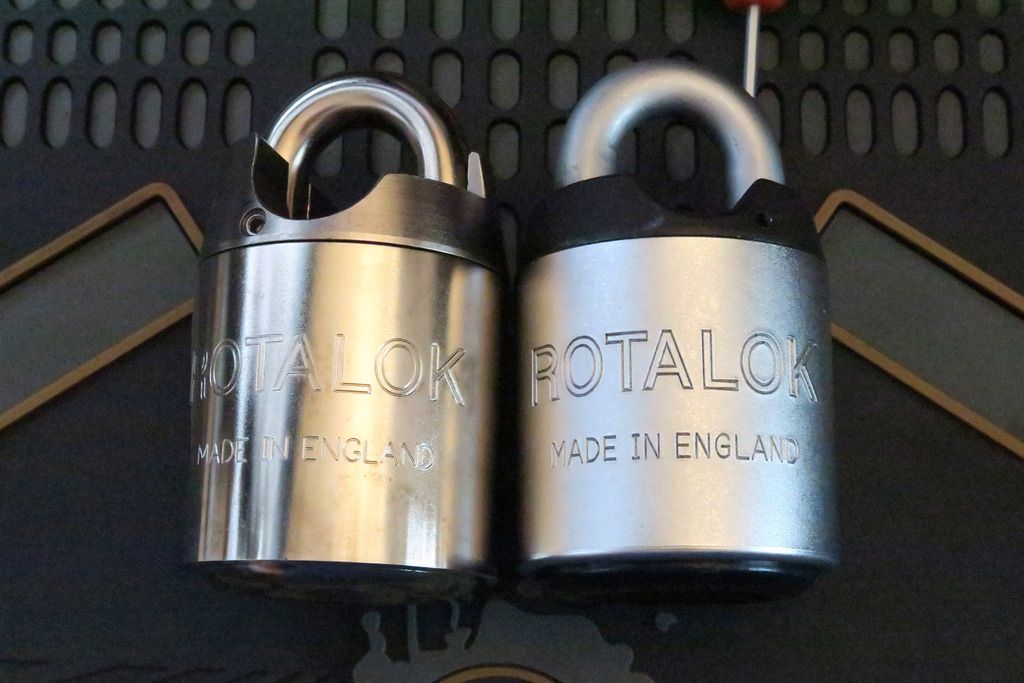
Older on the left, Newer on the right. I try to keep to this convention throughout all of these photos to keep it simple to compare and remember which is which (also in order for me to not mix the parts up!!)

So, what can we say from that photo? They are both stamped with the same ROTALOK and MADE IN ENGLAND lettering. The open shackle one has a black painted top and bottom piece, whereas the semi-closed shackle is silver all over. Note that this isn't such an oddity as the same is shown on Insight's site - for some reason, the open and fully closed shackle have the black ends whereas the semi-closed is all silver.

We can see that the shackle on the open shackle is a greer, duller colour and is thicker than the shiny semi-closed shackle version.

Image

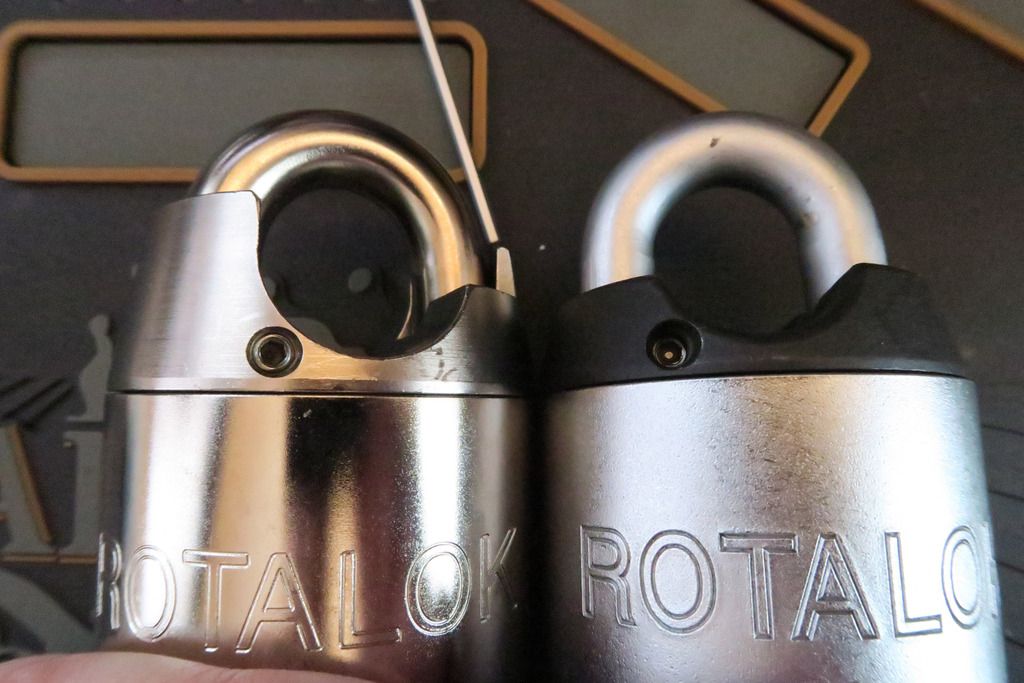
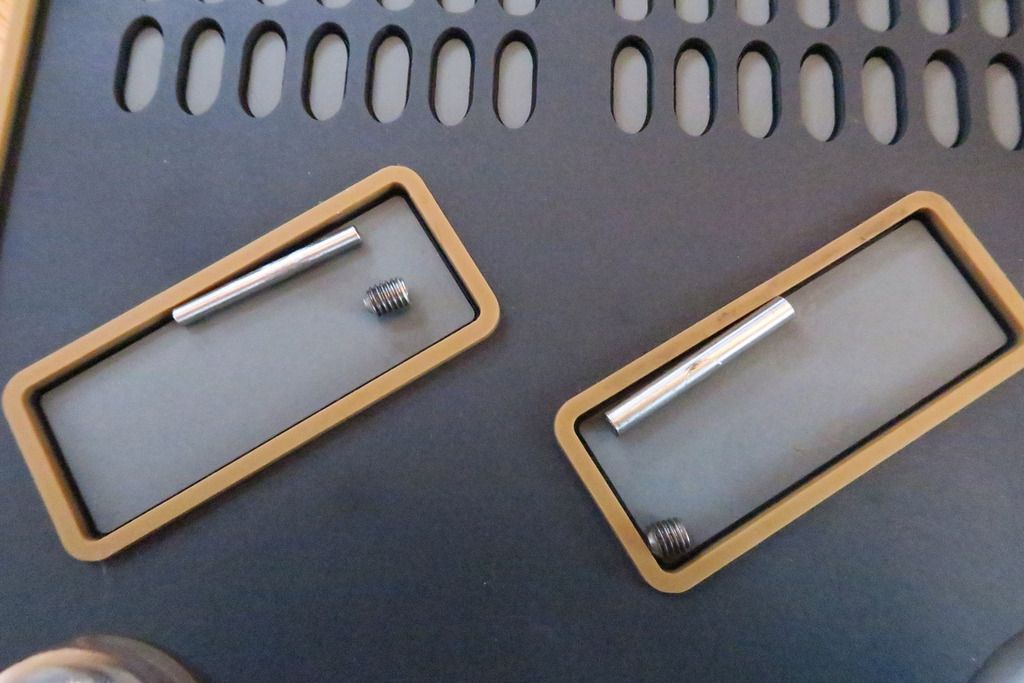
A closeup of the set-screw hole holding the shackle in shows that the right lock has its screw recessed, whereas on the left the screw sticks out further towards the front of the body.

Image

On the back of the shackle shrouds, you can see that left has two holes whereas right has only one. Both of the holes without screws are there to allow a small stick (I use a fine hex key) to push out the retaining rod once the set screw from the other side (see last picture) has been removed. The set screw holds the retaining rod in, however as the rod is usually lubed is can stick in place and need to be pushed out. It's this retaining rod that holds the shackle in. The other set screw on the left hand lock (semi-closed shackle) as seen in the above picture literally serves no obvious purpose - if you've read my lock thread post for that lock you'll recall upon removal there's just a blank metal wall behind, nothing that can be pressed or pushed out or interacted with in any way. It doesn't hold anything in. I have no idea what it's for.

Image

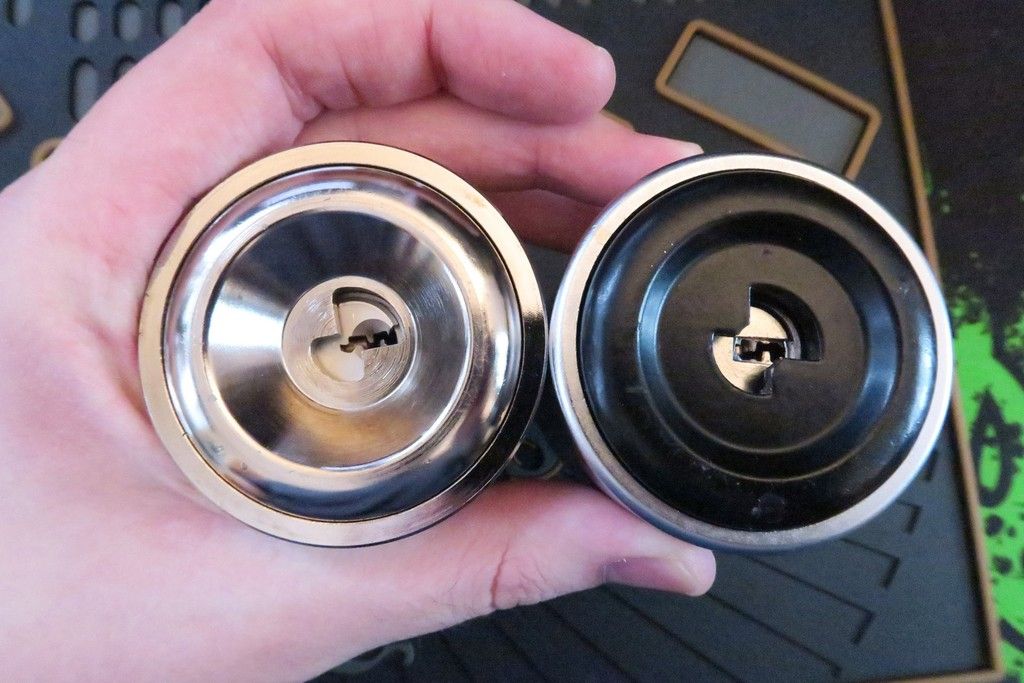
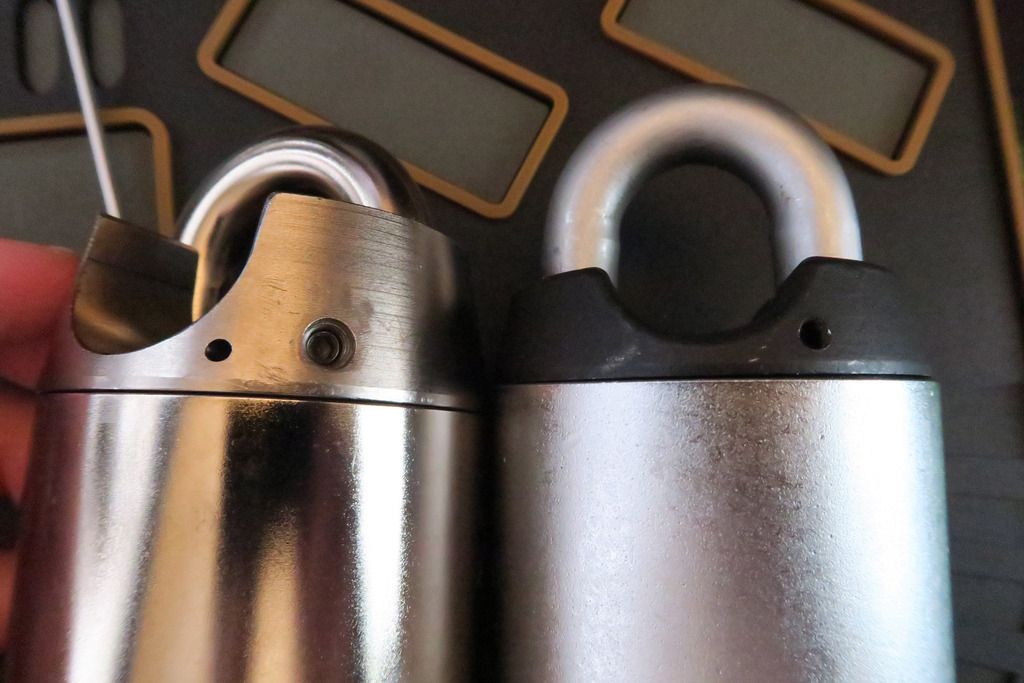
Bottoms of the locks. As previously mentioned, the older semi-closed lock has the stainless steel shiny bottom whereas the newer Rota has this black bottom. There is also a difference in the depth of the recess cone as you can see - likly the reason that the right lock is able to take an actuator add-on between the cylinder and back of the lock. The small divot at the bottom of the right lock was a scratch that I originally believed to be white paint but later realised was a scratch in the black material, which IS the paint - I believe that the metal is the same or similar underneath the paint as with the left lock. I did colour in this scratch with a sharpie which worked quite well to cover up the scratch! The left lock is using an Abus E60 pin tumbler cylinder whereas the right hand Rota is using the Cisa Astral dimple cylinder.

Image

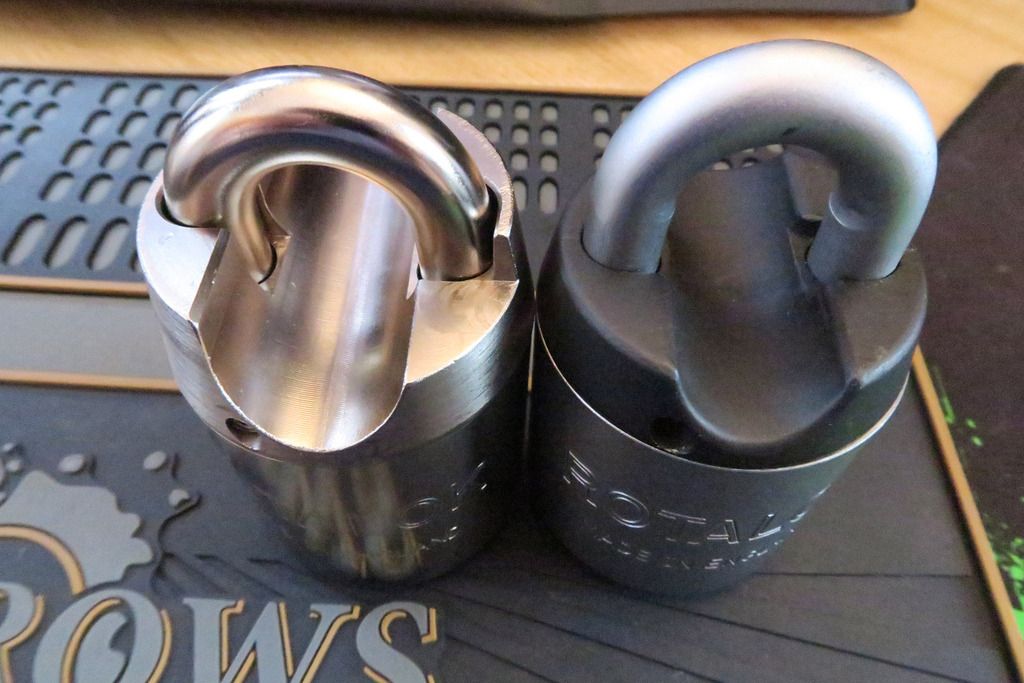
Both locks from above. Here you can see the differences between the open vs semi-closed shackle variants.

Image

Image

Here I've removed the set screw and retaining bar from the shackle retention hole. Notice that like the shackle, the retaining bar on the right lock is thicker than the left one. The set screw is also different - shorter and fatter.

Image

From the end you can see that the open-shackle lock's retaining bar is quite a bit thicker.

Image

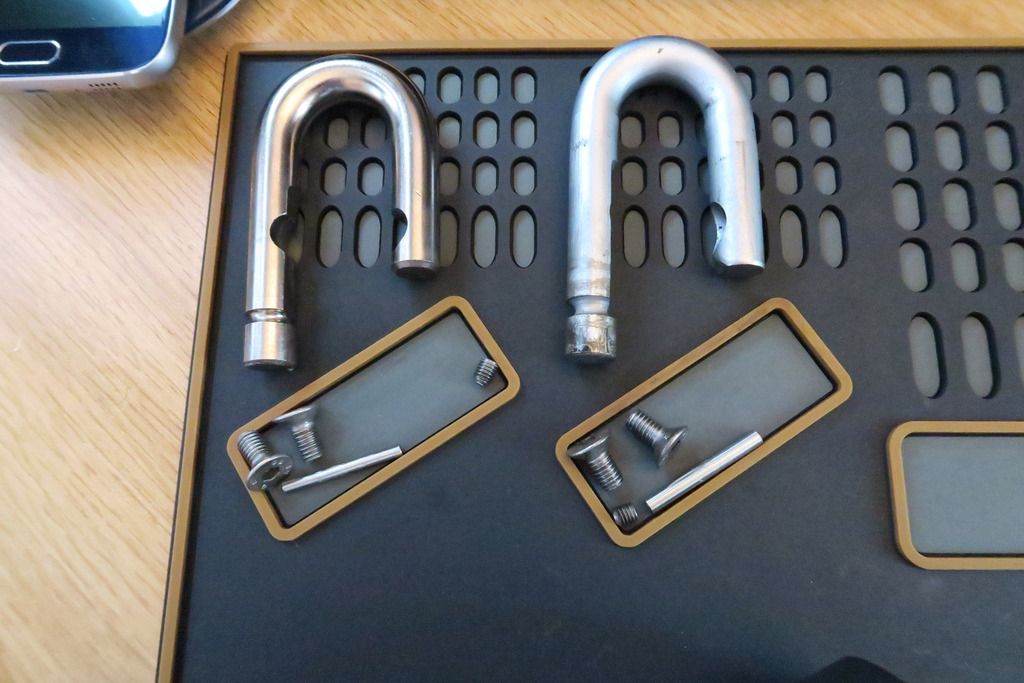
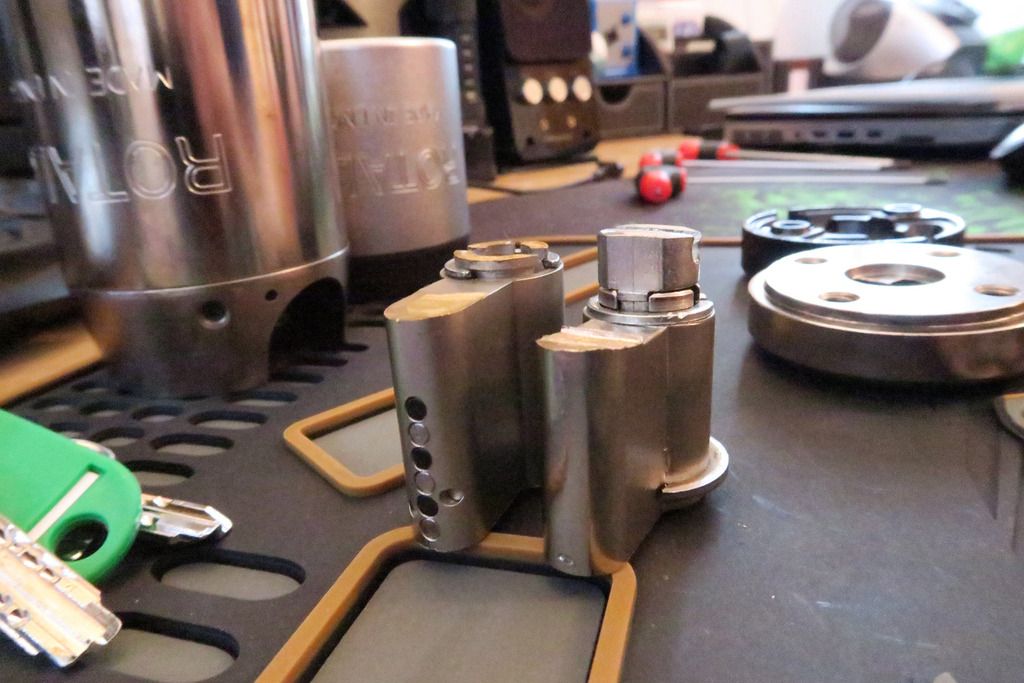
Shackles, Shackle retaining bars, and bottom plate screws removed.

Image

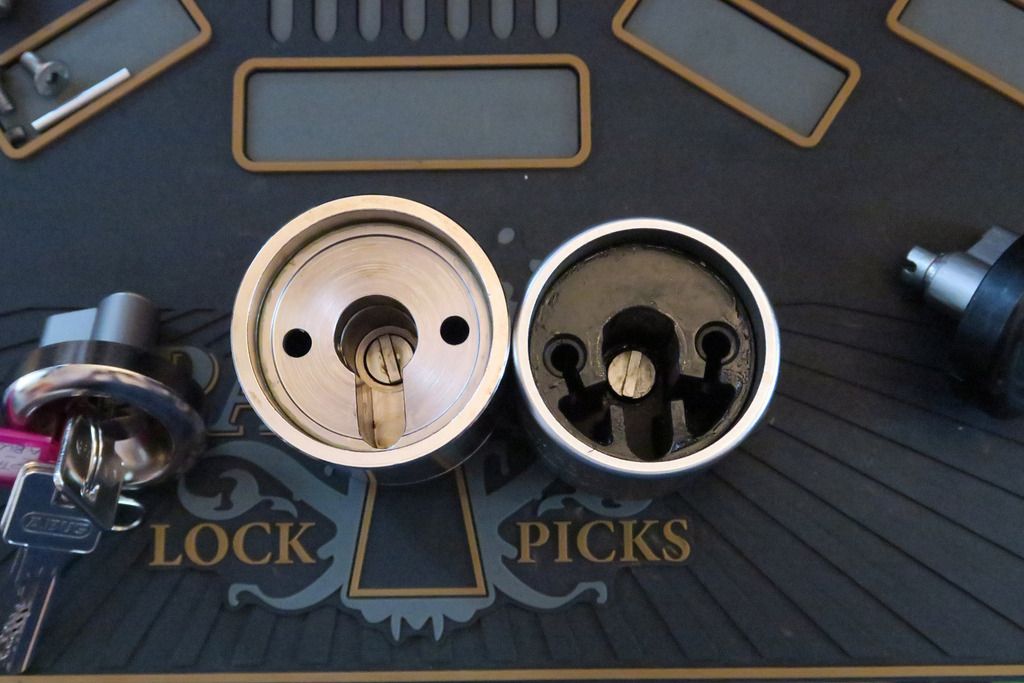
Inside of the locks. As noted in my last Rotalok post, the right Rota has a lot of extra cutouts which I haven't been able to discern the purpose for - odd triangular cutout shapes and such. Note also that the left lock is silver inside whereas the right lock is Black. This is similar to another Rotalok post that I've seen, but different as that one had two stepped height cylinder cutouts, and not those weird side triangles. The rearmost actuators seem more or less the same.

Image

Both bottom plates and cylinders from the side. Note the rear cam interface on the upper (open shackle) cylinder. We'll get to that!

Image

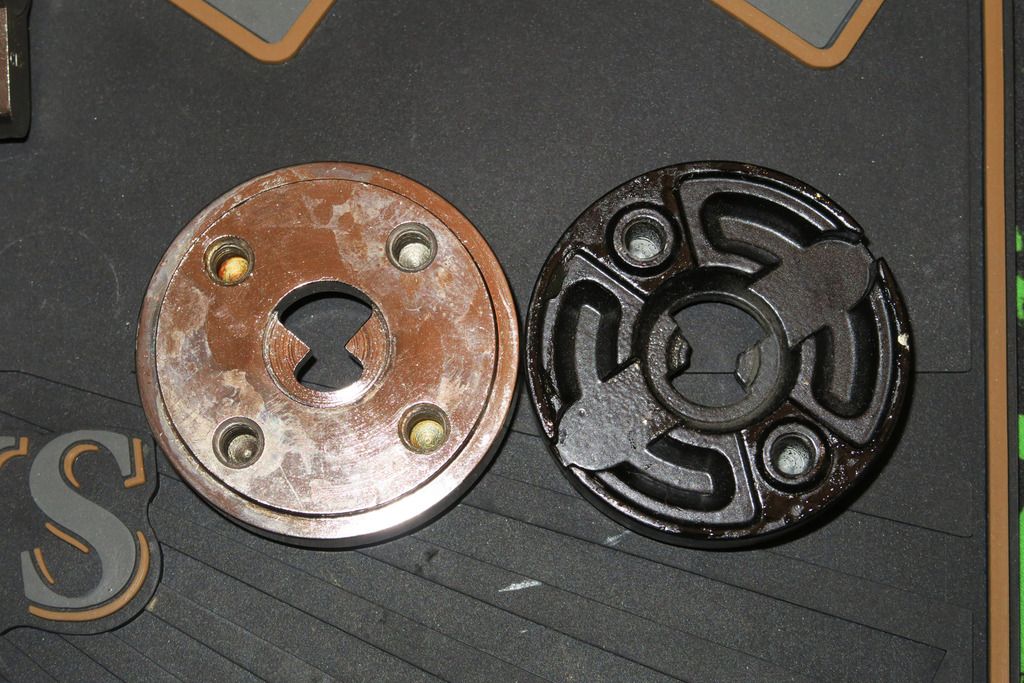
Noth bottom plates, side-by-side. The black/right one (open shackle lock) is at least similar, if not identical to the other one of these I've seen on the web. I've not seen one like my left hand bottom plate - the problem is that because it doesn't include a Euro profile cutout, cylinders cannot sit flush in here without either having a very sticky-out cylinder end, or filing away at the front of the bible, as is the case on the cylinder that came with mine.

The black bottom plate clearly makes more sense, and I'm wondering if the left one is an "alpha build" before they'd figured out what worked, whereas the right one was created after feedback concerning adding cylinders to these. I'd be very curious to take a look at Insight's identical all-silver semi-closed locks, since they look the same as this one from the outside yet the site reckons will take those cam modules, which I don't believe this one will.

I'm not 100% sure of the purpose of those semu-circular cutouts on the black plate which intersect with the cylinder cutouts. I'm guessing it's something to do with the strange triangular cutouts in the body.

Image

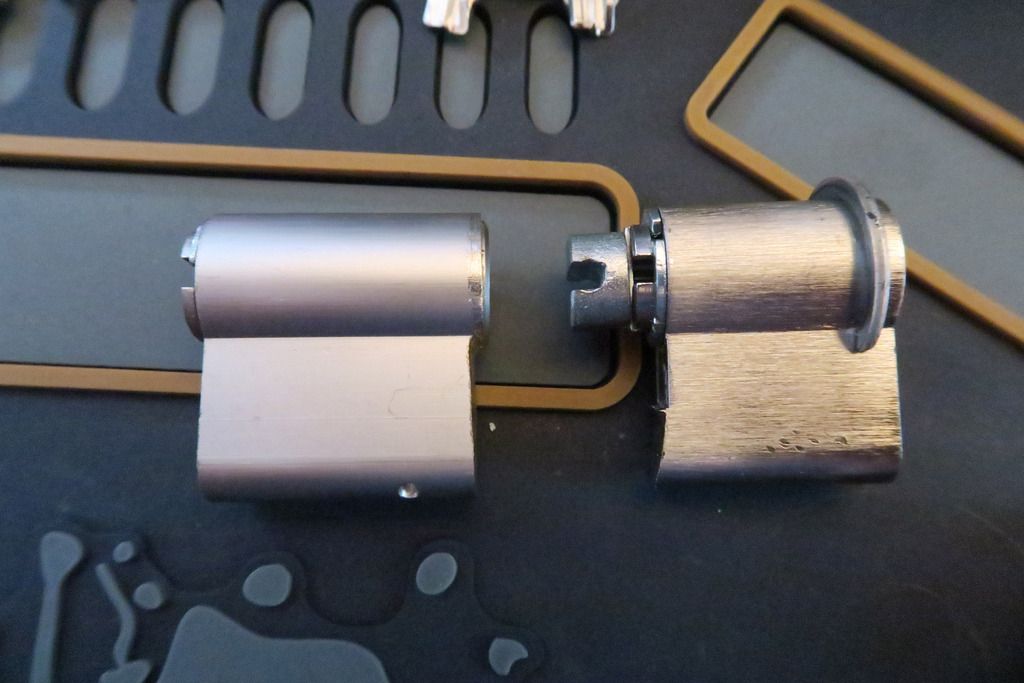
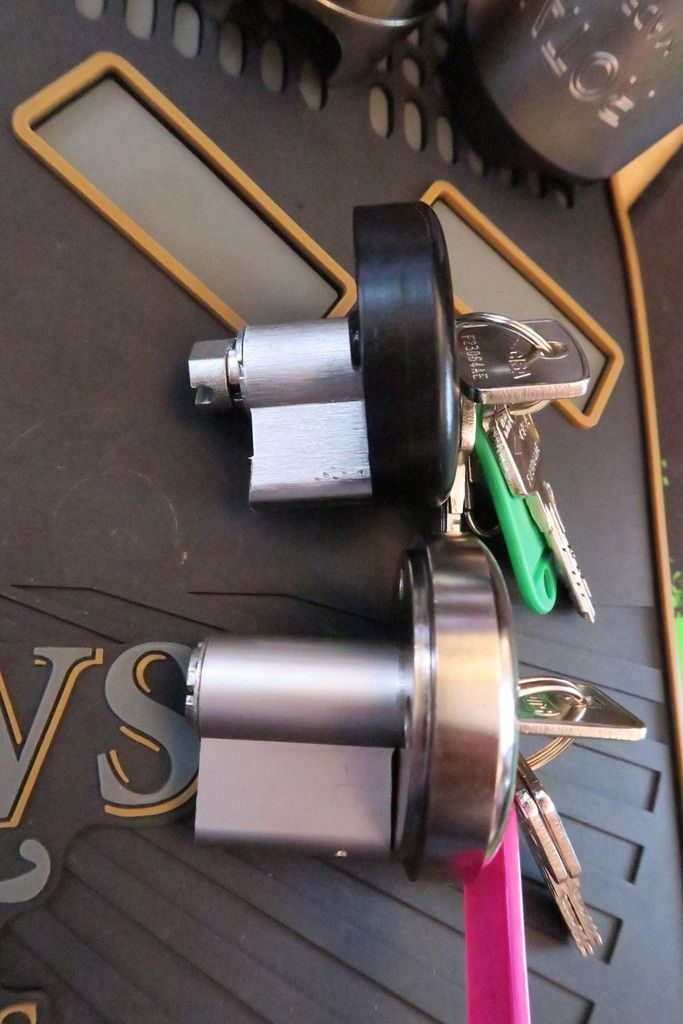
Both cylinders next to each other - left is from the semi-closed and right is from the Open. From here we can tell a few things:

1. The right Rota takes a Cam interface as seen here. The left one cannot and does not fit one of these.

2. You can tell from the slanted back of the bible on the right cylinder that it has been cut to size - either from a double Euro or a single Euro with standard Euro actuator. It does fit fine though. Although you can't really tell in this pic, the same is true of the left cylinder.

3. Near the front of the right cylinder on the plug area you can see a metal "halo" ring has been added, likely some kind of C clip or similar. I'm not sure if this was added at the Cisa factory, is an official addon piece at the Rotalok factory (or cylinder fitting kit supplied by them), or was simply DIY'd on by a third party. It serves the purpose of holding the front of the cylinder steady in the bottom plate, whose cutout is not quite the right size or shape for this. It seems that no matter which Rota I examine, they all need a bit of DIY and bodging to work!

4. You'll notice that material has been removed from the front of the bible on the left cylinder whereas the right one has not been filed at all. I assume that's due to the cylinder cutouts in the bottom plate.

Image

From the back you can see the flatter but still filed away rear of the left cylinder vs the also filed down right one.

Image

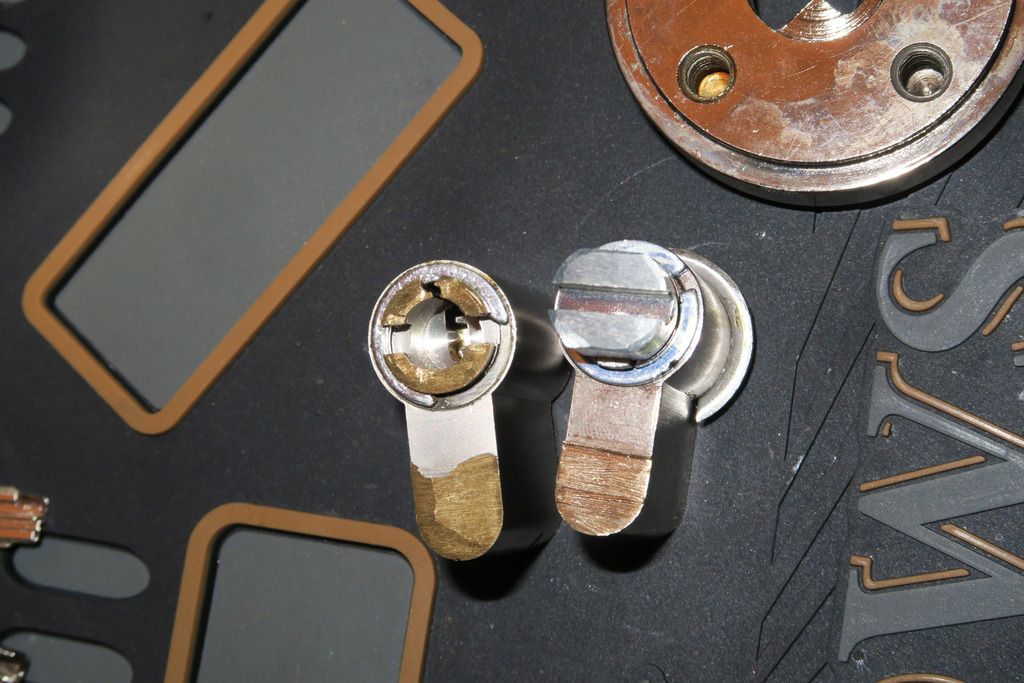
Backs of the cylinders, where you can also see how they have been filed down. You can also see that the rear of the left core's actuator has been filed down, whereas due to the cam interface this wasn't needed for the right cylinder.

Image

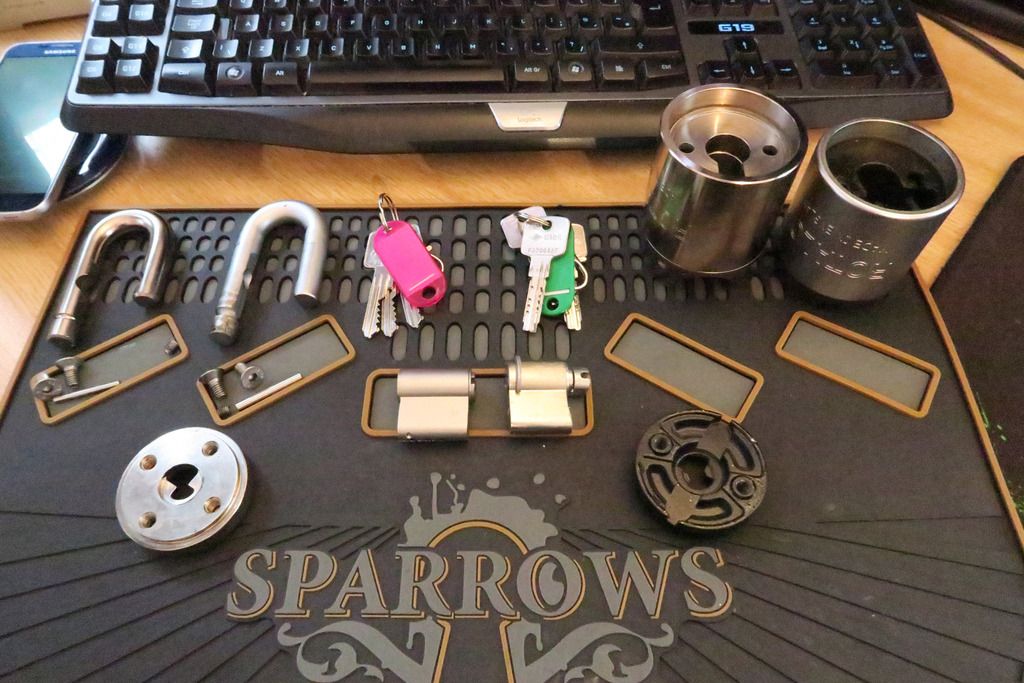
Everything laid out - semi closed shackle / silver / older Rotalok stuff on the left and open shackle / silver and black / newer Rotalok stuff on the right.

And that's it for this update - and is my last update for now! I do have other ideas in the works as well as other locks on the way so keep a keen eye out as I hope to be covering more stuff in the future!

For now though, thank you for following my progress and I look forward to sharing more with you in the future!
<<

LocksportSouth

User avatar

Active Member

Posts: 369

Joined: Wed Dec 02, 2015 6:51 pm

Location: UK

Post Wed Apr 20, 2016 2:46 am

Re: LocksportSouth's Stash

Hey again all!

I’ve recently acquired some more interesting stuff so here’s some pics and details!
First up, here’s a cool dual-custody padlock from China:

Image

The “Main” padlock key (located where you’d expect) is really an operator key, as the lock on the front of the lock (pictured) actually controls the bottom cylinder and stops it moving. The bottom key is 5 pin and the front key is 4 pin. The lock is branded “GHS CHINA”

Image

Here you can see both keyways. It’s an interesting lock:

Image

You can insert the bottom key only up until this point. It’s hard to see inside the keyway to figure out what’s going on but the small front lock extends some kind of bar or rotational doodad into the keyway, blocking the main key from going all the way in.

Image

You must instead insert the front key...

Image

And turn it....

Image

And then the bottom key inserts and operates normally:

Image

Key comparison:

Image
<<

LocksportSouth

User avatar

Active Member

Posts: 369

Joined: Wed Dec 02, 2015 6:51 pm

Location: UK

Post Wed Apr 20, 2016 9:02 am

Re: LocksportSouth's Stash

Today I’ve got another S&G 8077 series lock for you! I won’t be doing any more detailed analysis on how to operate these as I covered all that back in my earlier (I think it was the AB?) post and these all basically work the same. Today we’re looking at the 8077A:

Image

Image

Image

Open:

Image

With the back off:

Image

With instructions and change key:

Image
PreviousNext

Return to Your Lock Collections

Who is online

Users browsing this forum: No registered users

Don't forget to visit our sponsors for all of your lockpicking needs!
Powered by phpBB © 2000, 2002, 2005, 2007 phpBB Grop
"CA Black" theme designed by stsoftware