FAQ  •  Register  •  Login
UKLockpickers.co.uk Lockpicking supplies such as Lockpicks, tools, and more! COMMANDOLOCK.COM Military grade padlock systems lockpickshop.com A source for lockpicking supplies such as lockpicks, locksmith tools, and more!

LaGard Padlocks

<<

GWiens2001

User avatar

Lock-Goblin-Gordon
Lock-Goblin-Gordon

Posts: 3795

Joined: Thu Oct 25, 2012 9:05 pm

Location: Arizona, United States

Post Sat Aug 08, 2015 3:59 pm

LaGard Padlocks

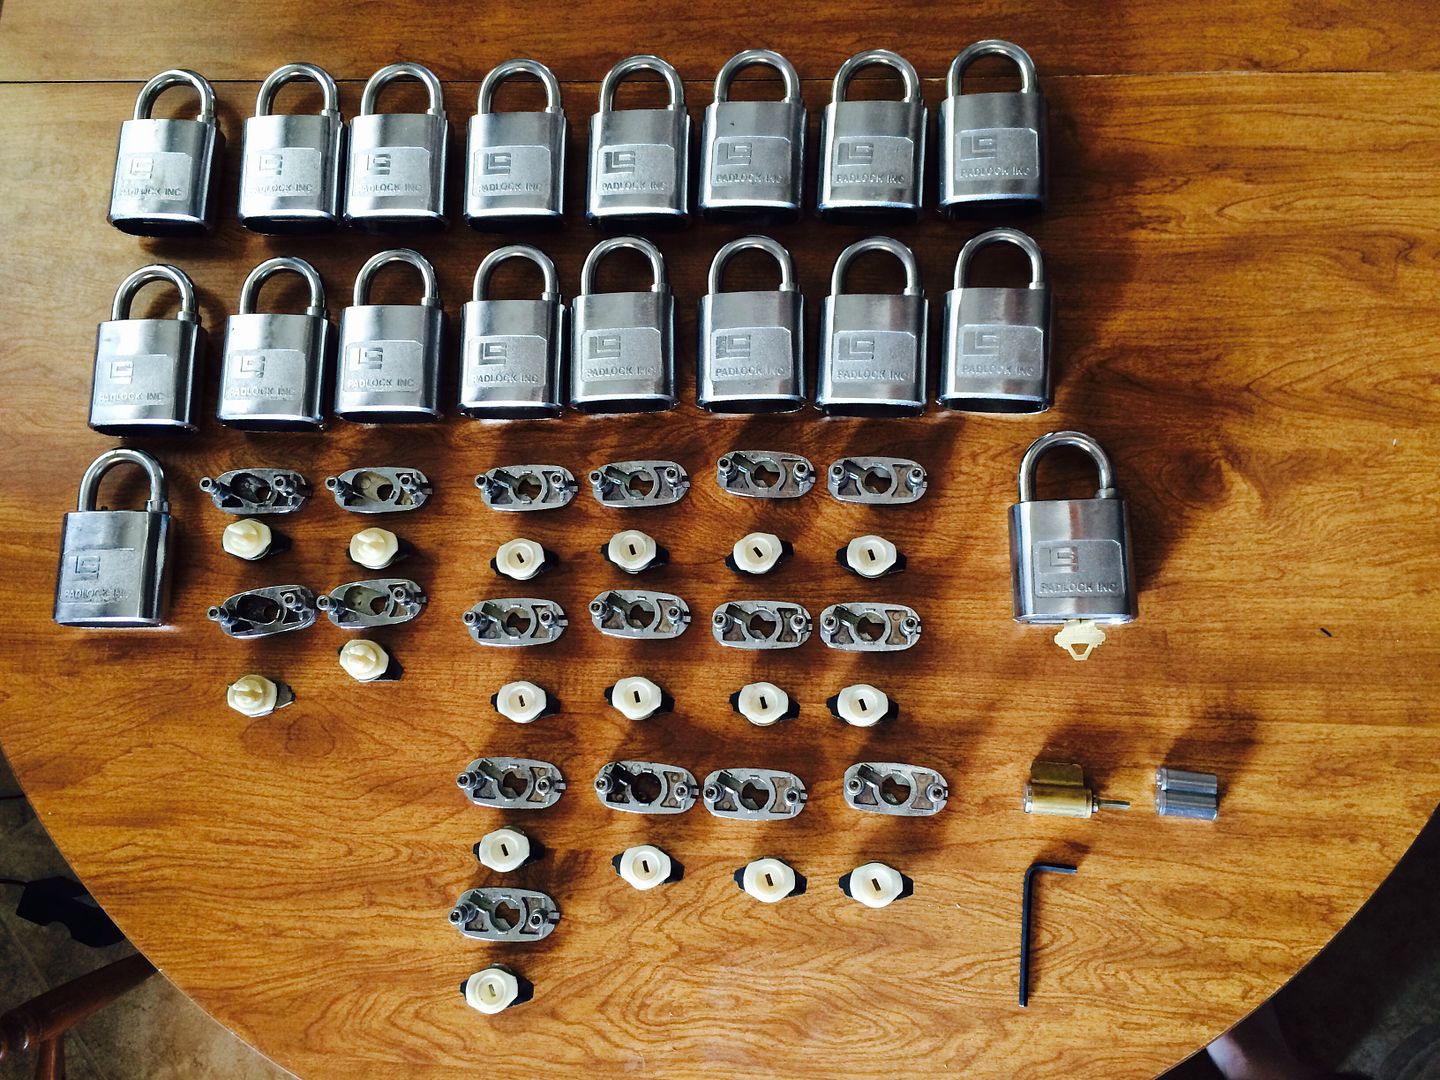
Had the privilege of receiving a batch of LaGard padlocks for someone else, and got to play with them a little. This will be an intro to the padlocks and how they are assembled.

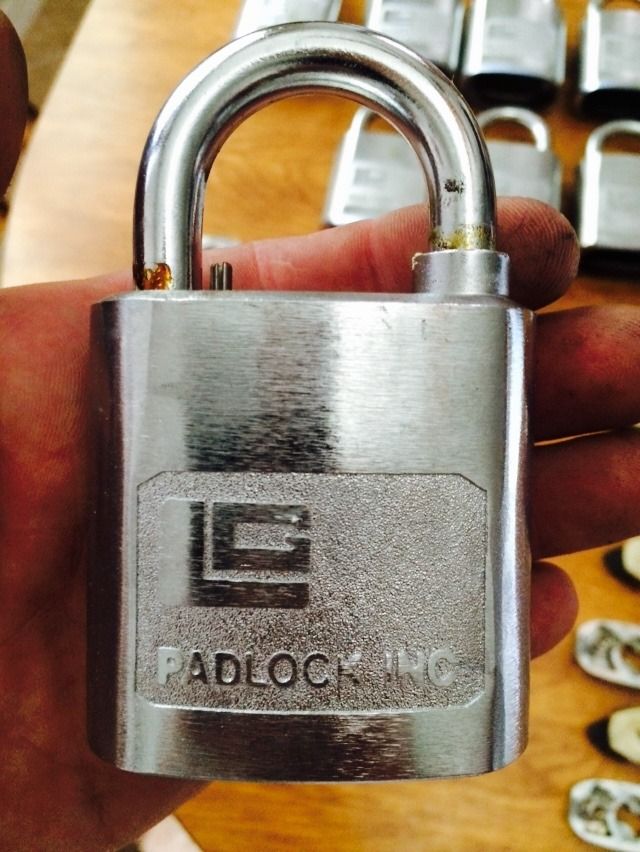
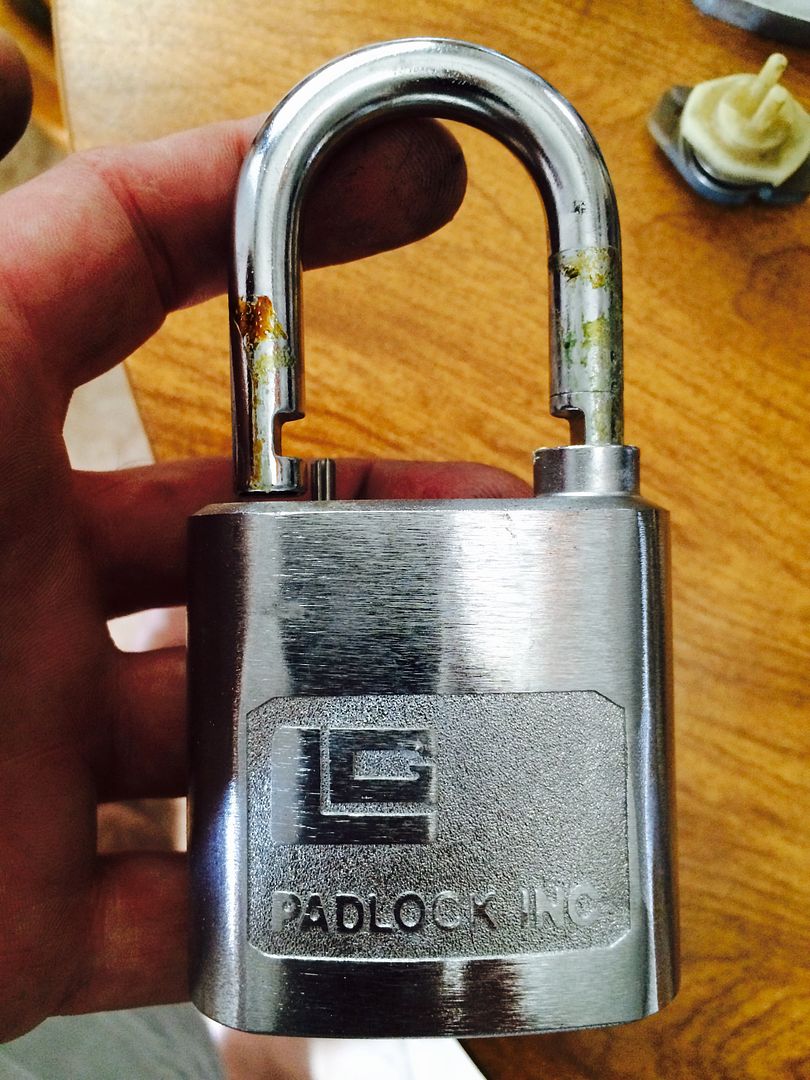
Here is what they look like.

Image

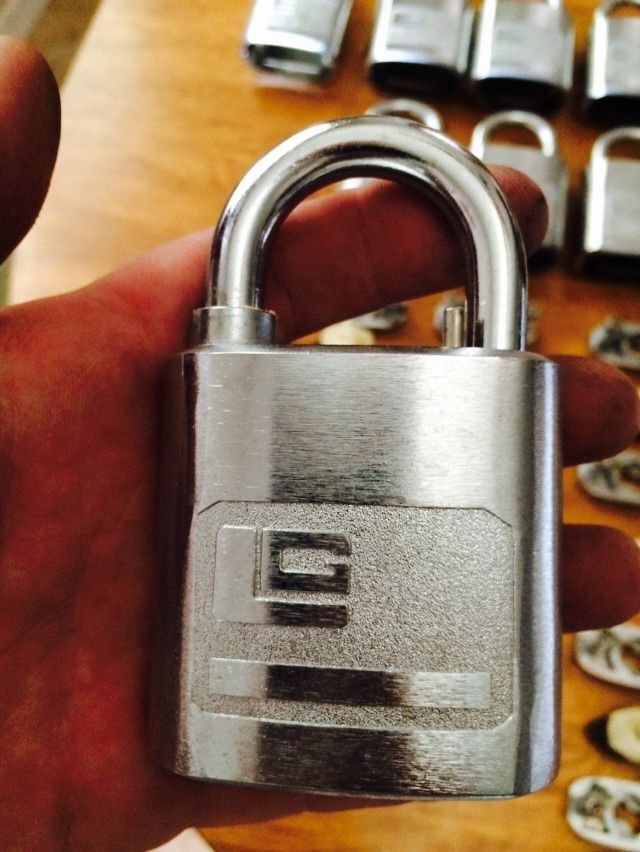
There are two versions of this lock, but the lock bodies and shackles are all the same.
Image

Image

Image

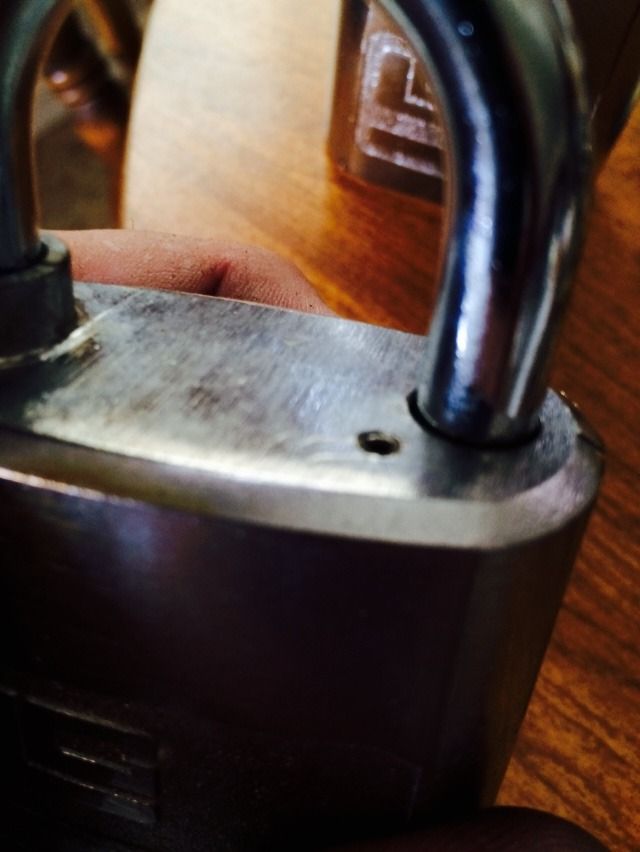
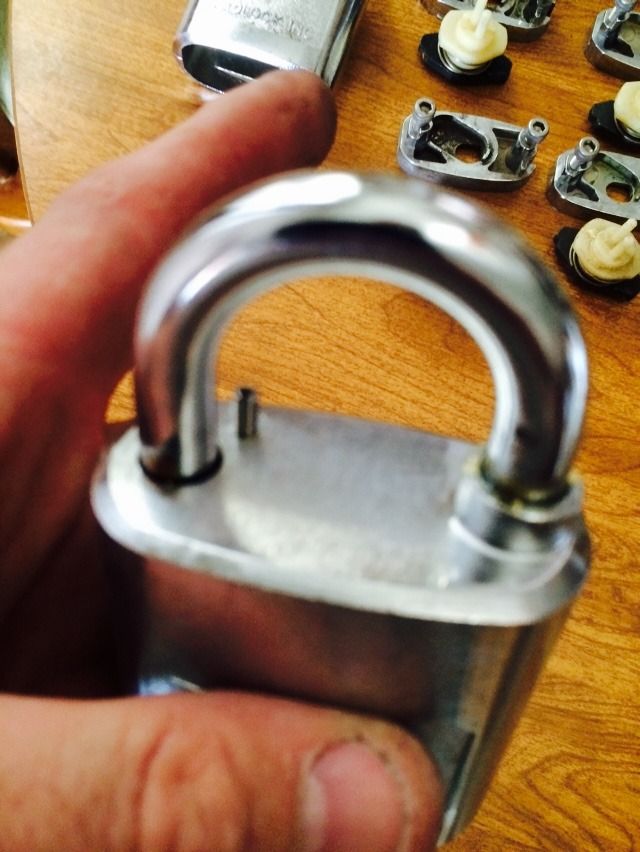
View of the top. Note the roll pin that is up on the upper left, next to the shackle. We will cover the purpose of the roll pin later.
Image

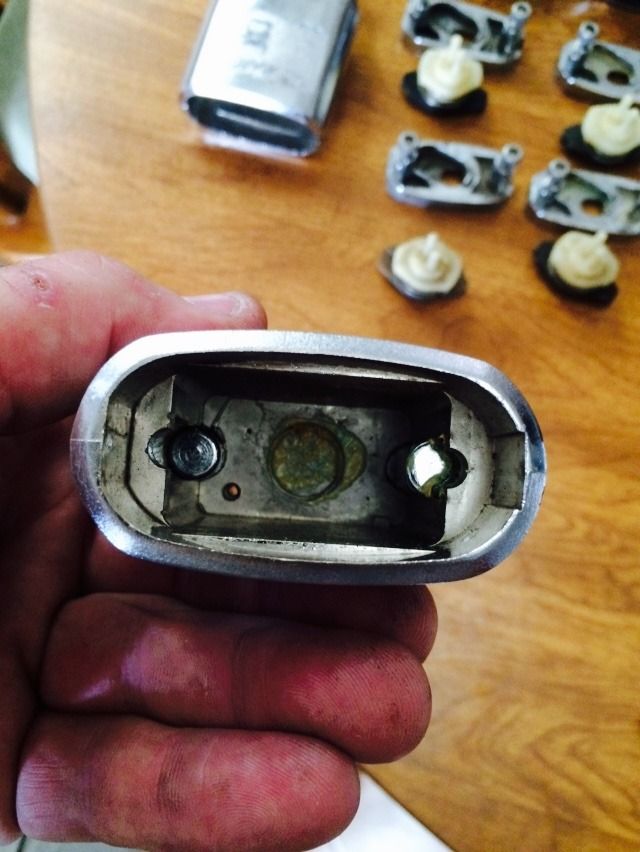
Inside the lock body:

Image

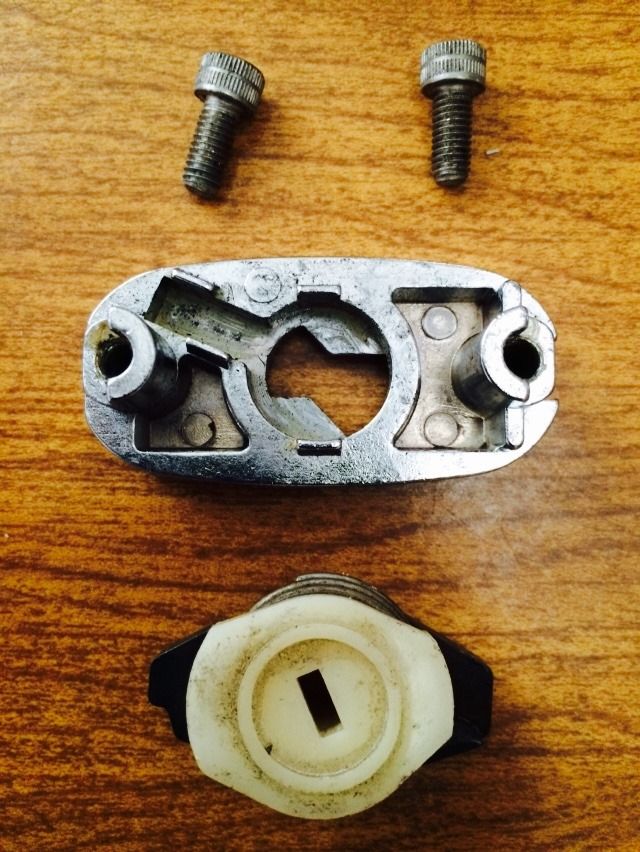
Here we have the remaining parts of the lock. The screws that hold the bottom plate, the bottom plate, and the cam/actuator.
Image

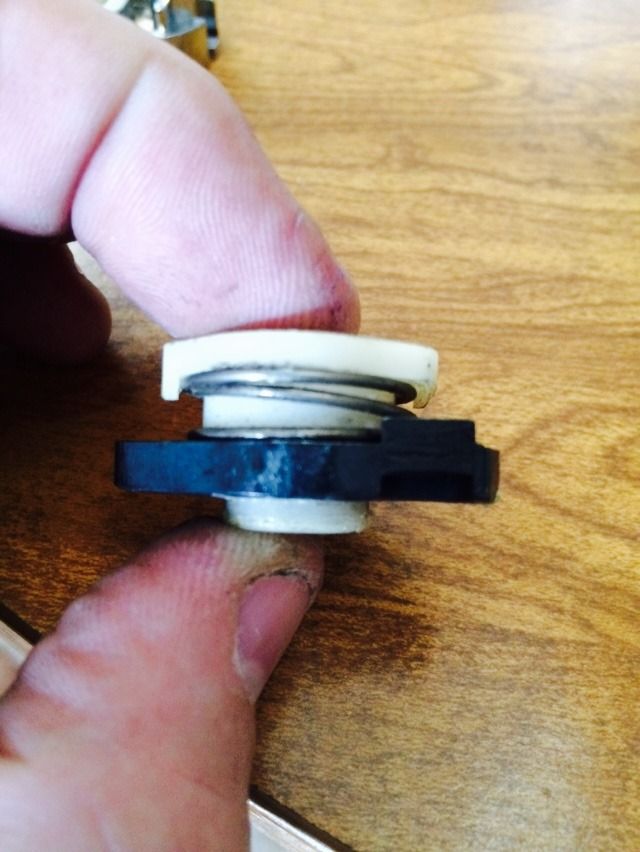
The side of the actuator (which also locks the shackle in place).
Image

Seen from the top, you can see that this lock can not be shimmed open.
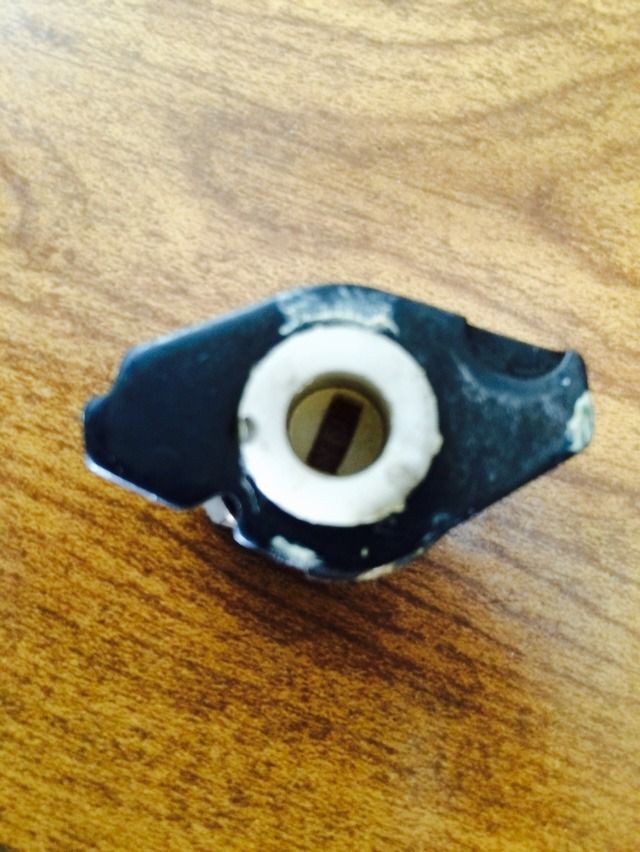
Image

But there is one thing that is undoubtedly being asked by by all of you. Where is the lock cylinder? The answer that... YOU provide the lock cylinder. Here is the bottom plate.
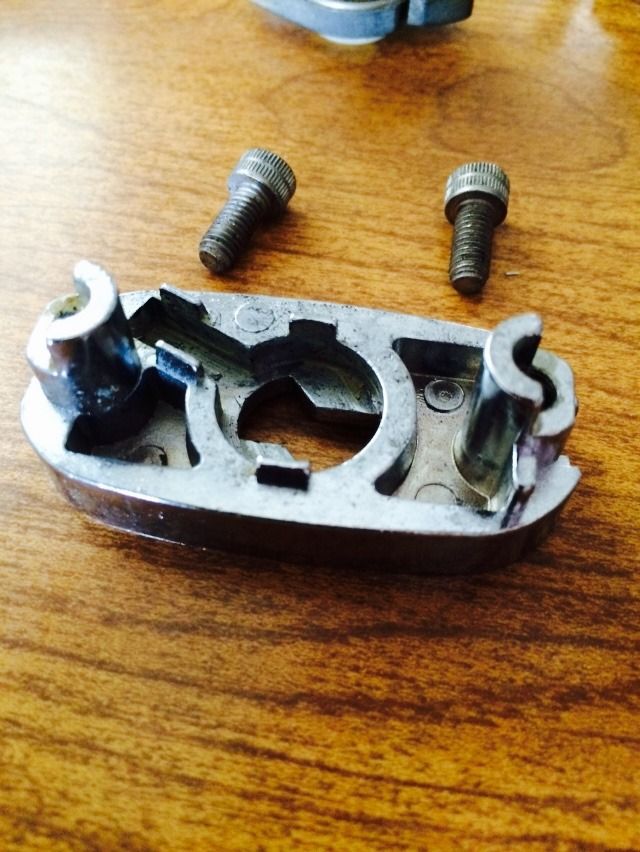
Image

Put in any KIK cylinder you happen to have handy.
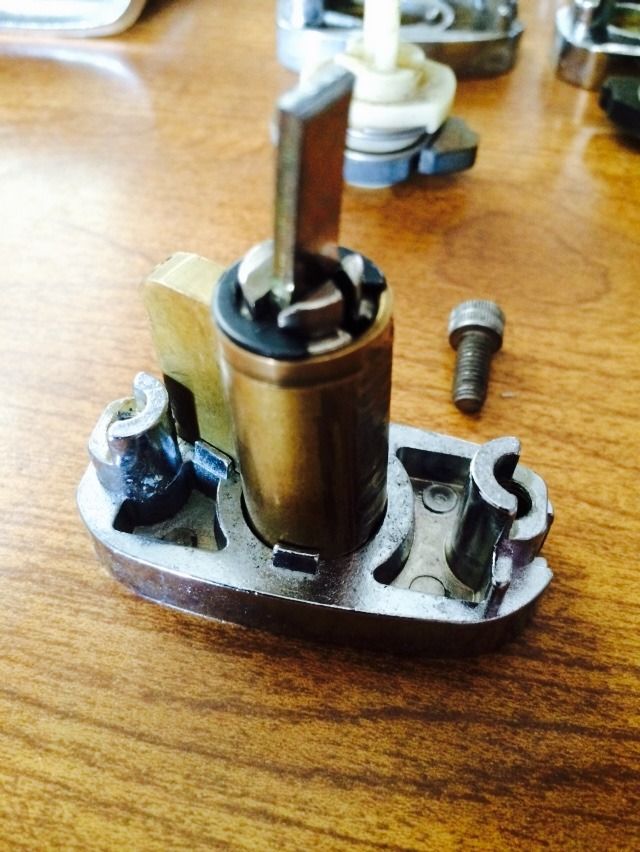
Image

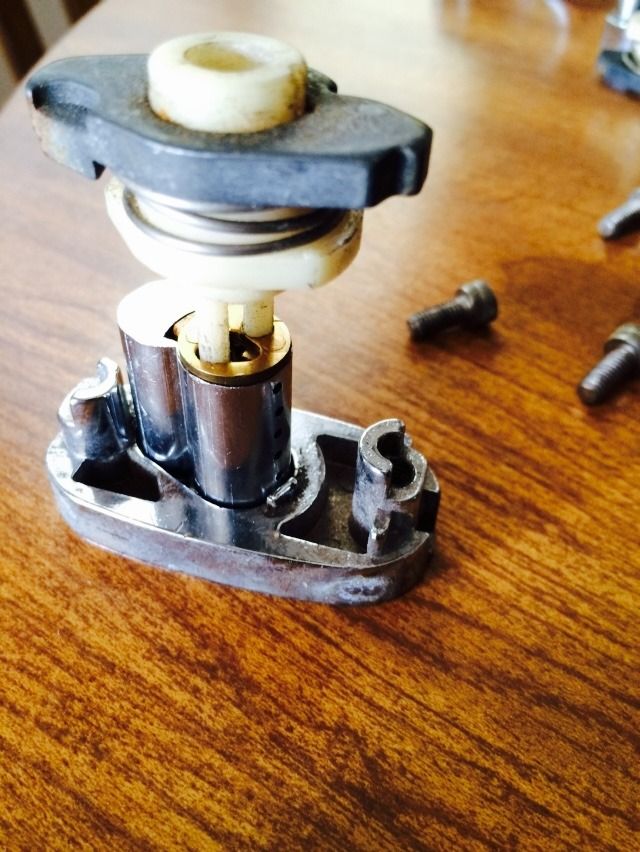
The cam/actuator then fits on the tailpiece of the KIK cylinder.
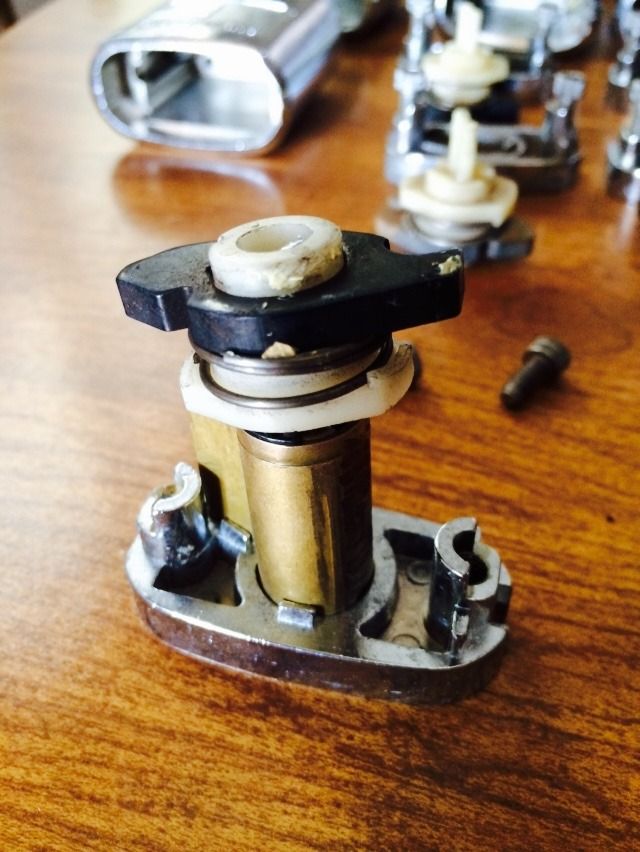
Image

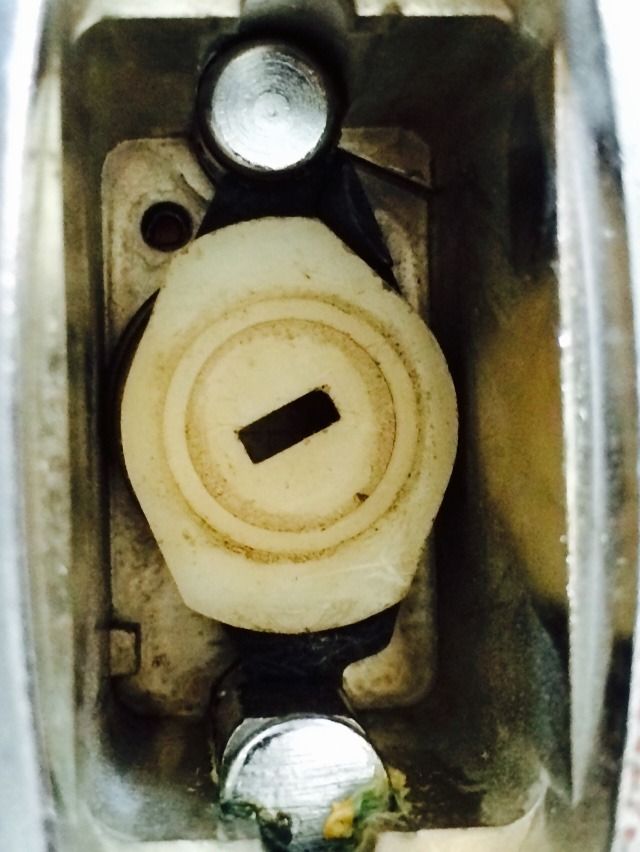
Inside the lock body, here is how the actuator looks in the unlocked position.
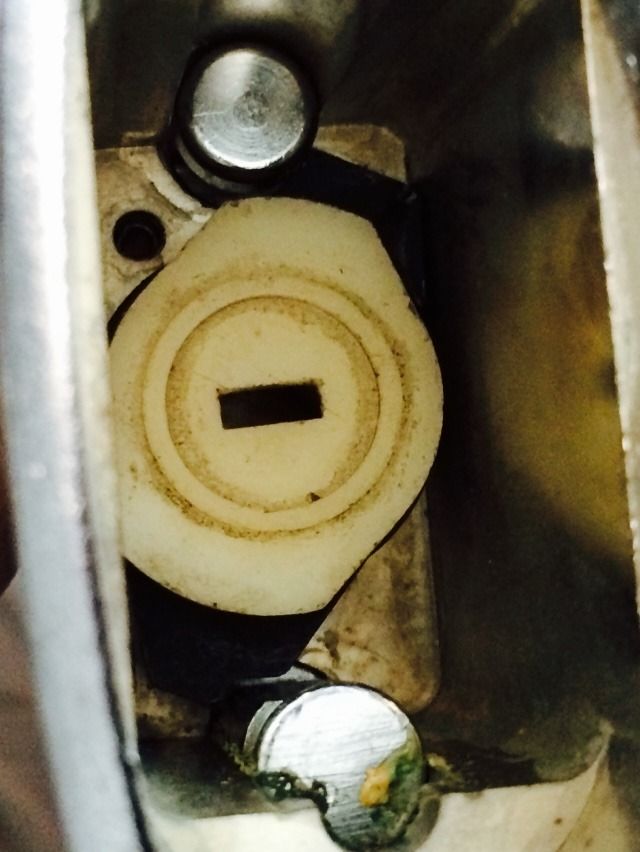
Image

And in the locked position

Image

OK, you likely are now impatiently wondering how to put this lock together. Well, suppose it is time to get with it before there is a riot.

Here is the actuator set next to the lock body. Notice the notched area on the top right of the actuator. That will be located on the shackle heel side of the lock. The view you have of the actuator is the way it will be facing inside the lock body.
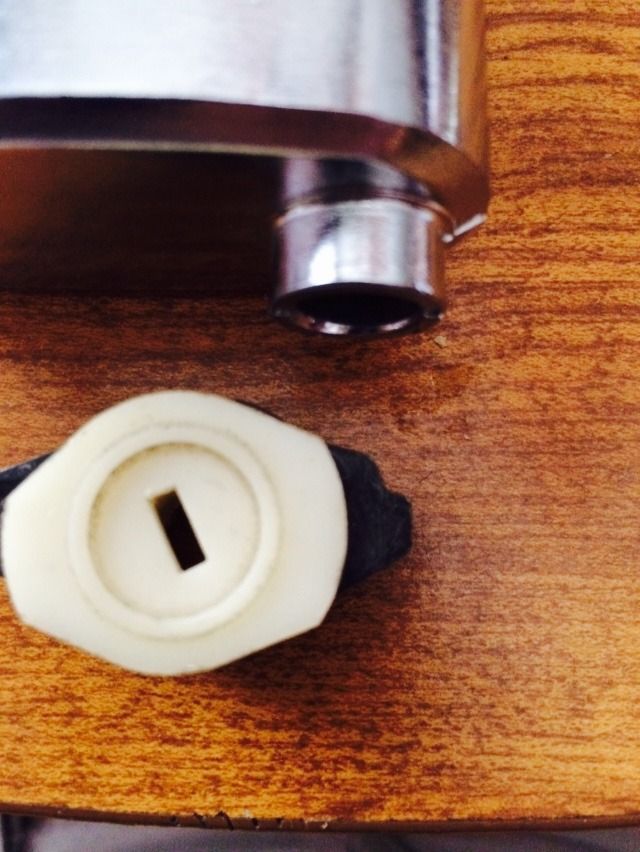
Image

The lock actuator placed correctly in the lock body. The hole for the roll pin is covered by the actuator, but is located at the bottom left. The only clear shackle hole is on the right, and this is where the shackle heel will be installed later.
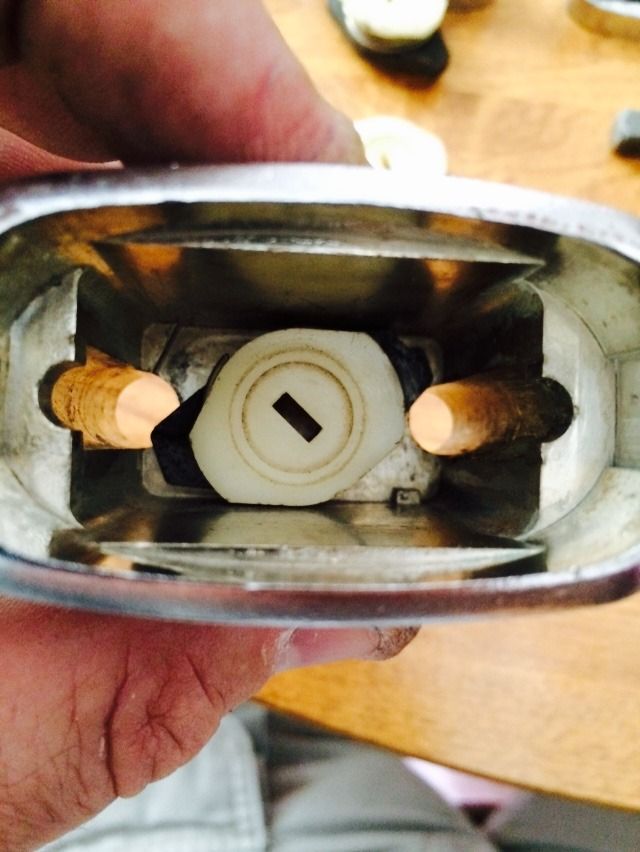
Image

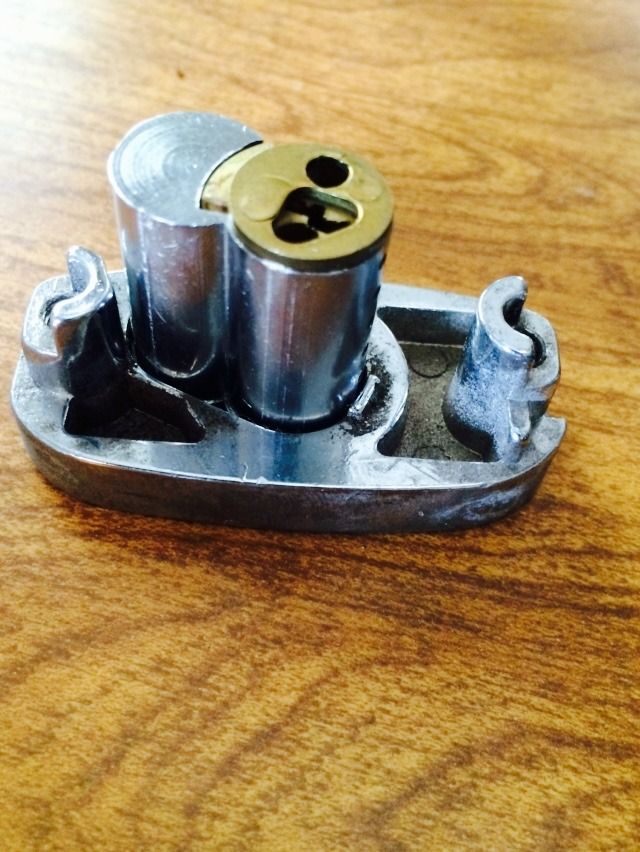
Install the KIK cylinder with the bible facing towards where the shackle toe will be located.
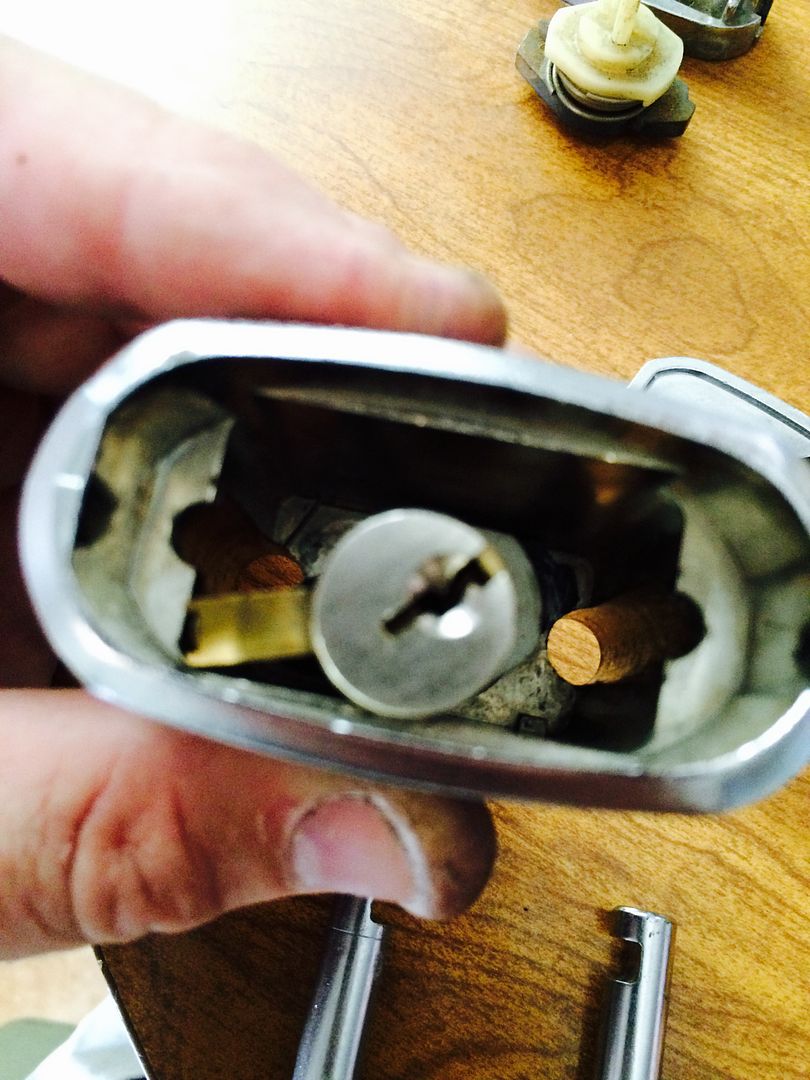
Image

Put on the bottom plate. You will need to shift the KIK cylinder around as you install the bottom plate so it fits into the slot made for it in the bottom plate.

Now take a 4 mm allen wrench to install both of the screws through the shackle holes, securing the base plate, which in turn keeps the KIK cylinder in place.
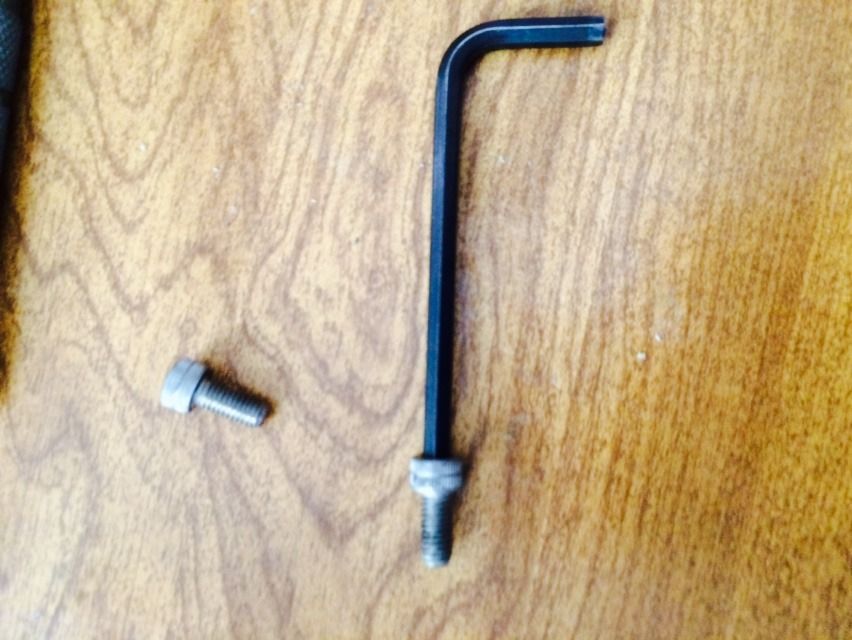
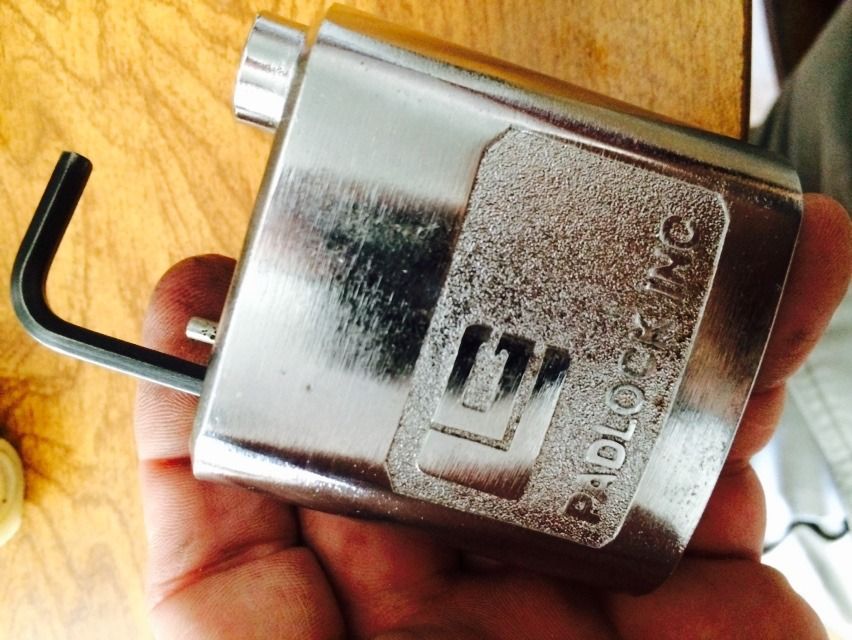
Image

Image

You usually use the key to turn the plug back and forth as needed to position the KIK cylinder. You will also need to turn the plug/actuator once the shackle has been installed.
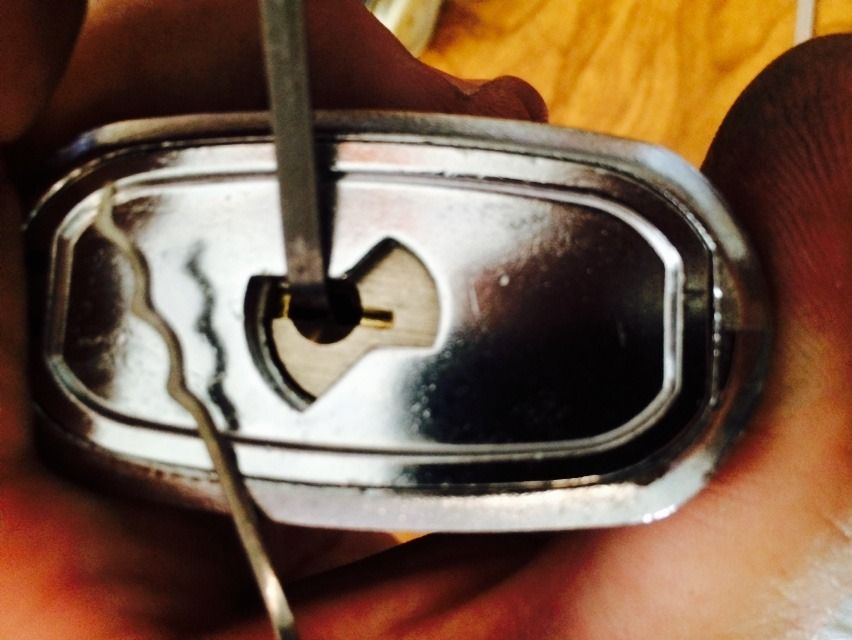
Image

What??? You assume that the closest KIK cylinder to me at the time these pics were taken has a key? :roll: The cylinders with keys are elsewhere, so settled for picking. Tough luck, guys and gals. :twisted:

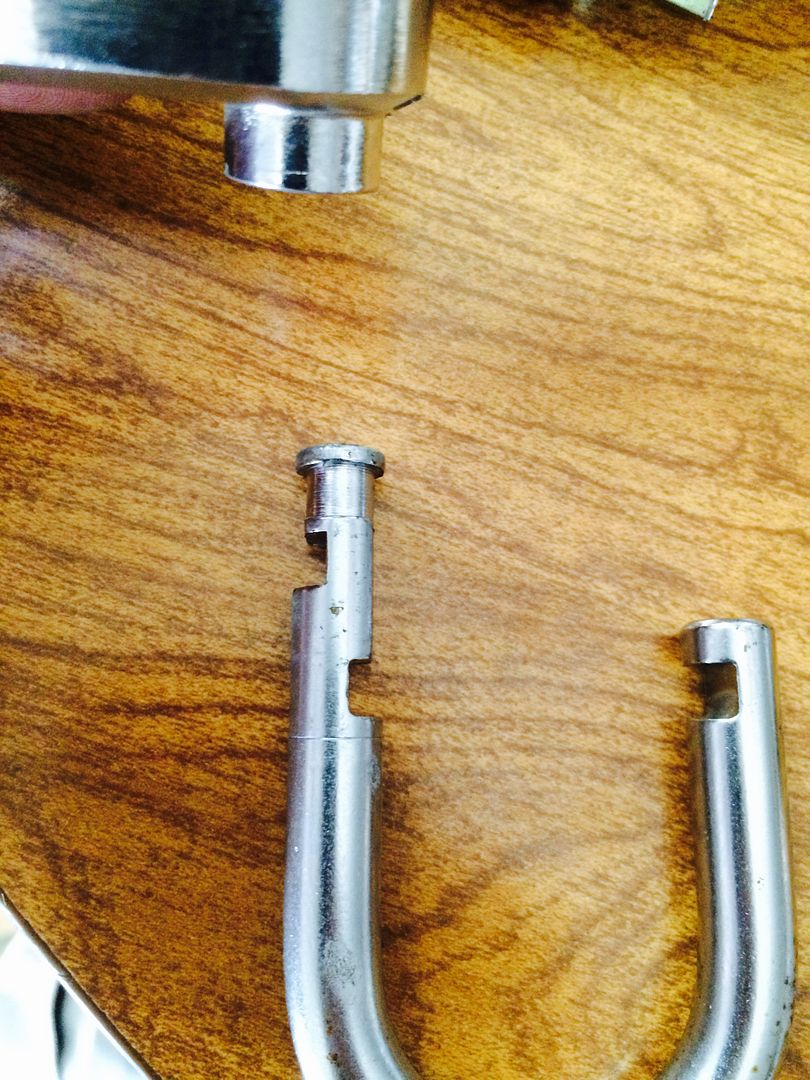
OK, time to put the shackle in place. Here is the shackle.
Image

See the groove the pick is pointing at? That is to mark how far you put in the shackle for installation.
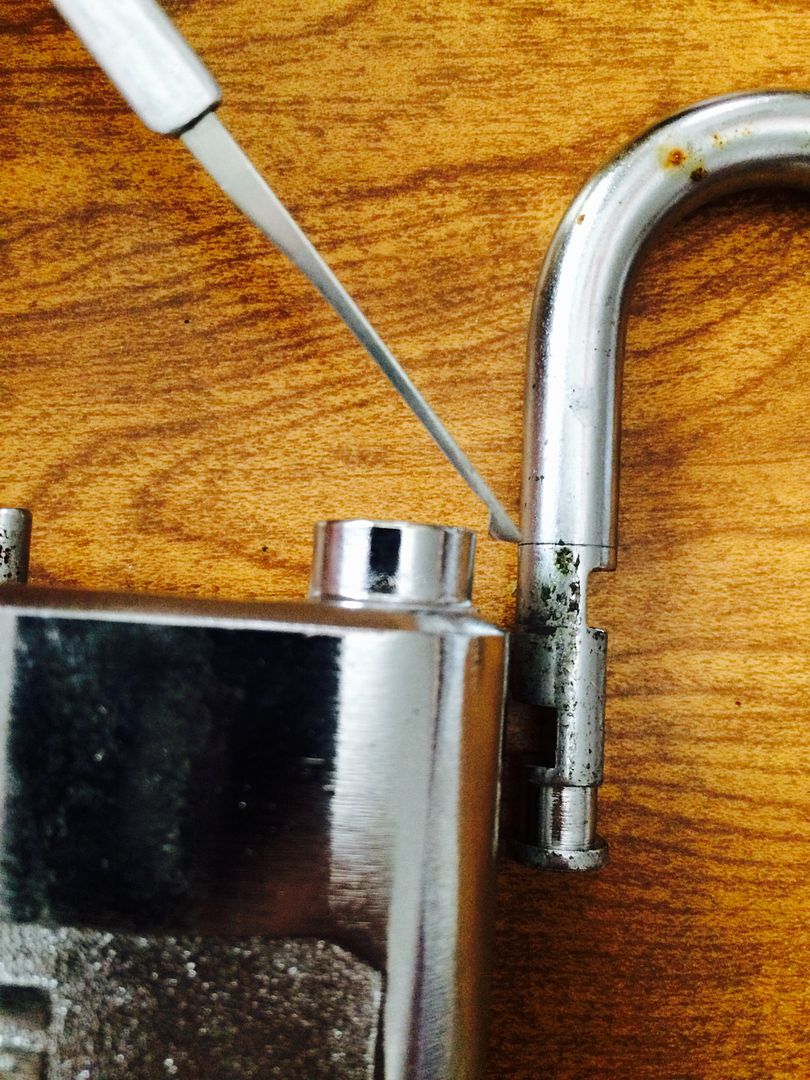
Image

Put the shackle heel as far as that line into the shackle hole with the raised section.
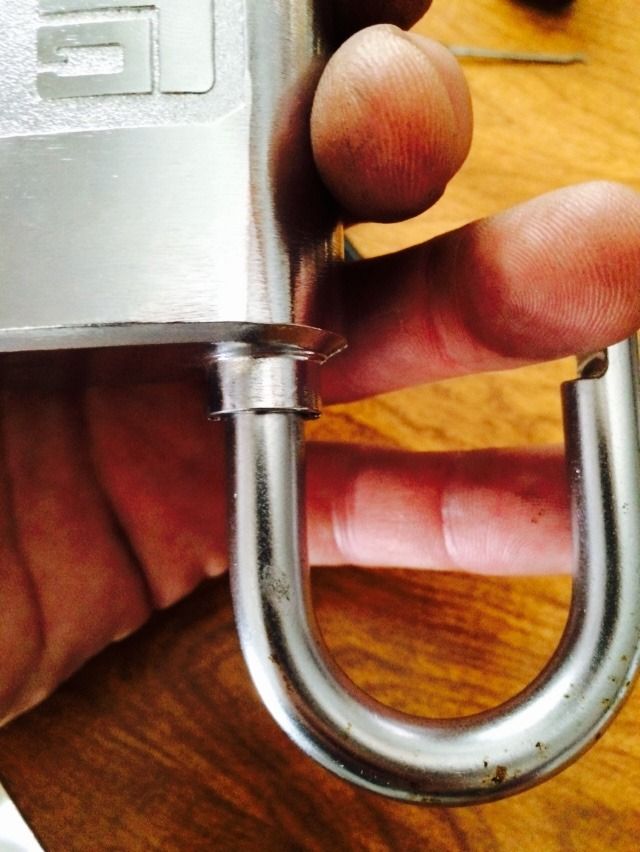
Image

Turn the key (heh heh) to the other direction. The shackle will not fall out now. The lock is now able to work.
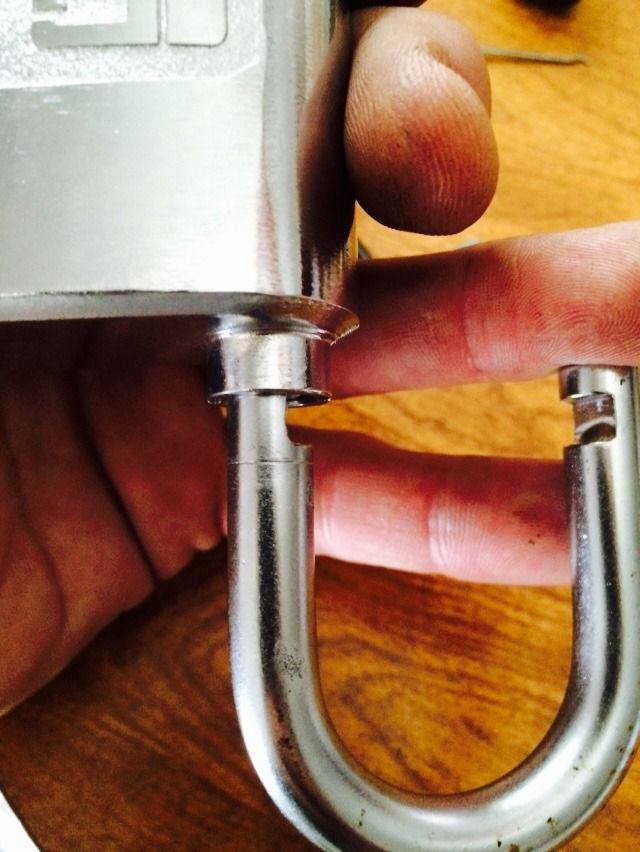
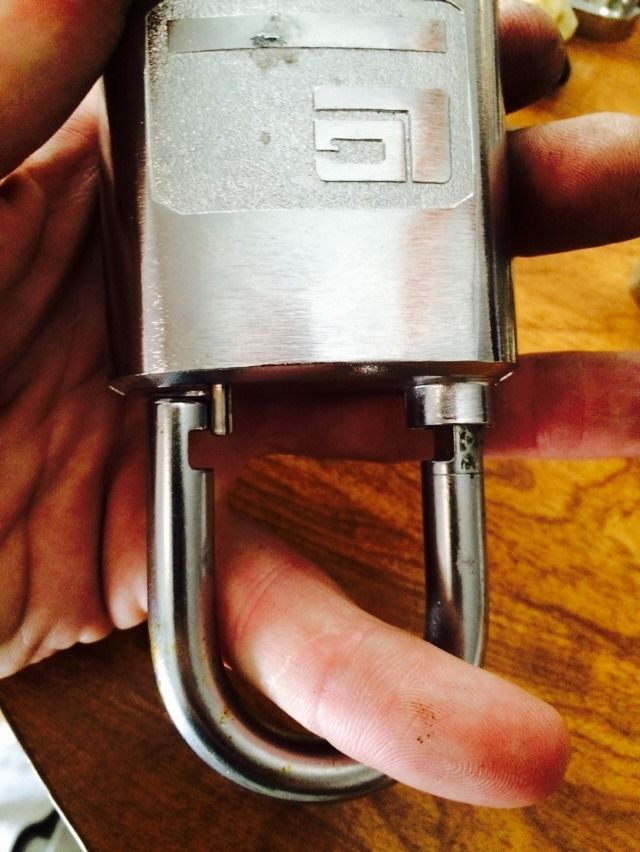
Image

Image

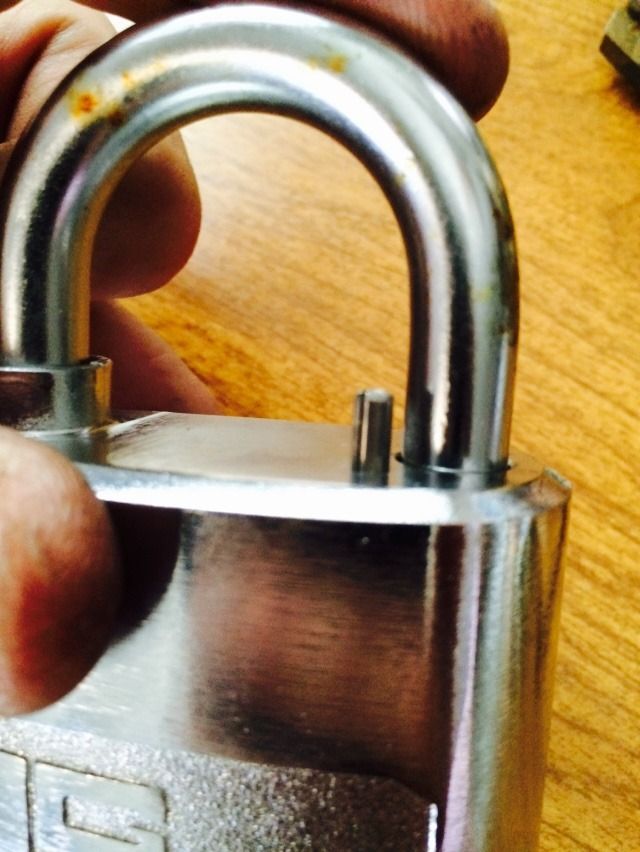
Except for one last step for final assembly. Remember that roll pin?
Image

Tap it down.

Image

Now the lock can not have the actuator turned the wrong way, causing the shackle to fall out.

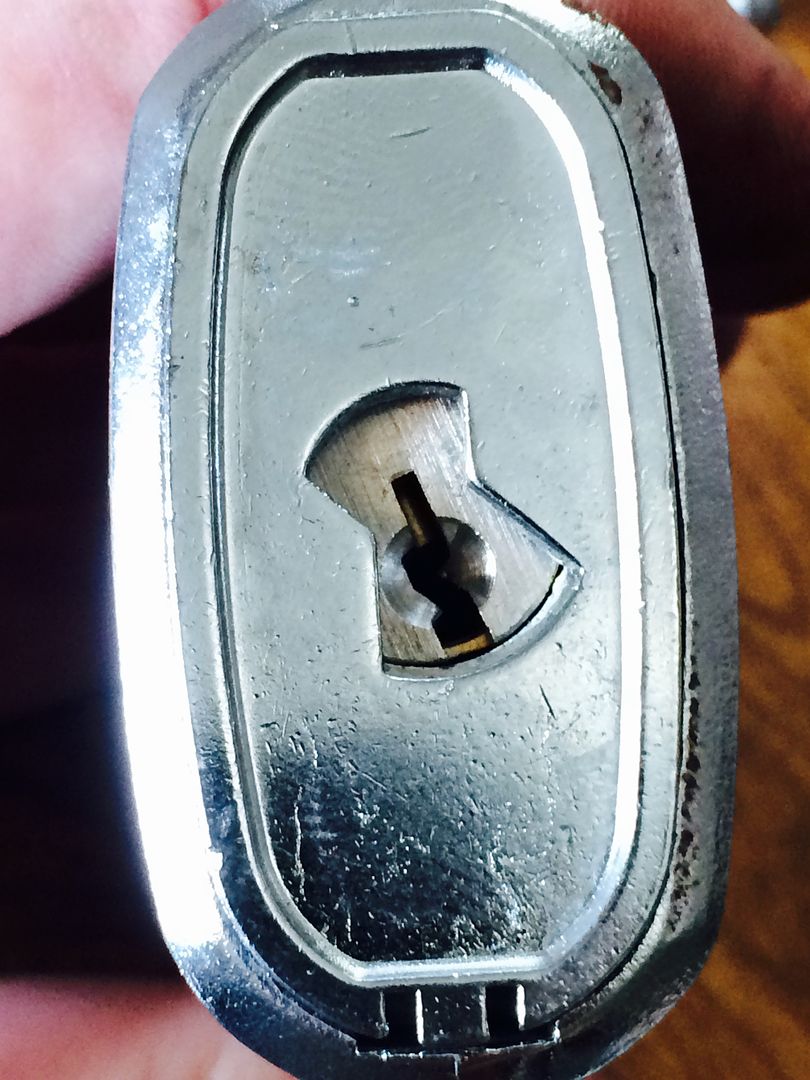
Note that the keyway is centered in the cutout.
Image

Turn the key clockwise, and the shackle opens. (This lock is key retaining). If the roll pin is removed, the key can be turned counter-clockwise allowing for disassembly of the lock. That is why the roll pin is there. :D

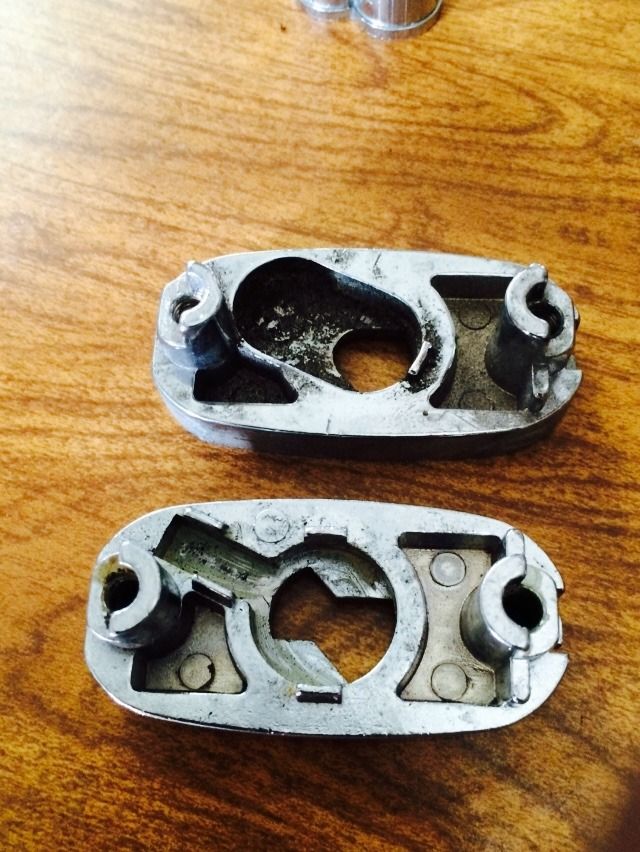
So that is the lock. Except for one thing. The different bottom pieces.
Image

The KIK cylinders are not fitting in there correctly. :evil:
Image

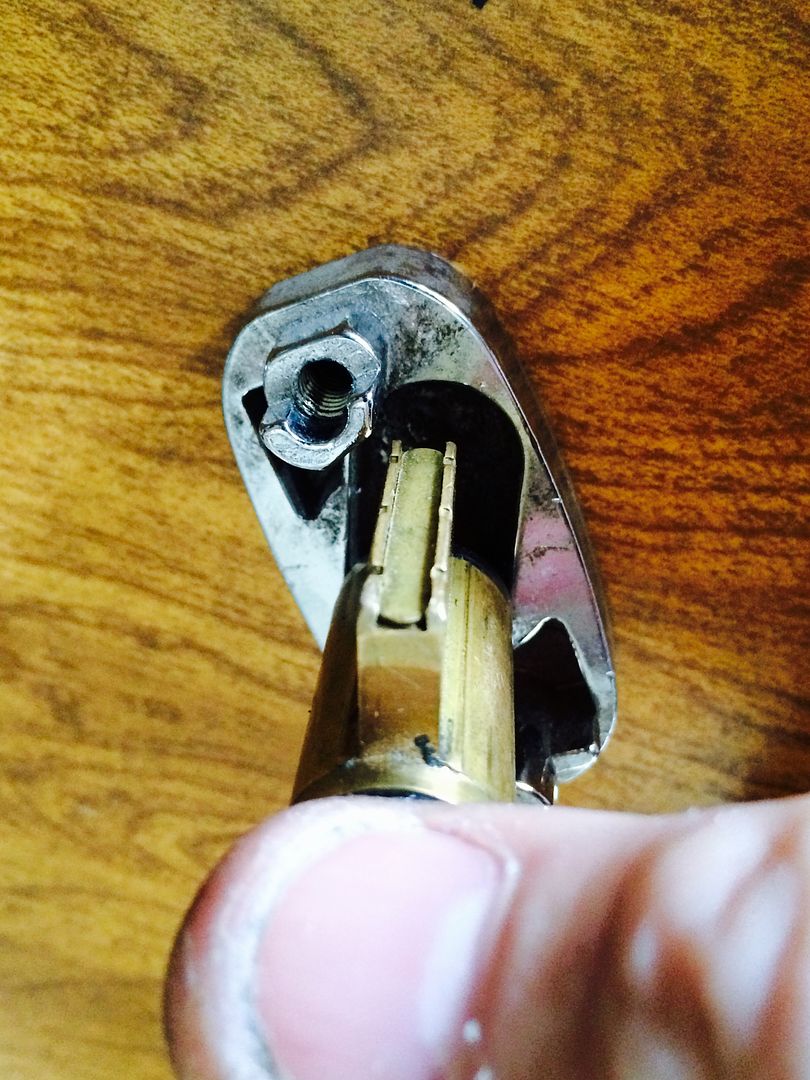
Hmmm. What fits there? SFIC!

Image

The SFIC version requires a different tailpiece/actuator.
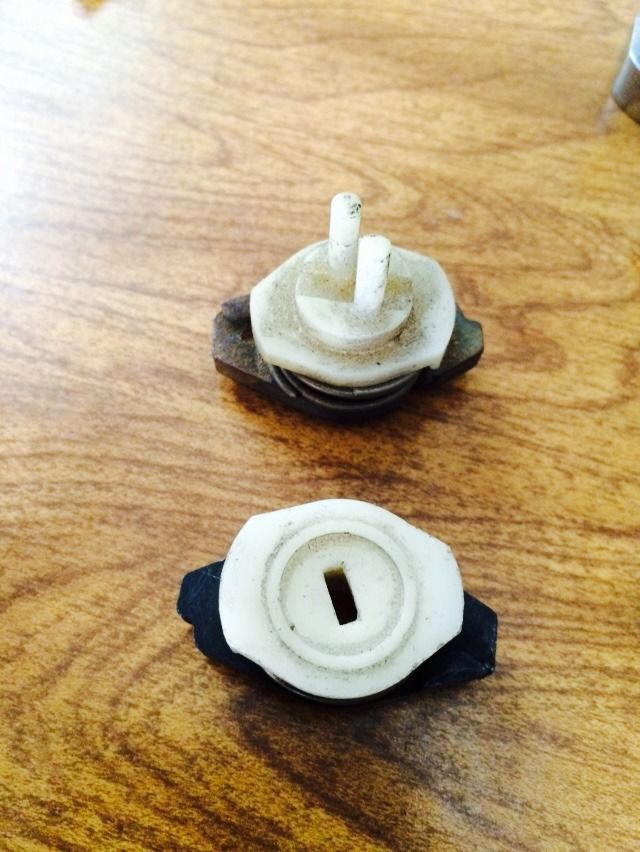
Image

Line up the tailpiece.

Image

And put it together. (It may take a little force to do so).
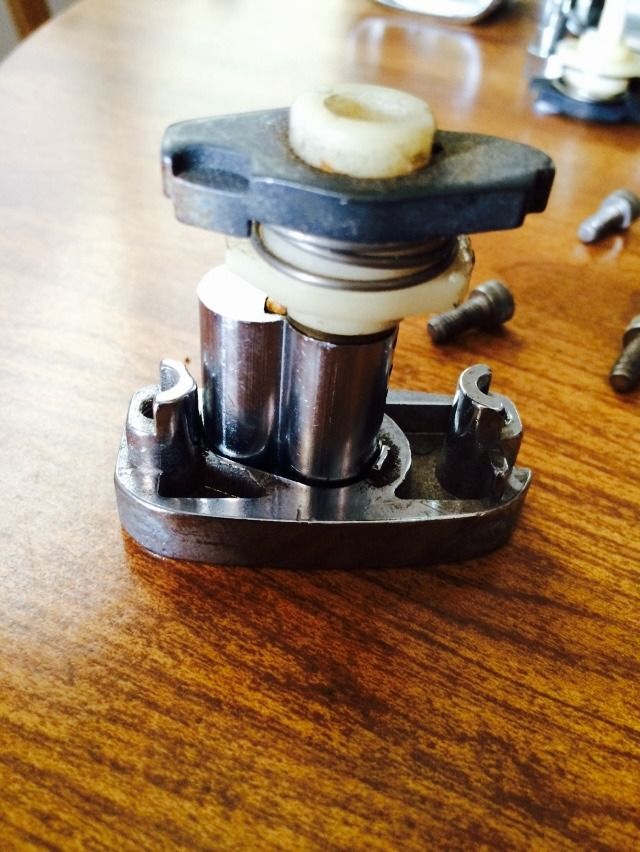
Image

OK, that covers the lock. Except for one thing... Riyame has the KIK versions for sale while they last. Send him a PM.

Hope it was fun for you!

Gordon
Just when you think you've learned it all, that is when you find you haven't learned anything yet.
<<

escher7

Active Member

Posts: 696

Joined: Thu Feb 14, 2013 12:20 am

Location: Canada

Post Sun Aug 09, 2015 12:41 pm

Re: LaGard Padlocks

Nice work Gord, but could we get a little more detail?
<<

Papa Gleb

User avatar

Contributor
Contributor

Posts: 1108

Joined: Fri Sep 05, 2014 11:10 am

Location: Brooklyn, NY

Post Sun Aug 09, 2015 2:07 pm

Re: LaGard Padlocks

Wow Gorden, superb write up as usual. Question, if I understood this is a one time assembly? meaning once the roll pin is in that is it the lock stays the way it was assembled unless you drill the roll pin out right?
<<

Riyame

Keeper of the Bests / Supreme Overlord of Small Format Interchangeable Picking Nightmares

Posts: 2164

Joined: Sun Jul 24, 2011 11:16 am

Location: Canada

Post Sun Aug 09, 2015 2:52 pm

Re: LaGard Padlocks

Papa Gleb wrote:Wow Gorden, superb write up as usual. Question, if I understood this is a one time assembly? meaning once the roll pin is in that is it the lock stays the way it was assembled unless you drill the roll pin out right?


That would be correct.
PhoneMan: I always knew I'd say something stupid and it would be someone's sig
macgng: i am an equal opportunity pervert
macgng: aww fuck thats goin in someone sig :-(

If life gives you melons, you might be dyslexic.
<<

GWiens2001

User avatar

Lock-Goblin-Gordon
Lock-Goblin-Gordon

Posts: 3795

Joined: Thu Oct 25, 2012 9:05 pm

Location: Arizona, United States

Post Sun Aug 09, 2015 3:46 pm

Re: LaGard Padlocks

Riyame would be correct in most cases. However, if you have a (very) small screw extractor, a tap, or a very small screw, you can pull out the roll pin.

At the Honda dealership where I work, the lock cylinders from the ignition switches are disassembled by pulling out the roll pins. For those, I get them out by using a sharp 1/16" drill bit at slow RPM. Slowly drill it into the roll pin. The drill bit will bite into the roll pin. When the roll pin starts to spin, then, keeping the drill at the same speed, pull the drill bit out. The roll pin will come out with it.

;)

Gordon
Just when you think you've learned it all, that is when you find you haven't learned anything yet.
<<

mastersmith

User avatar

Contributor
Contributor

Posts: 675

Joined: Wed May 25, 2011 4:16 pm

Location: Miami Township, Ohio

Post Sun Aug 09, 2015 5:03 pm

Re: LaGard Padlocks

Gordon, can you tell what the lock body is made of?
"All ye who come this art to see / to handle anything must cautious be...." Benjamin Franklin
<<

GWiens2001

User avatar

Lock-Goblin-Gordon
Lock-Goblin-Gordon

Posts: 3795

Joined: Thu Oct 25, 2012 9:05 pm

Location: Arizona, United States

Post Sun Aug 09, 2015 5:24 pm

Re: LaGard Padlocks

mastersmith wrote:Gordon, can you tell what the lock body is made of?


The lock body is steel. A magnet will stick to it.

Also, the roll pin can be driven into the lock body, allowing the padlock to be disassembled for rekeying.

Gordon
Just when you think you've learned it all, that is when you find you haven't learned anything yet.
<<

Riyame

Keeper of the Bests / Supreme Overlord of Small Format Interchangeable Picking Nightmares

Posts: 2164

Joined: Sun Jul 24, 2011 11:16 am

Location: Canada

Post Sun Aug 09, 2015 6:07 pm

Re: LaGard Padlocks

GWiens2001 wrote:Riyame would be correct in most cases. However, if you have a (very) small screw extractor, a tap, or a very small screw, you can pull out the roll pin.

At the Honda dealership where I work, the lock cylinders from the ignition switches are disassembled by pulling out the roll pins. For those, I get them out by using a sharp 1/16" drill bit at slow RPM. Slowly drill it into the roll pin. The drill bit will bite into the roll pin. When the roll pin starts to spin, then, keeping the drill at the same speed, pull the drill bit out. The roll pin will come out with it.

;)

Gordon


Well that is using a drill and a drill bit to remove the roll pin so technically it would be drilling out the roll pin :lol:
PhoneMan: I always knew I'd say something stupid and it would be someone's sig
macgng: i am an equal opportunity pervert
macgng: aww fuck thats goin in someone sig :-(

If life gives you melons, you might be dyslexic.
<<

Oldfast

User avatar

OldddffAASSTT the Spin Master Extraordinaire and American Lock Slayer

Posts: 4412

Joined: Thu Mar 31, 2011 9:16 am

Location: Michigan

Post Tue Aug 11, 2015 9:23 pm

Re: LaGard Padlocks

Haven't seen these before. Very useful info/breakdown... as always Gordon!

And the time you take for pictures always makes a world of difference for me.

Thanks!
" Enjoy the journey AS MUCH as the destination."
<<

HT4

User avatar

Active Member

Posts: 370

Joined: Mon Jun 22, 2015 8:12 pm

Location: Maryland

Post Wed Aug 12, 2015 9:00 am

Re: LaGard Padlocks

Great write up and interesting locks. Thanks for sharing.
Check out my "LockPickingLawyer" YouTube channel:
https://www.youtube.com/channel/UCm9K6rby98W8JigLoZOh6FQ/videos
<<

10ringo10

User avatar

Prolific Poster

Posts: 1357

Joined: Fri May 14, 2010 11:45 am

Location: EUROPE

Post Fri Aug 14, 2015 6:47 pm

Re: LaGard Padlocks

Nice gw - plastic and die cast zinc - melted one :mrgreen: yet
<<

GWiens2001

User avatar

Lock-Goblin-Gordon
Lock-Goblin-Gordon

Posts: 3795

Joined: Thu Oct 25, 2012 9:05 pm

Location: Arizona, United States

Post Fri Aug 14, 2015 8:51 pm

Re: LaGard Padlocks

10ringo10 wrote:Nice gw - plastic and die cast zinc - melted one :mrgreen: yet


A magnet sticks to the lock body.

Gordon
Just when you think you've learned it all, that is when you find you haven't learned anything yet.
<<

10ringo10

User avatar

Prolific Poster

Posts: 1357

Joined: Fri May 14, 2010 11:45 am

Location: EUROPE

Post Fri Aug 14, 2015 10:07 pm

Re: LaGard Padlocks

GWiens2001 wrote:
10ringo10 wrote:Nice gw - plastic and die cast zinc - melted one :mrgreen: yet


A magnet sticks to the lock body.

Gordon


That's a good way to test - very good point I need a holiday but Alaska will have to wait - good to see you posting again gw
<<

GWiens2001

User avatar

Lock-Goblin-Gordon
Lock-Goblin-Gordon

Posts: 3795

Joined: Thu Oct 25, 2012 9:05 pm

Location: Arizona, United States

Post Fri Aug 14, 2015 11:05 pm

Re: LaGard Padlocks

10ringo10 wrote:
GWiens2001 wrote:
10ringo10 wrote:Nice gw - plastic and die cast zinc - melted one :mrgreen: yet


A magnet sticks to the lock body.

Gordon


That's a good way to test - very good point I need a holiday but Alaska will have to wait - good to see you posting again gw


Thanks, Ringo. Still under the weather, but getting better.

Gordon
Just when you think you've learned it all, that is when you find you haven't learned anything yet.
<<

jeffmoss26

User avatar

Sargent Mossberg
Sargent Mossberg

Posts: 2161

Joined: Sun Apr 18, 2010 8:21 pm

Location: Cleveland, OH

Post Sat Aug 15, 2015 8:17 am

Re: LaGard Padlocks

Got mine yesterday and have been struggling to put them together - lol
femurat: They're called restricted for a reason...
Innerpicked: The more keys you carry, the more important you look
GWiens2001: Great video! Learned a lot about what fun can be had with a forklift and a chainsaw.
pmaxey83: but i first have to submit the proper forms for a new hobby to my wife

Return to This Old (or unusual) Lock

Who is online

Users browsing this forum: No registered users

cron
Don't forget to visit our sponsors for all of your lockpicking needs!
Powered by phpBB © 2000, 2002, 2005, 2007 phpBB Grop
"CA Black" theme designed by stsoftware