
![]() Wed Mar 11, 2015 4:10 pm
Wed Mar 11, 2015 4:10 pm
Papa Gleb's Pancakes & Keys + Antique Journey
Hello Dear Friends,
For the past few months, I have been learning, studying and battling antique lever padlocks specifically pancake padlocks. The mind boggles when locks designed over 100 years ago can be some of the most difficult locks to pick open which is why these locks have took a big place in my heart. During this time, I obtained 2 Yale and 1 Champion (pre 1902) pancake locks and quickly learned that although they are similar on the outside, they are very different on the in with different levels of difficulty. I finally got all 3 locks picked open, learned tons along the way, made decoding tools (inspired by The Lock Butcher and Lauren) and blanks. This amazing experience helped me to discover my passion (in this hobby) for these antique lever locks which I have started to collect. My understanding was that every single one of us is collecting, restoring and/or repairing antique padlocks but to my surprise that isn’t so true. During my battles, I have studied everything posted by Lauren and had many questions but having the above mentioned mind-set, I figured he must be bombarded with tons of messages every day so I feared he would not have time for my noob questions. This fear is probably the reason why we often have people in the shadows as it is very common to fear judgment but moving on, I finally reached out and was shocked to hear what Lauren had told me…. that I was actually the first person to contacting him with real questions related to these old locks. He opened my eyes to the reality that although many people may appreciate antique locks, there is a very small amount of us who actually have a passion for them and this is the reason I am sharing this and will continue to share my antique padlock journey. These locks have laid the foundation to our modern locks and can not be forgotten. Ultimately I would very much love to following Lauren's foot steps and make my own keys saving these old locks but living in an apartment I have no place for big tools/machines (drill press, grinder etc). I have some ideas of how to make this possible but that is another venture at a much later time.
So enough story time and lets move on to the fun stuff. If you have not seen my videos on decoding & picking pancake locks here are the links: https://youtu.be/gC-3Dhq7g2g and https://youtu.be/ahVygbf-Joo .If you have not seen Lauren’s work, the links are posted in the video description. I have also linked a few great videos done by the Lock Butcher on the same topic.
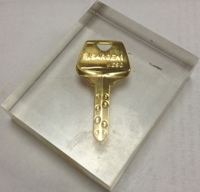
Here we have a Miller “Champion” push-key 6 lever padlock made on or before their patent date of 1902. After their 1902 patent, all of these padlocks have a pin above the letter H. My belief is that the pin was added to better hold the shackle/hasp in the lock when its open. I have not yet had a chance to play with a pancake post their 1902 patent (crazy luck shipping story will be shared shortly) but from what I have gathered, they have become slightly easier to pick. These locks do not fall to the easier methods of opening and require decoding the gates which in itself is tricky. As you can see in the pictures, I had to take measurements 3 times and even the 3rd measurements, although opened the lock, were of. As Lauren recommended and I fully agree, measurements of the gates must be taken from each side of the levers. At this point, I had the lock open and accurate measurements of the gates so next step to make keys but first need to make blanks. I had a thin piece of metal and a key sample (thanks to the Lock Butcher for providing me with a key sample), I scribed the key outline and began to work. Lucky I was able to use a bench grinder at my buddy’s shop for an hour which saved me tons and tons of hours I would have spent using my Dremel but moving on. After I had the rough outline, Dremel with all sorts of different grinding stones went to work. You can see all of the stages of the key as I am still currently working on 3 others. My mistake was not measuring the metal thickness and padlock key hole thickness. Instead I used visual comparison to the key sample I had which was much thinner and started to thin the metal using whatever I could (stones, cutting wheels etc). In reality, I only needed to remove 0.02 which some 220 grit sandpaper would have done a much nice even job. You can see below how creative my mind got to thin a flat piece of metal. Ok so maybe its not that creative but the jig works and actually lead me to a few more jig ideas but that’s nor here nor there. At this point, I was left with a good outside and the right thickness blade that easily fit into the lock so I moved onto making a key ring hole. Good think I had a step drill so I was able to make a nice round hole but not without some filing. I decided to start with a smaller twist drill bit which for some reason didn't go down the point I punched so I had to file the opposite side to make sure the step drill wouldn't go off to much. At this point the blank was done and ready for the bitting but it needed to be marked to fit all 6 levers. I measured the blank blade and divided by 6 which gave me a measurement of 0.052 which was perfect because each lever is approximately 0.050 thick. I then marked the blade with a black sharpie and marked lines where the cuts will be. You basically multiply 0.052 by the lever you want to cut. So for lever 1 you would mark a line from the base of the blade to 0.052 then for lever 2 the measurement from the base of the blade is 0.104 and so on, 3 is 0.156. With my blank all marked, I measure my file which was 0.051 (again perfect) and I slowly started to file all but the highest cut on my tool which is the same as to say the lever with the lowest gate. As the cuts started to appear, I started to compare the cuts to the tool and slowly filing off each cut as needed. At some point it got very hard to see which cuts needed more so I just put the blank and tool together against the light and it instantly became clear as the light would shine through the gaps. Continued this process until the blank and the tool met flush against each other and it was time to check the key. I inserted the key and pop, the lock opened. A bit more sandpaper on the cuts to smooth the sharp edges a bit left by the file and I was done. I now had a very nice first generation pancake padlock with a fully working key I made myself. A very amazing feeling that will never get tried… can easily be compared to the plug turns whether from picking or impressioning…. yea that feeling .
I did not mean for this to be so long but thoughts just started to came out and I went with it. I will be posting pictures of the other 2 pancake locks once I get working keys made for them, I have several other antique padlocks coming in this and next week but the star of the show is still to come…. I have a Miller double sided lever lock that arrived with all broken springs so I am making completely new springs of scratch. I have been taking pictures with every step so there will be plenty to show plus the Lock Butcher is making a barrel key for this lock also from scratch. I will post the diagrams of this key idea once its all done and ready.
For the past few months, I have been learning, studying and battling antique lever padlocks specifically pancake padlocks. The mind boggles when locks designed over 100 years ago can be some of the most difficult locks to pick open which is why these locks have took a big place in my heart. During this time, I obtained 2 Yale and 1 Champion (pre 1902) pancake locks and quickly learned that although they are similar on the outside, they are very different on the in with different levels of difficulty. I finally got all 3 locks picked open, learned tons along the way, made decoding tools (inspired by The Lock Butcher and Lauren) and blanks. This amazing experience helped me to discover my passion (in this hobby) for these antique lever locks which I have started to collect. My understanding was that every single one of us is collecting, restoring and/or repairing antique padlocks but to my surprise that isn’t so true. During my battles, I have studied everything posted by Lauren and had many questions but having the above mentioned mind-set, I figured he must be bombarded with tons of messages every day so I feared he would not have time for my noob questions. This fear is probably the reason why we often have people in the shadows as it is very common to fear judgment but moving on, I finally reached out and was shocked to hear what Lauren had told me…. that I was actually the first person to contacting him with real questions related to these old locks. He opened my eyes to the reality that although many people may appreciate antique locks, there is a very small amount of us who actually have a passion for them and this is the reason I am sharing this and will continue to share my antique padlock journey. These locks have laid the foundation to our modern locks and can not be forgotten. Ultimately I would very much love to following Lauren's foot steps and make my own keys saving these old locks but living in an apartment I have no place for big tools/machines (drill press, grinder etc). I have some ideas of how to make this possible but that is another venture at a much later time.
So enough story time and lets move on to the fun stuff. If you have not seen my videos on decoding & picking pancake locks here are the links: https://youtu.be/gC-3Dhq7g2g and https://youtu.be/ahVygbf-Joo .If you have not seen Lauren’s work, the links are posted in the video description. I have also linked a few great videos done by the Lock Butcher on the same topic.
Here we have a Miller “Champion” push-key 6 lever padlock made on or before their patent date of 1902. After their 1902 patent, all of these padlocks have a pin above the letter H. My belief is that the pin was added to better hold the shackle/hasp in the lock when its open. I have not yet had a chance to play with a pancake post their 1902 patent (crazy luck shipping story will be shared shortly) but from what I have gathered, they have become slightly easier to pick. These locks do not fall to the easier methods of opening and require decoding the gates which in itself is tricky. As you can see in the pictures, I had to take measurements 3 times and even the 3rd measurements, although opened the lock, were of. As Lauren recommended and I fully agree, measurements of the gates must be taken from each side of the levers. At this point, I had the lock open and accurate measurements of the gates so next step to make keys but first need to make blanks. I had a thin piece of metal and a key sample (thanks to the Lock Butcher for providing me with a key sample), I scribed the key outline and began to work. Lucky I was able to use a bench grinder at my buddy’s shop for an hour which saved me tons and tons of hours I would have spent using my Dremel but moving on. After I had the rough outline, Dremel with all sorts of different grinding stones went to work. You can see all of the stages of the key as I am still currently working on 3 others. My mistake was not measuring the metal thickness and padlock key hole thickness. Instead I used visual comparison to the key sample I had which was much thinner and started to thin the metal using whatever I could (stones, cutting wheels etc). In reality, I only needed to remove 0.02 which some 220 grit sandpaper would have done a much nice even job. You can see below how creative my mind got to thin a flat piece of metal. Ok so maybe its not that creative but the jig works and actually lead me to a few more jig ideas but that’s nor here nor there. At this point, I was left with a good outside and the right thickness blade that easily fit into the lock so I moved onto making a key ring hole. Good think I had a step drill so I was able to make a nice round hole but not without some filing. I decided to start with a smaller twist drill bit which for some reason didn't go down the point I punched so I had to file the opposite side to make sure the step drill wouldn't go off to much. At this point the blank was done and ready for the bitting but it needed to be marked to fit all 6 levers. I measured the blank blade and divided by 6 which gave me a measurement of 0.052 which was perfect because each lever is approximately 0.050 thick. I then marked the blade with a black sharpie and marked lines where the cuts will be. You basically multiply 0.052 by the lever you want to cut. So for lever 1 you would mark a line from the base of the blade to 0.052 then for lever 2 the measurement from the base of the blade is 0.104 and so on, 3 is 0.156. With my blank all marked, I measure my file which was 0.051 (again perfect) and I slowly started to file all but the highest cut on my tool which is the same as to say the lever with the lowest gate. As the cuts started to appear, I started to compare the cuts to the tool and slowly filing off each cut as needed. At some point it got very hard to see which cuts needed more so I just put the blank and tool together against the light and it instantly became clear as the light would shine through the gaps. Continued this process until the blank and the tool met flush against each other and it was time to check the key. I inserted the key and pop, the lock opened. A bit more sandpaper on the cuts to smooth the sharp edges a bit left by the file and I was done. I now had a very nice first generation pancake padlock with a fully working key I made myself. A very amazing feeling that will never get tried… can easily be compared to the plug turns whether from picking or impressioning…. yea that feeling .
I did not mean for this to be so long but thoughts just started to came out and I went with it. I will be posting pictures of the other 2 pancake locks once I get working keys made for them, I have several other antique padlocks coming in this and next week but the star of the show is still to come…. I have a Miller double sided lever lock that arrived with all broken springs so I am making completely new springs of scratch. I have been taking pictures with every step so there will be plenty to show plus the Lock Butcher is making a barrel key for this lock also from scratch. I will post the diagrams of this key idea once its all done and ready.
You do not have the required permissions to view the files attached to this post.